• Steel Soldiers now has a few new forums, read more about it at: New Munitions Forums!

  • Microsoft MSN, Live, Hotmail, Outlook email users may not be receiving emails. We are working to resolve this issue. Please add support@steelsoldiers.com to your trusted contacts.


Dave's Neverending M715 Build Thread

davidkroberts

Active member
1,453
22
38
Location
west tennessee
Hello all,

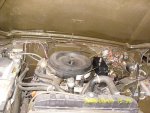
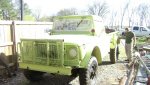
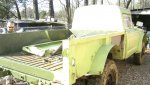
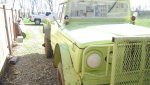
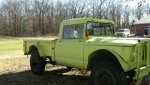
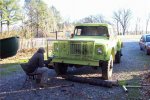
As some may remember I purchased a worn out, ugly, forest service yellow M715 with a solid body and a hard-top that looked like a five year old with damp rods welded it. Ive started the build and have decided to record it here.

The first pic is as received and will continue through cutting off the front brushguard and reinstalling the tailgate and equipment. Ive already painted a few test strips but am waiting for warmer weather and I still have to sand/grind down the bad welds on the ugly hardtop.

What I have planned at this moment is
1. New Tires/ Rims -most likely Marsh Racing Wheels with Michelin XL 16" tires
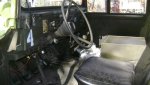
2. Semi upgraded interior- Hummer seats and Rolled-On Rubberized Bedliner on the floor. Probably going to relocate the Batteries under the Passanger seat like in a Hummer.
3. Rolled on Bedliner in the Bed
4. Upgraded Taillights

:-D

Dave in Tenn
 

Attachments

maddawg308

Well-known member
Steel Soldiers Supporter
10,852
723
113
Location
Front Royal, VA
I like the -715 series, too bad when I had one it was the somewhat less-useful M725 ambulance. Also, too bad I sold it. aua
 

Warthog

Moderator
Super Moderator
Steel Soldiers Supporter
13,775
227
63
Location
OKC, OK
Welcome to the 715 club. I too have a truck that was the lovely yellow.

It was OD green, some shade of tan, lovely greenish yellow, rolled on white and now Krylon Camo Green. One of these days I will sand blast it and start over.

Looking forward to your rebuild. I am in the process of gathering parts to put a 4bt in mine.

Warthog
 

WeBeJeepin

Member
123
3
18
Location
Jackson, MS
Since we are on the subject, just sandblasted my 715 last week. That original paint is some tough stuff! I started by blasting off the loose upper layer of paint, but after priming half of it I realized that I just needed to get it all off. Despite what my father has told me, blasting down to bare metal worked great and after 2 coats of primer and some sanding the body is smooth as a babys butt.
 

davidkroberts

Active member
1,453
22
38
Location
west tennessee
I like the idea of putting it under the hood better. Im still going to put a compartment under the passanger seat but it will be most likely just storage and tools now. Thanks allot Wolf
 

Wolf.Dose

Active member
1,062
9
38
Location
Boehl-Iggelheim, Germany
A battery compartment under the passenger seat will make the seat very hight. I had a simelar idea in 1981 during first restauration but I quit that idea after I found out that i will look through the upper windshild frame. And the storrage under the front seats were only 6 inch hight.
Wolf
 

Militoy

New member
184
2
0
Location
Mojave Desert, CA
It will be interesting to watch your progress - keep us up to date! I've always liked the style of the M715 fenders and bed, compared to the civie Gladiator. My son has had several early Cherokee and Gladiator projects - but I believe he would trade in a heartbeat for a solid M715.
 

oilcan

Member
924
3
18
Location
Ohio
If you're looking to stash batteries in a tight locaton, checkout those little dry cell racing batteries. The brand name used to be panther, but I think they changed it to odyssey.

I had one that got passed between several civie cars and trucks until it finally died about 15 years later. They're a little too pricey for me to put 'em in my trucks right now, though... :cry:
 

Barrman

Well-known member
5,149
1,544
113
Location
Giddings, Texas
There is room behind the seats for a battery on each side. I have HMMWV seats in mine and an Optima sits behind it just fine. Even room for the door glass to still fit. I haven't tried putting the top bows and racks in the official stowed postion however.
 

Attachments

davidkroberts

Active member
1,453
22
38
Location
west tennessee
Well It was finally warm enough for paint

We have finally had a day or two of above 65 degree weather so i can do some painting. Normally I wait on paint until almost the end on a project like this but that color was hurting my soul and just had to go.

I used 15 dollar a gallon hardware store duck boat paint in a 12 dollar harbor freight gravity feed paint gun. I ran the first coat with no thinner and got a good base coat. The second through fourth coat were cut almost in half to make the paint almost runny but was just dusted on to fill in all the little holes and gaps and even the paint off. Tomorrow I will go back and Go some touch-up with some rattle can OD from the hardware store same shade.

As far as prep went i didnt even wash to mud off, just brushed the thich crap off with a brush. I think its more authentic that way anyway. I did bang out some dents with a big hammer though.

Ive had better luck with cheap duck boat paint. It doesnt turn pink, cost allot, or kill you to breat some of it but i wouldnt recommend it.

first post will be the before shots second post will be the during and after.
 

Attachments

davidkroberts

Active member
1,453
22
38
Location
west tennessee
after pics

The after pics. The tailgate is off to get the weird angles. The doorjams and hood were just sprayed. The color is lighter than whats correct but not too awful bad and it does look better anyway.

Next comes tires, a roll-on bedliner inside and in the bed, and most likely a sawz-all and me getting that top off to put a soft top back on but i havent decided yet.
 

Attachments

Top
AdBlock Detected

We get it, advertisements are annoying!

Sure, ad-blocking software does a great job at blocking ads, but it also blocks useful features of our website like our supporting vendors. Their ads help keep Steel Soldiers going. Please consider disabling your ad blockers for the site. Thanks!

I've Disabled AdBlock
No Thanks