- 2,131
- 605
- 113
- Location
- Davis County, UT
Starting last month I knew I wanted to put my Deuce in the my town's Independence Day parade - I also knew that I tended to get just way too warm in my truck (engine heat and weather contributing) - especially while needing to man handle the manual steering. Tilting out the windshield would help but there'd be little to no air flow when nearly just idling down the road.
Then I cam across Andy1234's ad for 24V fans!
(not meaning to advertise for him, but hey, I think they're good quality fans at a great price from a trusted seller)
I've never done anything like this before so I sat in the truck with the fans and my VIC1 system (I'll post another thread in several weeks about the VIC1 when I get done) to try and plan where I wanted to put everything - i.e.: what was feasible, reasonable, and reachable - basically to find the the best solution while still working as I wanted. My brother counseled that I not mount the fans to the hard top because I'd still want to use them even if the hard top was removed.
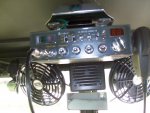
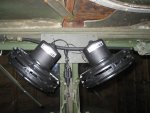
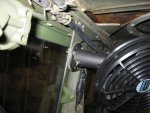
Finally, I settled on placing the fans in the top corners of the windshield, off the center post. There were already two holes in that center beam, and I decided to make use of them. Even after the installation I don't think it reduces my visibility one bit. I certainly do not find them in the way of seeing what I need to see.
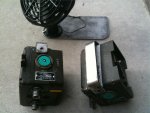
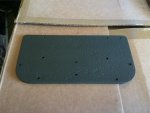
I figured I needed a metal plate to mount them to, so I had a local metal fabrication business cut me a 9"x4.5" plate that was 3/16" thick from my paper template. I didn't know what thickness I'd need, the fellow who made the plate suggested the 3/16"thickness once I explained my intentions. When I came back and paid, the plate felt way too thick, but now that I have it mounted the guy was spot on! Props to the knowledgeable and helpful folks out there!
The upper corners are rounded with about a 1/4" radius (I didn't measure, just hand sketched them), while the lower two are about 1.25" radius to match the fan base. All the edges are rounded too of course.
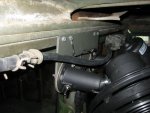
The fans are mounted to the plate at a 45 degree angle, right at the bottom left and right edges. This makes it so you can tilt the fans to blow at your face, down at your chest, or even use them as emergency defrosters - hah! I thought I might need some sort of rubber isolators or feet between the plate and the windshield frame to reduce vibrations, but I think the cork pad that comes with the fans does that admirably. Granted, I do have a hard top so that may add some stability to the window frame. There's only a very slight vibration if you run both fans on high, and I don't think I'll even worry about it.
I used self tapping screws to attach to the window frames, much like the self tapping screws in the dash that hold on the data/information plates. Except that these screws were a bit larger and had hex heads with attached washers.
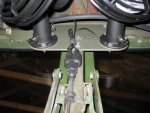
I painted the plate, wire tie downs, and all screws. simply with Kyrlon OD spray paint, two coats of olive drab after one primer coat. The paint comes off the screw heads a little bit when you run them in, so before I painted the mounting screws I ran them all into the holes I drilled to establish the threads in the metal. All screws, nuts, bolts, washers, and lock washers I purchased from the local Ace Hardware store. I used stainless steel for the bolts to hold the fans to the plate, but they did not have the self tapping screws in stainless, so zinc will have to do.
The mounting screws worked PERFECTLY as grounding points for the fans as well - I got lucky here because I hadn't planned that.") The fan wires were smaller than I expected so I stepped up one gauge to 14 and powered both fans from the single wire. This helped to clean up the exposed wire so I would basically only see one wire running down the frame into the dash. I used 3 male and one 'Y' splitter rubber shell connector and about 10 feet of Prestolite wire from Erik's Industrial and Military Surplus
The fan wires were smaller than I expected so I stepped up one gauge to 14 and powered both fans from the single wire. This helped to clean up the exposed wire so I would basically only see one wire running down the frame into the dash. I used 3 male and one 'Y' splitter rubber shell connector and about 10 feet of Prestolite wire from Erik's Industrial and Military Surplus
Prestolite Wire For Military Vehicles, 14 AWG, M13486/1-5
Rubber Shell Connectors w/ Ribbed Shell (qty 10) MS27144-3
Rubber Shell "Y" Connector MS27147-1
The rubber shell connectors added an 'authentic' military look, while also giving a versatility/ease of working on the electrical and being water proof (not that I actually plan on removing my hard top any time soon, but the truck isn't exactly water tight as is, and water could still get in from open windshields)
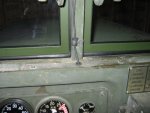
I drilled a 3/8" hole for the rubber grommet through the dash, but it didn't quite turn out as well as I had hoped. I centered it on the window frame post, but after I mounted the wire tie downs, the wire didn't run down the center of the frame... Also, at that point in the dash, two metal plates meet so it's twice as thick - which the rubber grommet has trouble sticking too. It stays in place as long as no one pulls up on the wire, because the 14 gauge Prestolite was a tight fight, but I still like it.
From the dash I piggy-backed the wire through the same hole/lip in the floor that the speedometer cable goes through, I then sat under the truck and fished the wire over the transmission (in front of the shifter) over to the battery box. I zip-tied the wire to a battery cable that was mounted to the frame (at this point I didn't feel like drilling a hole in the frame for another wire mount, and I felt the zip tie was sufficient). I wired the fans directly to the battery so they can be run while the truck is off. Obviously this can present a drain hazard to the batteries if left on. Soon though, I'll add a mastery battery disconnect switch:
Battery Master Disconnect Switch, 1331 / BA2205 / 16-03677
I also left about one foot of excess wire under the dash for any future work/modifications.
Finally, I've added a short video clip here so you can hear the fans and see how awesome they are! :-]
Then I cam across Andy1234's ad for 24V fans!
(not meaning to advertise for him, but hey, I think they're good quality fans at a great price from a trusted seller)
I've never done anything like this before so I sat in the truck with the fans and my VIC1 system (I'll post another thread in several weeks about the VIC1 when I get done) to try and plan where I wanted to put everything - i.e.: what was feasible, reasonable, and reachable - basically to find the the best solution while still working as I wanted. My brother counseled that I not mount the fans to the hard top because I'd still want to use them even if the hard top was removed.
Finally, I settled on placing the fans in the top corners of the windshield, off the center post. There were already two holes in that center beam, and I decided to make use of them. Even after the installation I don't think it reduces my visibility one bit. I certainly do not find them in the way of seeing what I need to see.
I figured I needed a metal plate to mount them to, so I had a local metal fabrication business cut me a 9"x4.5" plate that was 3/16" thick from my paper template. I didn't know what thickness I'd need, the fellow who made the plate suggested the 3/16"thickness once I explained my intentions. When I came back and paid, the plate felt way too thick, but now that I have it mounted the guy was spot on! Props to the knowledgeable and helpful folks out there!
The upper corners are rounded with about a 1/4" radius (I didn't measure, just hand sketched them), while the lower two are about 1.25" radius to match the fan base. All the edges are rounded too of course.
The fans are mounted to the plate at a 45 degree angle, right at the bottom left and right edges. This makes it so you can tilt the fans to blow at your face, down at your chest, or even use them as emergency defrosters - hah! I thought I might need some sort of rubber isolators or feet between the plate and the windshield frame to reduce vibrations, but I think the cork pad that comes with the fans does that admirably. Granted, I do have a hard top so that may add some stability to the window frame. There's only a very slight vibration if you run both fans on high, and I don't think I'll even worry about it.
I used self tapping screws to attach to the window frames, much like the self tapping screws in the dash that hold on the data/information plates. Except that these screws were a bit larger and had hex heads with attached washers.
I painted the plate, wire tie downs, and all screws. simply with Kyrlon OD spray paint, two coats of olive drab after one primer coat. The paint comes off the screw heads a little bit when you run them in, so before I painted the mounting screws I ran them all into the holes I drilled to establish the threads in the metal. All screws, nuts, bolts, washers, and lock washers I purchased from the local Ace Hardware store. I used stainless steel for the bolts to hold the fans to the plate, but they did not have the self tapping screws in stainless, so zinc will have to do.
The mounting screws worked PERFECTLY as grounding points for the fans as well - I got lucky here because I hadn't planned that.
Prestolite Wire For Military Vehicles, 14 AWG, M13486/1-5
Rubber Shell Connectors w/ Ribbed Shell (qty 10) MS27144-3
Rubber Shell "Y" Connector MS27147-1
The rubber shell connectors added an 'authentic' military look, while also giving a versatility/ease of working on the electrical and being water proof (not that I actually plan on removing my hard top any time soon, but the truck isn't exactly water tight as is, and water could still get in from open windshields)
I drilled a 3/8" hole for the rubber grommet through the dash, but it didn't quite turn out as well as I had hoped. I centered it on the window frame post, but after I mounted the wire tie downs, the wire didn't run down the center of the frame... Also, at that point in the dash, two metal plates meet so it's twice as thick - which the rubber grommet has trouble sticking too. It stays in place as long as no one pulls up on the wire, because the 14 gauge Prestolite was a tight fight, but I still like it.
From the dash I piggy-backed the wire through the same hole/lip in the floor that the speedometer cable goes through, I then sat under the truck and fished the wire over the transmission (in front of the shifter) over to the battery box. I zip-tied the wire to a battery cable that was mounted to the frame (at this point I didn't feel like drilling a hole in the frame for another wire mount, and I felt the zip tie was sufficient). I wired the fans directly to the battery so they can be run while the truck is off. Obviously this can present a drain hazard to the batteries if left on. Soon though, I'll add a mastery battery disconnect switch:
Battery Master Disconnect Switch, 1331 / BA2205 / 16-03677
I also left about one foot of excess wire under the dash for any future work/modifications.
Finally, I've added a short video clip here so you can hear the fans and see how awesome they are! :-]
Attachments
-
 57.9 KB Views: 232
 -
 54 KB Views: 207
 -
 72.2 KB Views: 272
 -
 64.1 KB Views: 246
 -
 64.9 KB Views: 226
 -
 57.8 KB Views: 252
 -
 63.9 KB Views: 233
 -
67 MB Views: 94
Last edited by a moderator: