- 2,131
- 605
- 113
- Location
- Davis County, UT
I do not consider myself a very "handy" person, but I really, really enjoy doing these little modifications on my M35A2. The truck doesn't require spit and shine as similar work would on new(er) vehicles, but I do try hard to think the project though and what will work best for *me*, and for my other future plans/uses of the truck.
So, after a long wait, I've finally installed my my battery disconnect in my Deuce!
For those interested, here's most of the parts and/or tools (and their approximate cost, not including tax or shipping) that I bought and/or used for this project.
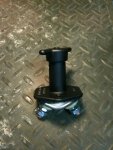
Battery Master Disonnect Switch, $54.00
2.5 feet of Presotlite 0 gauge battery cable, $12.00
(just 2 feet would probably be fine too)
0 gauge Ring Terminal x2, $7.50
1" Heat Shrink, 3" length x2, price: varies (see example link)
Heat gun, ~$20.00 (see example link)
Dremel 3000, $65.00
EZ Lock Mandrel Starter Kit (includes 5 metal cutting wheels), $16.50
(This required a trip BACK to Home Depot because I bought just 5 of the wheels before but nooo the Dremel didn't come with the "EZ Lock Mandrel", so I got this starter pack instead. It was a better price for the parts. The individual mandrel was $10.00 and $12.00 for the 5 wheels, vs $16.50 for both in the same package.)
1/4" x 3/4" Stainless steel bolts x2, washers x2, nylon lock nuts x2, ~$2-3.00
I also used a (I think) 1-1/8" Ridgid hole saw, part of this kit I bought years ago, $70.00
This also assumes you have some sort of corded or cordless drill. The batteries in my cordless drill need to be replaced and can't handle much more than a simple small hole. So I took this excuse to build up my tools and bought a 3/8" Dewalt corded drill, $65.00
Krylon Flat black spray paint, ~$6.00
Krylon Primer spray paint (optional?), ~$5.00
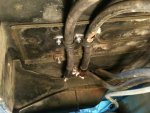
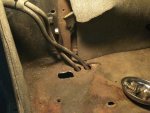
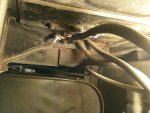
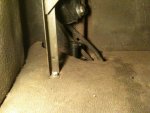
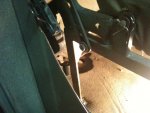
As you can see from my pictures, I decided to place my battery disconnect behind the passenger seat, as close to the back and side wall as possible. This disconnect isn't keyed or anything so I wanted to hide it as much as I could, but still be accessible for me to use. I know myself, if it were in a hard spot to reach, such as needing to crawl under the truck, I wouldn't use it - which would defeat my purpose.
First, I removed the 4 bolts holding in the passenger seat and then the seat itself. This was very awkward for me. The stock folding seat is not heavy at all, but you can easily bend on of the legs once it's no longer bolted down - so I suggest getting a hand. I also removed the whole battery tray. Note: I do NOT recommend even trying to remove or put in the battery tray by yourself (if you still have the stock, large heavy batteries). I did, and I won't do it again. With the size and weight of the original batteries, it's just trouble waiting to happen - either in a dropped and bent battery box, damaged batteries, or your own back/shins/feet.
I then highly recommend removing the passenger seat belt and the bracket that it's attached to - or at least loosening the bracket so you can move it out of your way. I didn't move the bracket at first and tried to cut with the hole saws at a slight angle, and ended up bending one of my pilot drill bits.
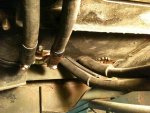
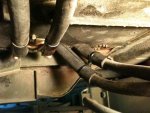
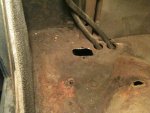
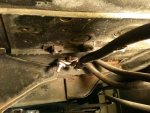
After that I did a bunch of measuring and deciding exactly where to mount the disconnect. I could have mounted it farther into the corner where it would be completely out of sight, but there are support members under the cab getting in your way. I didn't want to cut one of those support members or even attempt to go *all* the way into the back. Doing so would have been impossible to reach and I'd probably need to drop the fuel tank... which would have been way out of scope for the time and effort I wanted this project to take. What's nice about the spot where the disconnect is placed, is that on the underside it's a clean, straight shot to the batteries, with no support or cross members in the way or to possibly create an electrical short with.
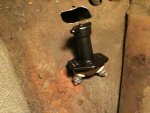
During breaks while I was cutting the hole or making trips to Home Depot / Ace Hardware to buy tools, I decided to paint the shiny silver battery disconnect flat black. My intent was to help reduce it's visibility behind the seat.
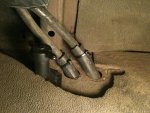
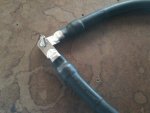
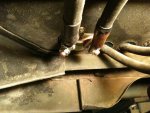
Once the hole was drilled and cleaned up, it was just easy work left! After stripping about 1" off either end of the 0 gauge battery cable, I used a 2lb sledge and one hex end of a metal chisel to crimp the ring terminal. To help reduce the chances of shorting to the truck body (and thus defeating the purpose of the battery disconnect) I covered most of either end with 1" heat shrink tubing. I used the kind that shrinks to at least 50% of the original size to get a snug fit. I also checked the cable for continuity before installing, as I had zero desire to have to pull out the battery box again to fix a bad crimp (or waste my heat shrink).
I took the over-all negative battery cable, attached it to one side of the disconnect, and put my new cable on the other side. I took this chance to clean the battery terminals, but they were already in good shape, but it didn't hurt. I reinstalled the battery box and then ran the new cable the negative battery terminal, reattached the terminals and "dog bone", and then I was basically done!
Oh, and before I reinstalled the battery box, I installed my a 24v Battery Tender, please see this thread for pics and description:
http://www.steelsoldiers.com/deuce-...-maintainer-installed-w-pics.html#post1072636
So, after a long wait, I've finally installed my my battery disconnect in my Deuce!
For those interested, here's most of the parts and/or tools (and their approximate cost, not including tax or shipping) that I bought and/or used for this project.
Battery Master Disonnect Switch, $54.00
2.5 feet of Presotlite 0 gauge battery cable, $12.00
(just 2 feet would probably be fine too)
0 gauge Ring Terminal x2, $7.50
1" Heat Shrink, 3" length x2, price: varies (see example link)
Heat gun, ~$20.00 (see example link)
Dremel 3000, $65.00
EZ Lock Mandrel Starter Kit (includes 5 metal cutting wheels), $16.50
(This required a trip BACK to Home Depot because I bought just 5 of the wheels before but nooo the Dremel didn't come with the "EZ Lock Mandrel", so I got this starter pack instead. It was a better price for the parts. The individual mandrel was $10.00 and $12.00 for the 5 wheels, vs $16.50 for both in the same package.)
1/4" x 3/4" Stainless steel bolts x2, washers x2, nylon lock nuts x2, ~$2-3.00
I also used a (I think) 1-1/8" Ridgid hole saw, part of this kit I bought years ago, $70.00
This also assumes you have some sort of corded or cordless drill. The batteries in my cordless drill need to be replaced and can't handle much more than a simple small hole. So I took this excuse to build up my tools and bought a 3/8" Dewalt corded drill, $65.00
Krylon Flat black spray paint, ~$6.00
Krylon Primer spray paint (optional?), ~$5.00
As you can see from my pictures, I decided to place my battery disconnect behind the passenger seat, as close to the back and side wall as possible. This disconnect isn't keyed or anything so I wanted to hide it as much as I could, but still be accessible for me to use. I know myself, if it were in a hard spot to reach, such as needing to crawl under the truck, I wouldn't use it - which would defeat my purpose.
First, I removed the 4 bolts holding in the passenger seat and then the seat itself. This was very awkward for me. The stock folding seat is not heavy at all, but you can easily bend on of the legs once it's no longer bolted down - so I suggest getting a hand. I also removed the whole battery tray. Note: I do NOT recommend even trying to remove or put in the battery tray by yourself (if you still have the stock, large heavy batteries). I did, and I won't do it again. With the size and weight of the original batteries, it's just trouble waiting to happen - either in a dropped and bent battery box, damaged batteries, or your own back/shins/feet.
I then highly recommend removing the passenger seat belt and the bracket that it's attached to - or at least loosening the bracket so you can move it out of your way. I didn't move the bracket at first and tried to cut with the hole saws at a slight angle, and ended up bending one of my pilot drill bits.
After that I did a bunch of measuring and deciding exactly where to mount the disconnect. I could have mounted it farther into the corner where it would be completely out of sight, but there are support members under the cab getting in your way. I didn't want to cut one of those support members or even attempt to go *all* the way into the back. Doing so would have been impossible to reach and I'd probably need to drop the fuel tank... which would have been way out of scope for the time and effort I wanted this project to take. What's nice about the spot where the disconnect is placed, is that on the underside it's a clean, straight shot to the batteries, with no support or cross members in the way or to possibly create an electrical short with.
During breaks while I was cutting the hole or making trips to Home Depot / Ace Hardware to buy tools, I decided to paint the shiny silver battery disconnect flat black. My intent was to help reduce it's visibility behind the seat.
Once the hole was drilled and cleaned up, it was just easy work left! After stripping about 1" off either end of the 0 gauge battery cable, I used a 2lb sledge and one hex end of a metal chisel to crimp the ring terminal. To help reduce the chances of shorting to the truck body (and thus defeating the purpose of the battery disconnect) I covered most of either end with 1" heat shrink tubing. I used the kind that shrinks to at least 50% of the original size to get a snug fit. I also checked the cable for continuity before installing, as I had zero desire to have to pull out the battery box again to fix a bad crimp (or waste my heat shrink).
I took the over-all negative battery cable, attached it to one side of the disconnect, and put my new cable on the other side. I took this chance to clean the battery terminals, but they were already in good shape, but it didn't hurt. I reinstalled the battery box and then ran the new cable the negative battery terminal, reattached the terminals and "dog bone", and then I was basically done!
Oh, and before I reinstalled the battery box, I installed my a 24v Battery Tender, please see this thread for pics and description:
http://www.steelsoldiers.com/deuce-...-maintainer-installed-w-pics.html#post1072636
Attachments
-
 76.4 KB Views: 209
 -
 73.8 KB Views: 200
 -
 50.8 KB Views: 204
 -
 74.8 KB Views: 219
 -
 62.5 KB Views: 222
 -
 82.3 KB Views: 226
 -
 69.8 KB Views: 222
 -
 77.9 KB Views: 225
 -
 77.8 KB Views: 254
 -
 68.1 KB Views: 250
Last edited: