• Steel Soldiers now has a few new forums, read more about it at: New Munitions Forums!

  • Microsoft MSN, Live, Hotmail, Outlook email users may not be receiving emails. We are working to resolve this issue. Please add support@steelsoldiers.com to your trusted contacts.


gauge cluster conversion question

Nate475

New member
39
0
0
Location
Glen Burnie Maryland
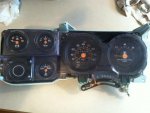
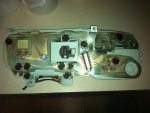
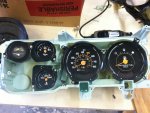
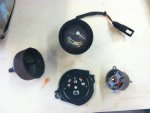
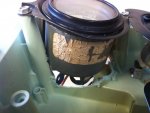
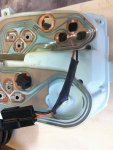
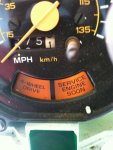
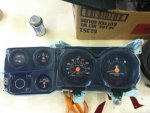
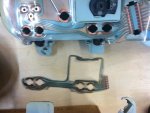
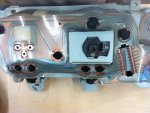
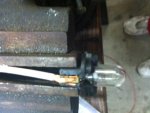
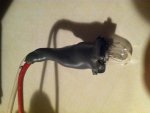
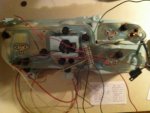
I took my dash apart today to replace several burned out bulbs behind the gauge cluster and that's when the problems started. After a little tinkering I realized that it wasn't the bulbs at all. It turned out to be a damaged printed circuit board. Who ever the military mechanic was who worked on this truck while it was on base had left screws out, broke off tabs to save work, and had damaged the circuit board because I could feel actual tears in it from behind the cluster. The only lights that work are the gen 1, gen 2, and my left turn signal, and my heater control panel light, everything else isn't getting power. LMC truck doesn't have anything but the civy stuff and I can't wait for something to show up for sale in the distant future.

So my question is, how do I convert this over to a civilian gauge cluster? I can get all the parts that I need, the problem is the gen 1 and gen 2 lights. How do I bypass these? I found an archived post about installing resisters from Radio Shack but that left a lot of unanswered questions.

Also, if I were to do a 12 volt conversion what happens with those generator lights? Do they still function the same, or does the 12V conversion eliminate them from the system without the need to modify or remove them? I want to do a 12V conversion so the question really is, if I do one, do I have to bother worrying about generator lights at that point?
 

cpf240

Active member
1,479
5
38
Location
Free in Northern Idaho
Why not try posting a Wanted ad in the classifieds? There are several members who have parts trucks from which to get such things. One is hillbillywizard. I think it would be much easier to get the correct part rather then figure out what needs to be rewired to make civy parts work.
 

Warthog

Moderator
Super Moderator
Steel Soldiers Supporter
13,775
227
63
Location
OKC, OK
Moved to the modified forum.

If you do the Rosscommon 12v conversion, the GEN1 light is no longer used but the GEN2 light is still used.

Do you understand the function of the GEN lights in a stock vehicle? They complete the exciter circuit to energize the alternators. Without the completed circuit the alternators would not "excite" and start producing electricity.

There have been a few people that have converted thier clusters but they have not offered up how they did it.

You will need to printout the wiring diagrams from both the CUCV and the civvy unit and then decide how to make it work. Alot of the civvy units don't use the idiot lights so you must change the sending units also.

What you want to do is not a plug-and-play change.
 
Last edited:

MarcusOReallyus

Well-known member
4,524
810
113
Location
Virginia
I haven't seen the board yet, so I don't know how complicated it is, but I do know that such boards can often be repaired. Basically, you trace the circuits and restore continuity. A little work with a meter and some special conductive paint is what's required, and sometimes, replacing or repairing connections.


I just did a quick search and found this:

http://www.circuitmedic.com/

You might find the info and materials you need there.
 

dyocis

New member
85
0
0
Location
Paso Robles, CA
As part of the resurrection of my '09 I am installing a civy dash cluster with guages. I've gone over the wiring diagram and traced all the leads. I think I have a good diagram of what wires need to be switched, but I won't know if its going to work until my engine gets back from the machinest. I'll post what I've got when I get home today, I can't guarantee it until I actually get it in the truck though.
 

Nate475

New member
39
0
0
Location
Glen Burnie Maryland
I haven't seen the board yet, so I don't know how complicated it is, but I do know that such boards can often be repaired. Basically, you trace the circuits and restore continuity. A little work with a meter and some special conductive paint is what's required, and sometimes, replacing or repairing connections.


I just did a quick search and found this:

http://www.circuitmedic.com/

You might find the info and materials you need there.
Thanks a bunch for that website.
 

Nate475

New member
39
0
0
Location
Glen Burnie Maryland
From what I can figure out so far the civy gauge cluster has one indicator light where the gen 1 is supposed to be. It might be possible to switch a wire or two in the harness so that you can use the indicator light circuit in the civy version as the gen 2 light, provided that you have already converted it to a 12 volt system and eliminated the gen 1 light all together.

I'm current rehabbing my stock gauge cluster. I got luck and the damage wasn't as bad as I thought.

Some other members were talking about replacing the gen bulbs with resisters from radio shack to bypass the indicator light bulbs. I'll look forward to reading your posts on the conversion.
 

Nate475

New member
39
0
0
Location
Glen Burnie Maryland
Moved to the modified forum.

If you do the Rosscommon 12v conversion, the GEN1 light is no longer used but the GEN2 light is still used.

Do you understand the function of the GEN lights in a stock vehicle? They complete the exciter circuit to energize the alternators. Without the completed circuit the alternators would not "excite" and start producing electricity.

There have been a few people that have converted thier clusters but they have not offered up how they did it.

You will need to printout the wiring diagrams from both the CUCV and the civvy unit and then decide how to make it work. Alot of the civvy units don't use the idiot lights so you must change the sending units also.

What you want to do is not a plug-and-play change.
Thank you for your help. Things weren't as bad as I had initially assumed. When I took the gauge cluster out I found that it didn't have any broken circuits. The problem was corrosion on the bulb socket contact points. I used a tiny piece of a Scotch Brite pad to clean off the copper contact points. I replaced the bulbs, cleaned everything, buffed out the lens, and now I'm repairing the mounting tabs the best that I can with JB Weld. I noticed that the cable guide tab for the shift indicator was broken off. So I'm working on a metal post with a nylon bushing, or sometime similar to replace that little guide post with. It should mount right into the metal dash after I drill a small hole for it.

This gets me back on the road again with a working gauge cluster but I plan on keeping this truck for many years to come and this clearly isn't a permanent fix. I've been comparing pictures of the Civy indicator light circuit board from LMC truck and the stock m1009 version and both seems to be identical. The problem is that I"m basing this on a catalog picture of the Civy circuit board so I can't be 100% sure. If it is the same that's great, but they still don't stock the gauge cluster backing plate. For that reason and the comfort of having gauges I'm going to work on figuring out the conversion.

I found a thread that talked about replacing the gen light bulbs with resistors from Radio Shack. I'm assuming that resistors come in surface mount for that attach directly to the circuit board and that they have inline resistors that can be tied into the dash wiring?

The solution appears to be an inline resister spliced between the two wires that feed into the gen 2 circuit to replace the gen 2 light bulb. After that it would be just a matter of adding the sending units and the wiring to the new gauges. The problem is figuring out what resister to use that would match the resistance of a #194 bulb? And I have to figure out how to test such a thing. So many more hours of study is needed for this one.

If anyone else here has done this conversion please speak up! Thank you.
 

Nate475

New member
39
0
0
Location
Glen Burnie Maryland
I think I have a simple solution figured out. The civy gauge cluster has an empty spot in the bottom left area where the gen 1 light is on the M1009 gauge cluster. There's nothing in it and there's a blank spot on the backing plate to create a hole for a bulb socket which won't interfere with the printed circuit board. If I take a marker light socket and cut a spot out for it in the civy backing plate with a dremel tool I can mount the gen 2 light right in that empty spot. then all I have to do is build a red lens for it and the problem is solved. It requires a 12 volt conversion first to eliminate the gen 1 light but that was already in my plans anyway.

This way I get to have my new gauges and my gen 2 light all in the same cluster without attempting to replace the gen 2 light with a homemade wiring experiment that I'm not qualified for. The plan is to remove the two wires in the gauge cluster wire harness that make up the Gen 2 circuit and splice them into the marker light socket which mounts into the blank spot on the civy gauge cluster.

Ok Brother Warthog, you seem to be better at wiring than I am, do you think this will work?

Nate
 

richingalveston

Well-known member
1,715
120
63
Location
galveston/Texas
I have a civy dash from an 87 burb, I have been working on the conversion also. What I am considering since I want to keep it 24 volt is to actually remove both gen 1 and 2 lights from the cluster and make new ones in the space next to the 24V gauge. Thus I can use all 4 spots for gauges. I am waiting to see if I can get the propper tach, to fit the big hole if not, I am going to retro a tach in the empty hole on the civy gauges. I have traced the ciruits, and you have to move around alot of the wires in the plug that goes into the back of the cluster. The civy gauge I have has a battery voltage gauge (I dont need) an oil pressure gauge a water temp guage and a blank hole. I want to put a trans temp gauge where the 12v battery gauge and a tach in the empty spot if I cannot move the fuel gauge there and make the tach the large gauge.

I am fairly certain, I can get the wiring changed on the clusters. I have a spare cucv cluster so I have been able to set them side by side and trace the circuits and document the difference. (i am putting it into a spreadsheet and will post to site) however, I am not sure about all of the sending units. In order to work the guages, the sending units have to change. Currently there is a low coolant light and a coolant temp light in the speedometer and I am not sure if these lights can work from the same sending unit or if I have to have two different sending units (one for light and one for gauge). If I have to have a second sending unit, then I am not sure where to put it. As far as the Tach, I have a dakota digital interface from the alternator that will drive any tach so I am now just trying to find the right tach. I woul prefer the one with the fuel gauge in it but it is apparently very hard to find and it is late 70's style so the numbers wont match the style of the spedo and other gauges. The lights in the cucv fuel gauge I do not care about, It is the seat belt and park brake. I have already disconnected the seat belt light.

I will post what I have traced with regards to the cluster plug, If anyone has any input on the sending units that would be appreciated.
I have installed a 4l80e and I beleive I can get the trans temp from the new trans without any problems. I just have not found a stock gauge that goes in the cluster for the trans. I am not sure if I can use a water temp gauge and make it a trans temp, it goes to 260 degrees and all I would have to do is change the label on the guage.

I will post the plug diagrams as soon as I can get the spreadsheet done.
 

Nate475

New member
39
0
0
Location
Glen Burnie Maryland
Thanks for posting that file, it's going to help. We need to share notes on this project. Regarding the sending units I suspect that the sending units might be the same for both the gauges and the indicator lights. This isn't confirmed but I can't seem to find any sending unit that was made just for the indicator lights when I've searched for them online. Before I do my gauge swap I'm going to install some detachable wire plug connectors on the wire harness which will make the wiring process much easier. I've got a Haynes manual somewhere around here, if I find it and there's anything worth posting, I'll post it.

I have a question for you. I don't have my 86 civy suburban gauge cluster yet, I'm still waiting for it to be shipped. In the pictures there where two wires coming out of the back of the speedometer. I don't remember any wires coming out of the military version when I had it out, do you know what those two wires are for and where they plug in?
 

richingalveston

Well-known member
1,715
120
63
Location
galveston/Texas
My cluster came from an 87 burb that I parted out. There are no wires that come from the back of the speedo in my cluster. I beleive the 87 was the first year of the throtle body injection on the 350 gas motor, however this should not have any effect on the speedometer, my unit had cruise control and was a fully loaded 2 wheel drive burb. The lights that show up in the speedo, highbeam and coolant lights are actually in the cluster and not on the speedo so I am stumped with regards of wires in the back of the speedo.
attached are some pics of my burb unit, it had the overdrive gear indicator but that was swapped with the cluster that is currently in my 1009. I will be switching it back because I have installed a 4l80e and it will be needed.
I was under the impression that the idiot light sending units only closed contacts in the sending unit when a certain temp was reached where the one from the gauges actaully provides changes in the resistance with changes in temp, thus the gauge has something to read. I am making assumptions at this time because I have not had the chance to investigate the sending unit options and requirements.
On the burb cluster I have, I plan to put my cucv speedo in this cluster because the trip odometer in this unit does not work. If it worked I would keep it but apparently this speedo replacement is no longer available so I was just going to use one of the ones from my CUCV clusters.

Yes, I will be glad to share notes, a group effort is always best so if any others want to chime in with helpfull info then please do.
 

Attachments

richingalveston

Well-known member
1,715
120
63
Location
galveston/Texas
after a lot of internet searching, I have not been able to find an 80's style tach to go in the large hole. I have found some 70's styles but they are gasser tachs and the numbers are not the same style. These tachs are also in the $400 price range wich is outrageous. I did find an entire cluster in good condition from a 70s unit with the tach on fleebay for $250. this is probably a good deal but the tach is still a gasser. a gasser tach will work but is shows a 5k redline. And $250 is still more than I will spend just to keep an oem look.
As far as the speedo wires, I could not find any that had wires from the speedo. The tach wires are seperate from the harness so this may be the wires you were talking about with regards to your cluster.
I can get the small fuel gauge from LMC for one of the small holes but have not found any small tachs that fit the cluster. I am now looking to find an aftermarket tach that I can put in either the large hole or one of the small holes. I can get just about any current tach for less than $60. So I cannot stomach buying a $400 one that still does not match the rest of the dash gauges.
If anyone has a source for an oem 80's style diesel tach that fits the large hole in the cluster, let me know.
 

richingalveston

Well-known member
1,715
120
63
Location
galveston/Texas
salt6, looks like the gages are already gone and by the looks of it, it was a gas gauge in the big hole and not a tach. It looks like the factory air is still in place, that is a pretty big score if you can get all of the parts cheap. I have the entire ac system from the burb I parted but at this time I only plan to use the rear air in my 1009.

I did find out that the water temp sending unit is still a one wire unit with the gauge so I am guesing that you put 12V into it and depending on the temp, something between 0 and 12 volts is what it outputs. not sure how resistance can be read with only one wire unless it is reading resistance to ground and to my knowledge that is not possible. the water temp sending unit was $20 at oriely's.

The sending unit for the oil presure does have to change and additional wiring will be needed since it is a 3 wire unit reading resistance. The sending unit is $64 at oriely's.

I did get a chance to take my civy cluster apart and the lights in the speedo are not the same as the standard cucv, the civy has check engine and 4x4. I did not have a bulb in the 4x4 socket, my unit was a 2 wheel drive unit so I guess to fix it they just left the bulb out.
I found a really good small tach option in the catalogs at the parts store, it is a low rev diesel tach max 5000 rpm that is 2 1/8 diameter and has white numbers with red needle, almost an exact match to the civi gauge cluster. It is $175. there is a second option that is 2 3/4 however has some yellow dashes along with the white numbers and red needle. it was only $74 but did not specify low rev, its max was 7000 rpm.
All of the 5 inch tachs were $400 plus and most had memory functions and shift lights so no basic 5 inch gauges were available.
Have not been able to determine the trans temp sending unit options yet, I can get this info from the shift computer so I may just stick with that.

I will probably do the Autometer #2697 for the tach, It is the $175 Oriely tach. I am going to see if I can get it elsewhere for less.
Oil presure switch for guage is BWD#wt359
Water temp for gauge is BWD#s4145

still working on it, looks like I may only use the water temp guage, the oil presure gauge, and the tach, still have one hole so I may purchase the clock just to fill it up.
 

richingalveston

Well-known member
1,715
120
63
Location
galveston/Texas
Had to update my last post, I have been looking at LMC catalog not online, the online LMC catalog has new tachometers to fit the big hole that are max 5000 rpm range. they are $124. and have a wireing harness availble for $24 (not sure i cant make my one wires.) I did find the small tach posted in previous post on ebay for $124 which is $50 less than Oriely's. I think I am going to get the LMC large tach now and the small fuel gauge. Thats what I was looking for from the start.
 

richingalveston

Well-known member
1,715
120
63
Location
galveston/Texas
I ordered the tach and small fuel gauge from LMC today, going to be a while before it gets here due to holidays. I went ahead and finalized my layout though and got some work done on the cluster. I moved the CUCV 24 volt gauge to the top left hole of the cluster. I had to cut out the back but the gauge actually fits almost perfectly. I used the old suburban volt gauge and with a hole saw cut the center out and mounted the 24 volt gauge in the hole then mounted it back into the cluster after trimming the back out. I will have the fuel gauge in the lower left corner when it gets here. I am moving the gen1 and gen 2 lights into the bottom of the tach, the bottom of the speedometer will be the 4x4 light and the check engine. If I can keep the water temp idiot light and use the gauge also then I am going to use the idiot light in the check engine location.
I had to cut up an old printed circuit board that I had (the blinker light tabs were already broken). I am going to laminate this section of circuit board over the new cluster circuit board. This is required in order to have dedicated wires to the gen1 and gen2 lights that will now be in the bottom of the tach when it gets here (picture currently shows the fuel gauge). I am now working on the wiring diagrams. The tach, new volt gauge and new fuel gauge will all have their own harness and not use the printed circuit board. This leaves the lights, oil presure and water temp to be wired to the plug in the back of the cluster.
 

Attachments

richingalveston

Well-known member
1,715
120
63
Location
galveston/Texas
Still waiting on the tach and fuel gauge. I did get a gen 2 light built. laminating the old board to the new one was not going to work as planned and was really not needed. I decided it was easier to modify the light bulb socket to have its own wires and not use the circuit board for gen 2. I removed the metal prongs from inside the socket, drilled the edges of the socket so that the pongs that make contact to the circuit board are now bent down the sides of the socket where they cannot make contact with the circuit board and I have enough room to soilder new wires to the prongs. once the new wires were in place, I mixed JB weld (two part epoxy) and coated the wires where they were soildered and down the wires to make a good solid socket that wont allow the wires to break when installing and removing.

Any light in the circuit board could be repaired in this manner if needed. You would just need a jumper with an in-line disconnect from the back of the plug to the new wires on the socket.

I cut off the circuit board plug from the old suburban wiring harness. I am going to purchase a new 18 prong connector (male and female side) so that all of the cluster plug wires and the new fuel gauge tachometer and 24volt gauge wires will go to one plug. I will then cut the current cluster plug off of my CUCV harness and install them into the new plug allowing for one disconnect for the entire cluster.
 

Attachments

Top
AdBlock Detected

We get it, advertisements are annoying!

Sure, ad-blocking software does a great job at blocking ads, but it also blocks useful features of our website like our supporting vendors. Their ads help keep Steel Soldiers going. Please consider disabling your ad blockers for the site. Thanks!

I've Disabled AdBlock
No Thanks