combat jump
Member
- 143
- 4
- 18
- Location
- Raleigh, NC
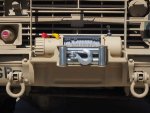
I wanted a winch that would look like it was original equipment; not a hitch attachment. I also wanted to remote the control box to an under-hood spot, rather than attached to the winch itself. Here is what I did:
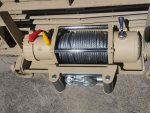
- Got a Harbor Freight “Chicago Electric” 12,000 pound winch for just 300 bucks with a coopin. I’m not going to debate the quality of HF verses (insert brand name here), it’s what I could afford, and there are quite a few favorable reviews online.
- While the installation is a permanent one, I wanted to be able to disassemble and remove the brush guard and bumper if I ever had to (for collision repair or whatever). For that reason there is nothing welded to the bumper itself.
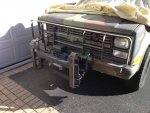
- I wanted to keep the brush guard intact. I wasn’t able to do this, and had to cut out a horizontal bar to allow the winch to drop into the mounting channel.
- The winch mounting channel is welded to the brush guard vertical supports. I used an HF universal fit winch mount channel and cut it to fit between the supports. Keep in mind that the point where the cable comes out is not centered on the winch. I took this into consideration, and cut the channel slightly offset. I also added extra steel pieces to “cap” the ends of the channel for a more finished look, and extra bracing.
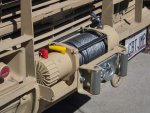
- I sawed a chunk out of the bumper to allow the winch to sit lower and set deeper into the truck. There is less of a “hanging out in the wind” appearance this way.
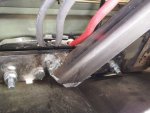
- So, while the winch plate is welded to the brush guard, what it’s bolted to (though the winch mount channel) is welded to the frame – this is the second structural attachment point. I ran a ½”x2” wide bar the length of the winch mount plate, and drilled it to match the bolt holes that come with the mounting channel. I bought extra (longer) grade 8.8 metric bolts that go through the ½” bar, winch channel, and winch.
- To tie this ½” bar to the frame, I welded ¼” wall 2” square tubing from it to a new frame cross member of the same steel.
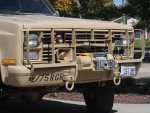
- I had to relocate the license plate.
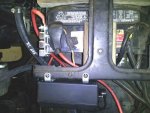
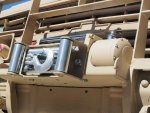
- The control box is attached to the front battery hold down. I may come up with something better soon.
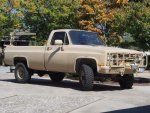
- I painted the winch desert tan to match the truck.
Attachments
-
 99.3 KB Views: 319
 -
 70.3 KB Views: 352
 -
 53.1 KB Views: 328
 -
 67.1 KB Views: 317
 -
 56.8 KB Views: 306
 -
 72 KB Views: 305
 -
 53.3 KB Views: 324