• Steel Soldiers now has a few new forums, read more about it at: New Munitions Forums!

  • Microsoft MSN, Live, Hotmail, Outlook email users may not be receiving emails. We are working to resolve this issue. Please add support@steelsoldiers.com to your trusted contacts.


Spotlights

Armada

New member
3,046
4
0
Location
Buick City, MI
What is the current draw for a standard 24v spotlight like those found on bridge trucks, wreckers, etc? I'm wiring in 2 of them on my m35. I would like to run both of them from the same power lead, different switches. I should probably wire in a breaker too? I have an extra 15 amp breaker I can use. Thanks.

Paul
 

steelandcanvas

Well-known member
6,187
85
48
Location
Southwestern Idaho
How many watts are they? Apply Ohm's Law. Watts didvided by Volts = Amps. If you have an Ohm meter, check how many Ohms the filament is, Amps would equal Volts divided by the Resistance.

John
 

OPCOM

Moderator
Steel Soldiers Supporter
3,657
27
48
Location
Dallas, Texas
15A breaker should be OK. but if it is a magnetic one, it may annoyingly trip from the surge when the lamps are turned on cold.
 

Armada

New member
3,046
4
0
Location
Buick City, MI
Thanks guys. Patrick, this is the breaker I have, a standard military one. It came off of my parts duece. Are these of the magnetic type?
So it would be ok to power both lights from a single power lead that is split at the switches? Electronics is not my specialty, obviously....
 

Attachments

cranetruck

Moderator
Super Moderator
Steel Soldiers Supporter
10,350
74
48
Location
Meadows of Dan, Virginia
The flood lights are 150W/ea and a 15 amp breaker is marginal if you have two turned on at the same time. NSN 6240-00295-2421 for the light.
The standard circuit breakers on the deuce (and other MVs) can handle the inrush current.
I would use a 20 amp breaker for two lights and run it directly from the regulator/battery (wire #10?), bypassing other CBs. There is no such thing as too many circuit breakers. :)
 

Armada

New member
3,046
4
0
Location
Buick City, MI
Spotlight mounting and wiring completed. They work great! I used a 20 amp breaker and along with a switch on the lights themselves, I wired in a master switch inside of the cab. You were right Bjorn, it was the #10 wire. It is a heavier gage wire that is a constant power source. I will post pictures of the light mounting fabrication incase someone else wants to add them to their M35.
 

Armada

New member
3,046
4
0
Location
Buick City, MI
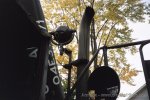
OK, as promised, here are some pics of my spotlight installation.
I used light 'poles' from a bridge truck.
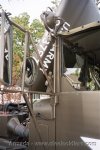
I wanted to be able to direct the lights from inside of the cab, so that determined the area to mount them. The drivers side didn't leave me with a lot of options for mounting the pole, so I attached it to the windshield frame. I could have shortened the pole to windshield frame heigth so it could be dropped with the windshield, but I never put the windshield down so I left the length. I can always change the length if I had to.
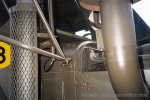
I had more to work with on the passenger side as far as a mounting location. As you can see, I attached the pole to the exhaust stack mounting bracket, and added my own bracket to the upper exhaust stack. It worked out well.
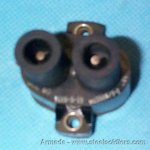
The lights themselves have an 'on/off' switch built into them, but I wanted to be able to control the power from in the cab. I made a mounting bracket for under the dash and installed 3 switches. My beacon lights switch was relocated to the bracket, and I installed individual switches for the spotlights. I just leave the spotlight 'on/off' switches in the 'on' position and power them up from in the cab.
I really like them. I can't believe how much light they put out!
Power is drawn from the #10 wire and connected to a 20A circuit breaker, then to the main switches.
Thanks guys for your help with this project!
 

Attachments

cranetruck

Moderator
Super Moderator
Steel Soldiers Supporter
10,350
74
48
Location
Meadows of Dan, Virginia
Beautiful work man! You are right, they put out a lot of light, soft and nice to work under at night.
Your dash is going to rival mine one of these days, except your finishing work is better. :)
 

mangus580

New member
6,010
282
0
Location
Western NY
Great Job!! Thats EXACTLY what I had planned to do with some of mine... I also plan to put a pair facing back, using hte convoy light poles.
 

alphadeltaromeo

Active member
1,901
3
38
Location
Alto, GA
You've done an excellent job. I love the color of the deuce and double that with respect to Bjorn's sentiments on the finish work. Now, a few pics of the lights in action to see how well they work and we'll be set :D
 

maddawg308

Well-known member
Steel Soldiers Supporter
10,852
723
113
Location
Front Royal, VA
Wow - that's a clean looking cab! I love how you organized all the switches on the bottom of the dash, really nice work!
 

mangus580

New member
6,010
282
0
Location
Western NY
Curious.... why did you not mount the pass side the same as the drivers?

Also, what did you use to clamp the drivers side to the windshield?
 

Armada

New member
3,046
4
0
Location
Buick City, MI
Curious.... why did you not mount the pass side the same as the drivers?

Also, what did you use to clamp the drivers side to the windshield?
The passenger side has the clamp mount for the gun ring leg that runs up to the bottom of the windshield frame and the light poles were too long and would interfere with it, unless I shortened the pole. Plus if I ever did put the windshield down, I would still have a spotlight available for use.
The driver side light pole is held on by clamps. They are clamps used for attaching conduit pipe to a flat surface, 'C' shaped with a 'leg'. The 'leg' is attached to the windshield frame with large self tapping bolts. I then drilled a hole through the 'C' part of the clamp and through one sidewall of the pole, then tapped the hole in the light pole and used a socket head cap screw to securely attach the conduit clamp to it. One clamp on top, and 2 clamps towards the bottom of the pole. The bottom clamps were also mounted on the pole reversed of the top one to help stengthen the installation.
To get the wires into the cab, I ran them through a hole on each side of the cowling. The hole on the drivers side was already there and was a little larger than what I would have wanted. I put a grommet in each hole.
Hope this helps.
 
Top
AdBlock Detected

We get it, advertisements are annoying!

Sure, ad-blocking software does a great job at blocking ads, but it also blocks useful features of our website like our supporting vendors. Their ads help keep Steel Soldiers going. Please consider disabling your ad blockers for the site. Thanks!

I've Disabled AdBlock
No Thanks