2INSANE
Well-known member
- 722
- 819
- 93
- Location
- Belgrade, Montana
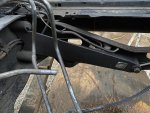
Pm sentYa have a part number for that bolt-on RACOR housing? Thanks!
Steel Soldiers now has a few new forums, read more about it at: New Munitions Forums!


Pm sentYa have a part number for that bolt-on RACOR housing? Thanks!

Interesting info on that thermostat. I may have a similar issue once I get my P400 installed. I used a new high-flow water pump from FloKooler and a 195 stat. Only difference is my engine will not be turboed so I won’t have as much heat to dissipate. Looking forward to seeing your results.I randomly went to a guys house that owns a stock M1009 and looked at the motor bay. I am not happily convinced the 6.5 valve cover and Cdr location will suit my needs. I will replace the 6.2 valve cover and oil fill tube and use a civilian Cdr bracket.
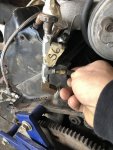
The motor misfires a little. I will turn down the fuel 1/4 turn to see if it changes anything.
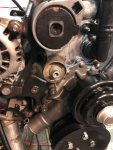
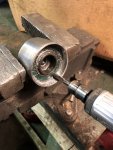
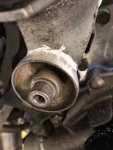
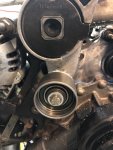
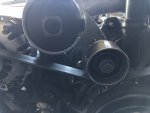
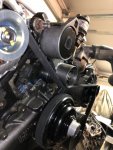
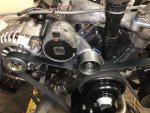
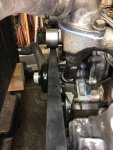
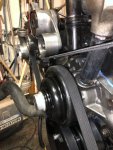
Kinda not liking the serpentine system because of too much belt vibration since there is no vacuum pump pulley to correct that.
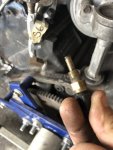
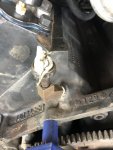
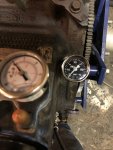
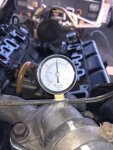
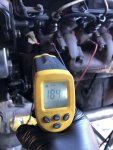
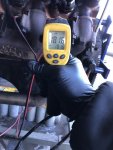
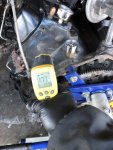
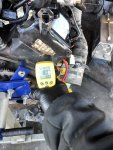
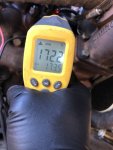
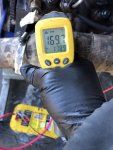
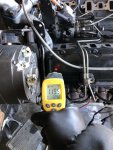
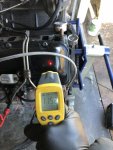
Also I am seeing the coolant boiling in the block before the 195 degree thermostat opens up. I think I will try a 130 or 180 degree thermostat to see if that fixes that problem. Just as the 6.5 diesel pages recommended not to use a single thermostat with a 130gpm pump. A much lower thermostat is needed or none at all to correct this problem or the dual thermostat with 180 degree therms.
In addition, the top radiator hose collapses from too much vacuum from the 130gpm pump. The coolant reserve tank is needed to prevent this during the testing.
When you say you are seeing "coolant boil" what do you mean? I assume you are running 50/50 green stuff which boils around 220?Also I am seeing the coolant boiling in the block before the 195 degree thermostat opens up. I think I will try a 130 or 180 degree thermostat to see if that fixes that problem. Just as the 6.5 diesel pages recommended not to use a single thermostat with a 130gpm pump. A much lower thermostat is needed or none at all to correct this problem or the dual thermostat with 180 degree therms.
Your welcome! I am not afraid to post up my failures and problems that arrive. It is all part of the learning process for me and the reader. I just ordered a 180 degree thermostat and will try that.Interesting info on that thermostat. I may have a similar issue once I get my P400 installed. I used a new high-flow water pump from FloKooler and a 195 stat. Only difference is my engine will not be turboed so I won’t have as much heat to dissipate. Looking forward to seeing your results.
thanks for the great write up.
I currently am using Red Dex Cool to help prevent corrosion.When you say you are seeing "coolant boil" what do you mean? I assume you are running 50/50 green stuff which boils around 220?
Also, what about fabbing up an Idler pulley to shorten that belt span where the vacuum pump would be? (I guess my first instinct would be to try and gut a 6.5 vac pump on the working end but still leave the pulley and bearing intact on he driven end)
Your welcome! I am not afraid to post up my failures and problems that arrive. It is all part of the learning process for me and the reader. I just ordered a 180 degree thermostat and will try that.
I currently am using Red Dex Cool to help prevent corrosion.
This article explains exactly what just happened to me with the coolant boiling.
I have to keep filling the radiator with coolant which is my que for this issue. No oil in coolant, no coolant in oil.

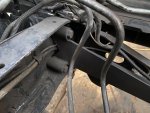
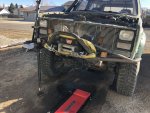
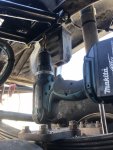
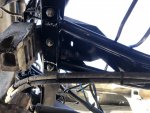
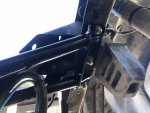
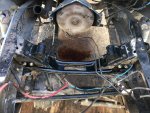
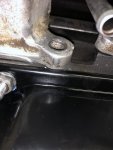
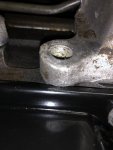
Ok will do!Nice work. I’m interested to know how much additional clearance the ORD crossmember provides under the front of the engine. Please post photos of this when you get to installing the engine. My P400 has the extra girdle which spaces the oil pan downward. I’m fairly certain the front of the pan will hit the OEM crossmember. I know I’m going to have to do something to provide clearance, and I was wondering if the ORD crossmember would clear. If not I may have to fabricate my own special crossmember. Uncharted waters here. I doubt if a P400 has ever been installed in a square body ever in history.
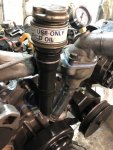
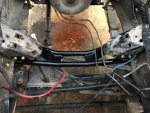
Here's an early photo of the P400 girdle showing the front of the pan. I took this photo as the engine came out of the crate from GEP. There's a possibility that the pan will clear the OEM crossmember, I'm just going to need to get the engine started into the space and see. I am anxious to see how much clearance you will have with the ORD crossmember.Ok will do!
.JPG")
Wow! Yea what is that like 4” of more drop from the girdle? I think you should give Kennedy diesel a call. I think he would know.Here's an early photo of the P400 girdle showing the front of the pan. I took this photo as the engine came out of the crate from GEP. There's a possibility that the pan will clear the OEM crossmember, I'm just going to need to get the engine started into the space and see. I am anxious to see how much clearance you will have with the ORD crossmember.
View attachment 819822
I just came across this cross-member a couple of weeks ago. Maybe it is of interest to you.Here's an early photo of the P400 girdle showing the front of the pan. I took this photo as the engine came out of the crate from GEP. There's a possibility that the pan will clear the OEM crossmember, I'm just going to need to get the engine started into the space and see. I am anxious to see how much clearance you will have with the ORD crossmember.
View attachment 819822
We get it, advertisements are annoying!
Sure, ad-blocking software does a great job at blocking ads, but it also blocks useful features of our website like our supporting vendors. Their ads help keep Steel Soldiers going. Please consider disabling your ad blockers for the site. Thanks!