richingalveston
Well-known member
- 1,715
- 120
- 63
- Location
- galveston/Texas
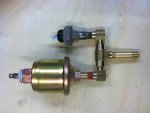
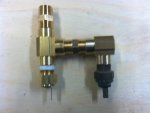
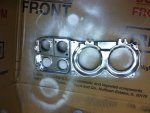
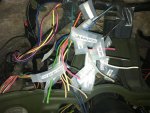
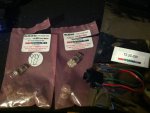
one attachment did not make it, here is the breakdown for the cluster plug new configuration
Attachments
-
89.9 KB Views: 85
Steel Soldiers now has a few new forums, read more about it at: New Munitions Forums!


")
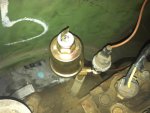
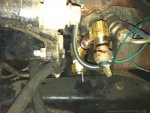
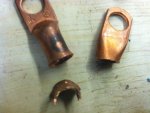
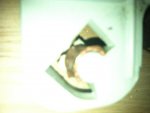
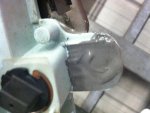
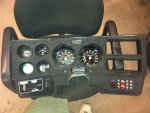
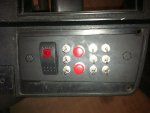
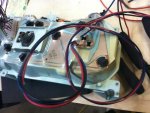
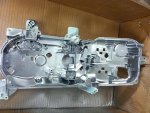
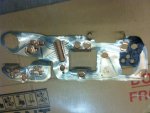
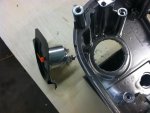
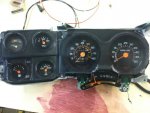
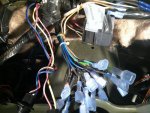
did some work on the cluster today, just trying to prevent the shifter tab from breaking in the future. The wire had already cut almost half way through the plastic tab. I cut a flared copper lug to put around the tab and then JB welded it in place and built up the rest of the plastic also. The flare on the fitting provides a shoulder to help keep the wire in place. I also build my switch panel. I used micro switches I got at Fry's electronics. I soilderd on pigtails. the large black switch is for my front locker. the next three are: torque converter lock up, trans economy mode, and trans manual mode. The two red push buttons are upshift and downshift when in manual mode. The remaining switches are reserverd for lighting. I made an aluminum plat the same size as the plastic stock stereo cover. I managed to get all of the switches in the hole where I did not have to cut the bezel any. The switches are rated for 5 amps at 28v so they should be ok for 10 at 12 volts. I dont plan to run any more than 5 amps through them. Any thing larger will have relays. Still waiting on the fuel gauge, steering column wiper switch and trans controler. The Trans Controler will mount where the 24 volt meter was located.
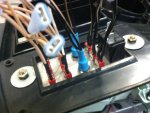
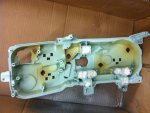
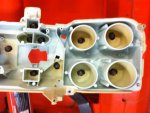
I am not to worried about the circuit board, I use it on all of the gauges I can. As far as I can tell these have lasted 20+ years. for the cost of the wire and plug you could put a new board on from LMC. If you put a new board in and used some good di-electric grease, they will probably last longer with less problems. The Cluster I got from the 87 burb looks brand new from the back, all of the copper is still shinning. It was easy to build the gen two plug and this could be done with all of them if you wanted.
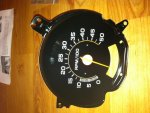
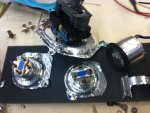
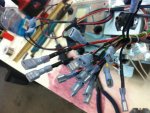
I got the tach from LMC today but they shipped me the wrong fuel gauge. The tach cannot use the old fuel gauge terminals so it will require its own harness. My tach will be wired to the Dakota Digital module which is mounted above my glove box so none of the wiring for the tach will leave the dash area. I already have the 24volt meter on its own harness and the fuel gauge will have to have its own harness since the cluster has nothing in this area (lower left corner gauge position). I was going to use a new plug but I think I will not spend the money and use the factory plug for all that I can and the other devices will have their own plugs in order to disconnect the harness. The Water temp gauge and oil presure gauge will use the circuit board along with all of the lighs with exception of gen 2.
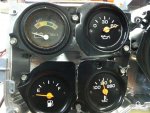
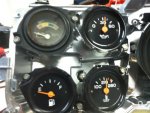
Here is a pic of the tach, it is a perfect match with the hole for the lights in the bottom. It is going to be a week or so before it is installed and can be tested, I am now waiting on a windshield wiper switch for the steering column and my column is torn appart with ignition switch out and batteries disconnected so until the switch gets here all I can do is wire the tach to the cluster and look at it.
They are a little hard to find for some reason. Here is the link:can you provide a part number? i looked on LMC truck and was unable to locate this particular tach....


This broke in my G30 at about 275k miles as well. A lot of the parts are interchangeable with the CUCV.Good work. Looks like it came originally from GM like that.
Yeah that stupid shift tab has broken on 3 of the 5 CUCV's here. I fixed it the M1009 just last week.
View attachment 401802
Not the best looking, but it works and the bezel covers it up. And more importantly it shouldn't break again
Looking forward to seeing your dash put back together into the truck!

We get it, advertisements are annoying!
Sure, ad-blocking software does a great job at blocking ads, but it also blocks useful features of our website like our supporting vendors. Their ads help keep Steel Soldiers going. Please consider disabling your ad blockers for the site. Thanks!