• Steel Soldiers now has a few new forums, read more about it at: New Munitions Forums!

  • Microsoft MSN, Live, Hotmail, Outlook email users may not be receiving emails. We are working to resolve this issue. Please add support@steelsoldiers.com to your trusted contacts.


WSUCougar's M925A1 Acquisition and Build Thread

167
18
18
Location
NW Missouri
I have a few questions on the M925 and thought this might be a good place to ask. If it's not appropriate please split this off into a new topic.

My neighbor and I have been discussing old MVs for "emergencies" and have begun the learning process. Originally we had discussed picking up something that was multi-fuel capable. The newer models are much more widely available with none of the older trucks even being available for auction in our area. I've done a bunch of reading here on the forums. There is wonderful information here but too much for a beginner to process at once. With that in mind, here are my questions.

Where can I find information to read that will help me answer these questions. What is the height, width and length of the different M900 class 5 ton trucks? What are the differences between the 900 series cargo trucks? Are any of the modern trucks capable of being multi fuel?

Thanks!
 

wsucougarx

Well-known member
6,951
65
48
Location
Washington State
Apology for not keeping updated

Hey guys, I apologize for my absence from this thread. Between just being busy and the lousy weather, I haven't had a chance to take many pics or progress on this project as I would have liked. Currently, the cab of my M925A1 is fully painted and is currently being left to dry out. I shot my Home Depot Behr Exterior Latex paint...bad idea. Well, actually not too bad of an idea. The biggest issue is the drying time. With the rain and just humid days, the Behr paint is not wanting to dry as quickly as I would like it to. To help expedite things, I've been running a heater in the cab to help things along. I currently have a tarp draped over the cab, thus cutting off natural lighting. All my work has been under a work light and pics don't take too well in those conditions. As soon as I get a break in the weather, I'll post a ton of before and after pics. Again I apologize for not keeping this thread going.
I know pics speak volumes but here's what I have done to the cab upto this point:
-Replaced all the hardtop insulation with USGI Sleeping rolls (Took 3 mats total to do the entire top)
-Painted the entire cab using Behr Exterior Flat 383 Green
-Replaced both windshield wiper motor switches with current issued ones
-Added dash rifle mounts
-Recovered the passenger seat cushions
-Replaced the idiot warning lights with full USGI Red LED lights and replaced the dashlight covers
-Replaced all the dataplates except the VIN plate
-Repaced all the dash bolts/screws with stainless steel ones..looks cleaner and won't rust;-)
-Installed Combat Locks to each door
-Ripped out the door opening mechanisms and greased them up.
 

wsucougarx

Well-known member
6,951
65
48
Location
Washington State
Interior Cab Pics BEFORE

Here are pics of the cab before I got started on her.

Pics:
1- Angled cab shot showing the brown center console insulation cover and brown floor mat
2- Mismatched passenger cushion covers (Old Cotton Duck fabric and New Nylon)
3- Dash didn't look too bad at all
4- Angled shot of the floor mat and just wear and tear on the paint
5- Dash shot again, not sure why I posted this pic;-)
6- Rusty surface on the dash top. Luckily I got a brand new windshield assy out of the deal
7- Rusty winch shifter tower and the mismatched door and door access panel.
8- Folded up corner on the center console insulation cover and very worn heater duct from boots rubbing on her.
9- Very well used passenger door with a crumbling window crank handle. Luckily it was an older door with that nice gloss paint underneath. I've found the older painted doors or parts don't rust as much as the "newer" CARC'd parts.
10- Yet again, another pic of the dash...hahaha
 

Attachments

Last edited:

wsucougarx

Well-known member
6,951
65
48
Location
Washington State
Getting things fixed, primed, and replaced

This was probably the toughest phase on the cab. My impatience kept trying to get the best of me. One thing that kept lingering was the finished project...what would it look like? While working on the cab, I kept having deja vous moments of when I was a child working on models. I kept having to keep myself in check as to not rush though the prep phase.
The blue tape was placed down to keep the slow drying/slow curing latex paint out. I wanted a good substrate for the hardtop insulation panels to be glued to. Once painting was complete, I peeled the tape off and applied my adhesive glue for the insulation.
I had an issue with the center console insulation cover corners. I'm sure many have issues with the corners being bent back due to age and heat. Mine was folded back about 1-2 inches like a soft taco. Rather than try and muscle the the corners back into place and risk cracking the cover, I placed a portable heater in the cab and heated up the corner. Sure enough it worked! I just used self-tapping sheet metal screws with large stainless steel washers to work her back into place.
During this phase I also replaced the windshield wiper motor switches with the modern ones. I like the looks of the new ones so I bought some NOS off ebay. I ended up buying two too many so I'll post them up in the classifieds later.
Because I was using latex, you have got to make sure you cover any bare metal with primer. The reason being is latex won't stick too well and will cause the metal to rust though.
I pulled the driver seat to help with maneuverability and to paint the seat seperately. I also found the driver's seatbelt to be well used and replaced it as well.
Found I made a video of this phase:
http://www.youtube.com/watch?v=aS8zzCm04Gs
 

Attachments

Last edited:

wsucougarx

Well-known member
6,951
65
48
Location
Washington State
Interior Cab Paint Complete

Now the foundation is done, I can get going on my mod projects. So at this point, I am going to continue concentrating on the cab. As with all my projects, I am a bit of a purist. The greatest compliment would be a soldier not to notice anything on my trucks. Meaning, nothing looks out of place and looks like a standard military truck..just a bit cleaner;-). I try to stick with USGI parts and will not put any aftermarket MADE IN CHINA parts on this truck. I even stick with electrical tape made in the USA (though I spend twice as much..haha).
http://www.youtube.com/watch?v=fXoKk3ina8U

Projects Completed:
-Painted the cab of the truck
-Replaced all the dataplates
-Added various MV labels to the interior

I still have the following projects to do:
Fire Extinguisher Bracket
Mount the VIC-1 Intercom System
-MX-7777
-AM-1780
-C-10456 control boxes (4 total)
-LS-454 Loudspeakers (2 total)
Light Switching Console using the rotary battery type switches (Back up lights, Route Clearance Lights, Int. Cab Lights, Infrared Lights)
12v Outlet for SureFire Hellfighter Weapon System Light
Complete the door weapon mounts and dash weapon mounts

Pics:
1- Most recent 383 Green CARC Substitute Home Depot Behr Paint recipe that I used
2- My trusty Wagner Painter that has been used on all my MV's and keeps working like a charm
3- Interior cab complete. Not sure if you can see it, but I wrapped the heater duct with USGI 100 MPH tape. I was unable to track down a NOS heater duct so I made due with what I had. Heater motor is seized. I got another one ready to install.
4- Hardtop paint complete with new insulation panels installed (USGI Sleeping Mats cut to shape- took 3 mats total for the project)
5- Dash cluster
6- I even painted the nasty brown cab floor mat with this paint. This will be a true test to the durability of this Behr Paint;-)
7- Dash cluster again
8- Idiot light cluster with new red LED's and red lenses
9- New dataplates and wiper motor switches
10- Combat door locks installed. This will show you how well the Behr paint matches CARC. The combat lock is CARC'd and the door is Behr paint;-)
 

Attachments

Last edited:

wsucougarx

Well-known member
6,951
65
48
Location
Washington State
Side by side comparisons

Thought I'd post some close side by side comparisons w/before and after pics. Grrr, pics are out of order. One of these days I'll figure out how to post these pics...hahaha
 

Attachments

wsucougarx

Well-known member
6,951
65
48
Location
Washington State
Videos added to post #46 and #47

After several attempts, I finally got my Motorola Droid X2 to communicate with YouTube. I've put up two videos. Check out Post #46 for the before video and post #47 for the after video. I'm due for another smart phone, so hopefully I'll get one that's a bit more user friendly with YouTube.
 

wsucougarx

Well-known member
6,951
65
48
Location
Washington State
Next Phase-External Lighting

Just dropped $200 on military wire connectors, wire, and switches. As with my previous M923 build, I am going to adorn the truck with a series of 6 Trucklite Route Clearance Lights. I have three different styles of RCL's that I am going to use. Today I predrilled all my mounting holes on the hood assy. I also cut my Prestolite 12 AWG wires down to size to make a custom wiring harness.
Phase One:
The first phase is running three 12 AWG power wires from the battery box (all three wires hooked together on one battery terminal loop) to the firewall. All three wires will be wrapped together in electrical tape. From here I will have each wire go into a 15 AMP military breaker circuit (3 total). From here, I will run the 12 AWG power wires into the cab of the truck. From here, I will use a military 1 to 2 splitter to create 6 total circuits. The 6 circuits will be separate from each other via military rotary switches (what we use for our battery switches). Not exactly sure what all 6 circuits are going to be. But so far it's:
1- Back Up Lights w/indicator light
2- Forward Route Clearance Lights (6 total on one switch)
3- Forward Infrared Lights
4- Forward Aux. circuit for future use.
5- TBD
6- TBD

I fashioned a back up light/status light setup using an M35A2 Airshift bracket (Spruce Mountain Surplus) and it's indicator light (light from a Low Air Pressure kit). I modified a rotary switch to fit in the "airshift lever" hole. Because the switch was offset from the hole, I used a large stainless steel washer to hide the blemish. (I'll post pics up soon of the setup)
Phase Two:
I will run three 12 AWG power wires (IR, RCL, and aux circuit) from the cab rotary switches to the front of the truck (all three wires will be wrapped in electrical tape). At the junction where the hood hinges, I will add the military 1 to 2 splitters once again. The splitter will supply power to the lights on the left and right of the truck. Plus, if I should need to remove the hood at a future time, I can simply disconnect my light wires easily. Rather than use 12 AWG wires to each light, I will use 14 AWG as the RCL's draw hardly any amps.

I will have pics posted as soon as I start this project. As my schedule stands, my next day off won't be until next Tuesday.

Pics:
1- Rotary Switches used for each circuit
2- Wire Connectors
3- Military splitters
4- Circuit Breaker used
5- Rotary Switch Lever used
6- Prestolite 12 AWG Wire used for power (backup lights also)
7- Prestolite 14 AWG Wire used for each light
 

Attachments

juanprado

Well-known member
Steel Soldiers Supporter
5,506
2,707
113
Location
Metairie/La (N'awlins)
Mike,

Just a pic to give you an idea what I did with that bracket. The clear lens has a orange/yellow led to mark my convoy lights on and the green lens has a white led is for my front driving lights. All I had to do was drill one hole and everything else matched up but it does leave a blank hole. I am also doing the same set up on the right side of the column for 2 more switches and indicator lights.

Always enjoy your detailed posts. I look forward to your progress. :)IMG_0027.jpg
 

wsucougarx

Well-known member
6,951
65
48
Location
Washington State
Thanks Juan! I bought a piece of angle iron that will be around 8 inches long. I'm going to drill a series of holes for the switches. I'm contemplating toggle switches for future projects as well...hahaha. It's hard to do a project without trying to think way far ahead. A guy can certainly get too carried away on these trucks. Hmm, convoy lights..I don't yet have those;-) Oh, I sent your book out today;-)
 

wsucougarx

Well-known member
6,951
65
48
Location
Washington State
Lights for the Project

Here's the lights I'm using. Sorry these are just generic lights off the internet but they're exactly what I'm using.
Pics:
1- Aurora 24v incandescent bulb armored lights for back up lights (I like the small size as opposed to the 7" RCL's)
2- Forward Infrared Lights
3- Trucklite RCL's
 

Attachments

Amer-team

Well-known member
1,706
28
48
Location
Centralia/WA
Mike, did you see that military wiring kit on CL about 3 or 4 weeks ago? they said it had the connectors and tools for doing this type of work. Keep up the good work. P
 

Brian46

New member
21
0
0
Location
Langley BC
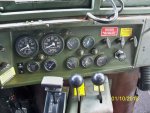
After the battery issue was solved, I turned my attention to that blasted ABS Light on the dash. As mentioned previously, the light is always on. This indicates a faulty ABS system and the truck should not be driven over 40 MPH. To me, 40 MPH is still too fast with how well these brakes work. I did have some lock up issues during my recovery trip home and, quite truthfully, it scared the crud out of me a couple times. Nothing like having the rear end trying to slide to the side.
Anyways, before tackling this issue I printed off a copy of "Field Maintenance Troubleshooting ABS Without Diagnostic Tools" from TM 9-2320-272-23-2 pages 0156-1 to 0156-15. It has a step by step process on how to check your entire ABS system one component at a time. The process is actually quite easy, just time consuming. I love stuff like this anyways:).
So a summary of what you're suppose to do in order:
1) Check both wheel speed sensor leads in the rear axle
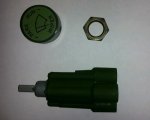
2) Check to make sure both front and rear ABS Solenoid Valve Connections are OK (3 prong plug that screws in)
3) Check the ABS wiring harness 28 pin connector.
4) Check the ABS wiring harness
5) Check the ABS Power Supply Connection (circuit #10)
6) Check the ABS Ground Wire
7) Check the under the dash ABS Harness Connections
8) Check Circuite #54 from the Starter switch (Is the 3 AMP fuse OK?)
9) Check the battery voltage (between 21-24 VDC?)
10) Check the ABS Volatage Supply w/multimeter
11) Check the ABS Ground Wire w/multimeter
12) Check the under the dash ABS wiring harness wire individually w/multimeter
13) Check 15 AMP fuse and wires w/multimeter

So heres the deal with my truck. When you go to start up, the ABS system does try to do the self-check. However, it only does half and the ABS Light stays on. Now when I say half I mean you only get 1/2 of the audible clicks from the rear of the truck. During the normal self-check, after flipping both switch (but not engaging the starter) you hear two series of 3 clicks followed by the ABS light turning off. In my case, I only got one set of 3 clicks followed by a sustained ABS Light. So I went to the task of checking everything mentioned above not once but twice to no avail. I traced every single wire checking for abrasions, nicks, cuts, burrs etc etc. Nothing!! I checked every connections 6-7 times each to no avail. I pulled out the dash wires to see if they were mismatched...nothing. I wacked the ECU with a rubber mallet...nothing. I found that whoever put this unit together or whoever replaced the 3 AMP fuse put a 30 AMP fuse in instead!!!! I thought for sure the ECU was fried. I went down to NAPA and secured some 3 AMP fuses and came home to try it out. I was expecting the fuse to blow as many have had their 3 AMP fuses blow when the ECU was fried. However, mine did not blow. Maybe there was hope for my ECU. Then I just sat there and stared off into space. Then it hit me. What was the source of the "clicks" during the self-check? What did the "clicks" represent and why? I recruited my son for this task. As I laid down in the wet gravel, he sat in the cab toggling the off/on switches. I found out the "clicks" were coming from the ABS Solenoid Valve units. The reason for the two sets of clicks is because there are two ABS Solenoid valves (front and rear). I found the Rear Solenoid Valve unit was making the clicks but the front unit was not. The front unit is also where the ABS ECU is. Hmmm, I thought if my ECU was fried then how would the ABS Solenoid know to do the self-check.....OK, now we're onto to something here. I ran into my garage and searched for a spare ECU/ABS Solenoid Valve unit I bought off ebay for $35 last year. I disassembled the ECU portion off the bracket so I was just left with the Solenoid valve. I crawled under the truck and disconnected the front solenoid valve wire from the old unit and connected it to my spare. I kept the original ECU in the truck hooked up. I jumped into the cab, said a prayer that this would work. I switched on both switches......I hear the first set of clicks....pause.............then there it was, the 2nd set of clicks......I look down to see my ABS light...........shut off. It worked!!!!!! So my ECU was good after all. Just had a bad ABS Solenoid Valve unit!!! All this took 8 hours of work!!! But hey if I don't roll over the truck and die then 8 hours was worth it:razz:

Projects Completed:
ABS System Fixed and Fully Operational!!

Pics:
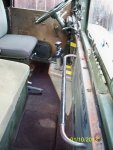
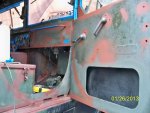
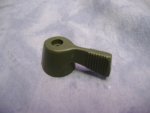
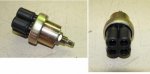
1- Speed sensor leads. Check the two prong connections. Located right on top of the rear axle.
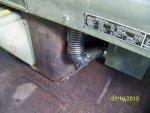
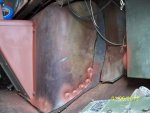
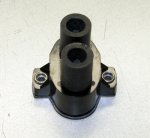
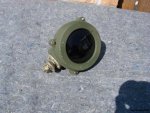
2- Rear ABS Solenoid Valve (click click click)
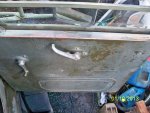
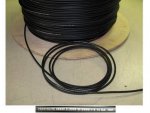
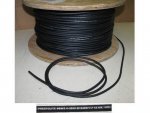
3- Speed sensor going into the hub of the rear axle.
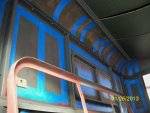
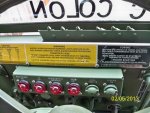
4- ECU 28 pin wiring harness and plug
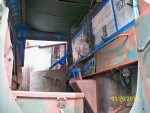
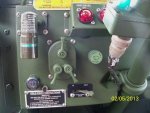
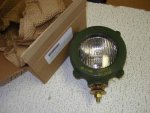
5- ABS power source (Circuit #10)
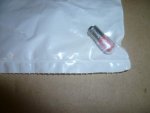
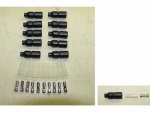
6- 30 AMP fuse in the 3 AMP's place.....seriously?!?!?!?!?
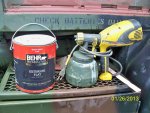
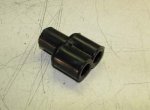
7- My spare unit I robbed parts off of
8- The old ECU mounted just above the middle axle. If I were any fatter I wouldn't be able to fit between the air dryer and axle.
9- The two connections going into the front ABS Solenoid Valve/ECU assy
10- Having the original ECU hooked up but using my spare ABS Solenoid to rule out/rule in a faulty solenoid unit.
Great post, It helped me out big time in finding out what the issue was with the ABS on my M931A2
 
Top
AdBlock Detected

We get it, advertisements are annoying!

Sure, ad-blocking software does a great job at blocking ads, but it also blocks useful features of our website like our supporting vendors. Their ads help keep Steel Soldiers going. Please consider disabling your ad blockers for the site. Thanks!

I've Disabled AdBlock
No Thanks