• Steel Soldiers now has a few new forums, read more about it at: New Munitions Forums!

  • Microsoft MSN, Live, Hotmail, Outlook email users may not be receiving emails. We are working to resolve this issue. Please add support@steelsoldiers.com to your trusted contacts.


M1010 DUVAC Removal Plan "B"

Mad Texan

Well-known member
Steel Soldiers Supporter
657
1,150
93
Location
Chester County, PA
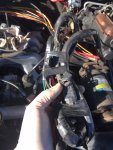
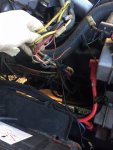
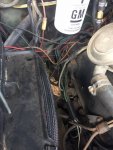
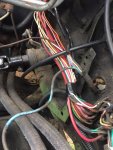
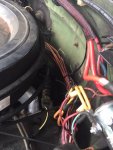
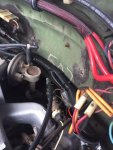
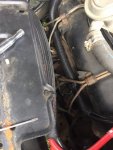
I proceeded with installing my alternators today... I did not remove all the wiring for the DUVAC yet, but I plan to. I did Ohm wires out and disconnected power and ground to the blue box as well as where it fed into the 12v bus. I'm still waiting on a few things but I made a dry run to check operation. Before starting I checked individual voltages, 12.4 front battery and 12.7 rear battery. After starting front battery was 13.6 and both were 27.8. After running for a while the front voltage was at 14 and both were at 28.1.

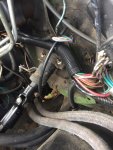
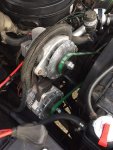
I did find that the voltage at the stator taps on the lower alternator was higher than what I should have for a tach reading. I checked the voltage on the upper alternator stator taps and they were good. So I moved the brown diagnostic wire to the upper alternator as that is what I am using inside the truck for a tach signal. Seems to be working although I am going to adjust it a little at idle.

All in all... a successful day! I updated the diagram I made above... proceed at your own risk... YMMV
 

Attachments

Last edited:

m38inmaine

Well-known member
2,090
45
48
Location
Maine USA
Looks good, I sold the original "Plan B" truck a couple of weeks ago, he drove from Maine back to CA without issue, a testament to it's reliability. I never had any problems as well, glad to see this M1010 cure is living on to help others.
 

Recovry4x4

LLM/Member 785
Super Moderator
Steel Soldiers Supporter
34,014
1,814
113
Location
GA Mountains
I will second the motion. Shortly after ChevyC-60 completed his truck, it became my truck. The system works flawlessly. Still have the truck.
 

Mad Texan

Well-known member
Steel Soldiers Supporter
657
1,150
93
Location
Chester County, PA
Looks good, I sold the original "Plan B" truck a couple of weeks ago, he drove from Maine back to CA without issue, a testament to it's reliability. I never had any problems as well, glad to see this M1010 cure is living on to help others.
I will second the motion. Shortly after ChevyC-60 completed his truck, it became my truck. The system works flawlessly. Still have the truck.
A testament to great minds and good execution! Thanks to all for sharing and allowing us to enjoy these vehicles further!
 

Mad Texan

Well-known member
Steel Soldiers Supporter
657
1,150
93
Location
Chester County, PA
A while back I did finish removing the DUVAC wiring as I know I'll never go back. After working on cars for years, finding a random bundle of wires taped off can be troublesome for someone unfamiliar and can cause hours $$$ of diagnostics. Just some photos of the operation...
 

Attachments

Another Ahab

Well-known member
17,825
4,157
113
Location
Alexandria, VA
A while back I did finish removing the DUVAC wiring as I know I'll never go back. After working on cars for years, finding a random bundle of wires taped off can be troublesome for someone unfamiliar and can cause hours $$$ of diagnostics. Just some photos of the operation...
It is troublesome (isn't it?!), even for someone FAMILIAR with electrical issues:

- Raised as a "Wood Butchering" carpenter, I was always mystified and stymied by electrical work

- Never liked it because my go-to solution to most problems encountered was (and still is), a wrecking bar

That doesn't do much good when you're up against wiring.


So, Mad Texan, you are clearly a man of real patience and uncommon intelligence:

- How does one systematically tackle that kind of spaghetti pile?!!
 

Mad Texan

Well-known member
Steel Soldiers Supporter
657
1,150
93
Location
Chester County, PA
It is troublesome (isn't it?!), even for someone FAMILIAR with electrical issues:

- Raised as a "Wood Butchering" carpenter, I was always mystified and stymied by electrical work

- Never liked it because my go-to solution to most problems encountered was (and still is), a wrecking bar

That doesn't do much good when you're up against wiring.

So, Mad Texan, you are clearly a man of real patience and uncommon intelligence:

- How does one systematically tackle that kind of spaghetti pile?!!
Systematically, there was a wrecking bar that was required to cut off the factory sheath that both bound and protected the wires, a razor blade. Once it was cut off it was just removing the wires no longer in use. Sometimes that was like untangling Christmas lights, but I wanted an end result that left no evidence of the DUVAC charging system. Once it was removed, just recovering the wires and protecting them, I added loom along the passenger valve cover and secured it like the drivers side. The replacement charging system that @m38inmaine and @ChevyC60 pioneered is simple and reliable. I have a binder on the truck that has M1010 pertinent information including a diagram for the charging system now.

I actually enjoy doing wiring. When it's somewhat organized it's easy to diagnose, but when it's a rats nest... :eek:
 

SandM1010

New member
14
7
3
Location
Franklin/MA
Systematically, there was a wrecking bar that was required to cut off the factory sheath that both bound and protected the wires, a razor blade. Once it was cut off it was just removing the wires no longer in use. Sometimes that was like untangling Christmas lights, but I wanted an end result that left no evidence of the DUVAC charging system. Once it was removed, just recovering the wires and protecting them, I added loom along the passenger valve cover and secured it like the drivers side. The replacement charging system that @m38inmaine and @ChevyC60 pioneered is simple and reliable. I have a binder on the truck that has M1010 pertinent information including a diagram for the charging system now.

I actually enjoy doing wiring. When it's somewhat organized it's easy to diagnose, but when it's a rats nest... :eek:
Nice work I was thinking about cleaning up the wiring also, but sometimes I think maybe a future owner will want to go back to stock. I think it would be a bad idea but you never know. In the end I will probably do the same one day and just save all the wiring along with the box just in case.
 

Mad Texan

Well-known member
Steel Soldiers Supporter
657
1,150
93
Location
Chester County, PA
Nice work I was thinking about cleaning up the wiring also, but sometimes I think maybe a future owner will want to go back to stock. I think it would be a bad idea but you never know. In the end I will probably do the same one day and just save all the wiring along with the box just in case.
I’ve seen several say the same about going back to stock, I guess if it’s all there and pristine I could see saving it. My DUVAC wiring was hacked with splices and wire nuts and honestly I don’t know if it worked at all when I got the truck. The charging system in the M1010’s seems to have been flawed from day one while the M1008’s and M1009’s are reliable. The same debate can be said about keeping 24v or converting to 12v only.
 

greenmachine001

New member
14
0
1
Location
Knoxville Tennessee
Recently, I acquired an M1010 with intermittent charging issues. I went through and cleaned all of the charging system connections, then reading about all the issues with the stock DUCAV system (and wanting a reliable charging system), I decided to start with m38inmaine's "Plan B", removed the DUVAC and associated wiring, then replaced the top alternator with a 12 volt unit. Afterwards, I discovered the bottom 28 volt alternator wasn't charging at all, and neither was the 28 volt alternator I removed from the top. So rather than taking a chance on rebuilding the 28 volt alts, I went and did the ChevyC60 modification (post #11). Using identical 12 volt isolated ground alternators, I wired one (top alt) to the front battery, and the other (bottom alt) wired to the rear battery. So, now I get 14.21 at the front battery and 14.17 at the rear battery.
Voltmeter is back in the green and all is well.
Next step is to replace the battery terminals.
This Harbor Freight hydraulic crimper does a superb job as well!
Hey man sorry to wake up an ancient post but any way you could share the part numbers off the alternators you used and maybe post some pics of the back of them for how you have them wired? Thanks!
 

Mad Texan

Well-known member
Steel Soldiers Supporter
657
1,150
93
Location
Chester County, PA
Hey man sorry to wake up an ancient post but any way you could share the part numbers off the alternators you used and maybe post some pics of the back of them for how you have them wired? Thanks!
I believe we've all used this alternator in this thread: Leece Neville (110-555JHO) 12v 160A 1 wire self exciting alternator.

And here is a diagram for wiring:
1701094500867.png
 

ballencd

Active member
157
54
28
Location
Columbus, NC
I know it's an old thread but I have a few questions. I just acquired a 1984 M1010. The charging system works fine but I had a M1009 for 18 years and it was so much simpler then the M1010 system and I want my M1010 to be simple. I was in the process of replacing the injection pump and decided to do a electrical upgrade to (2) of the LN 12 V alternators while I had the injection pump out and the wiring was easy to got to. I have pulled the blue box regulators from the drivers side inner fender and pulled all the wires that were connected to it but I have a few that don't make sense to me.
1) a brown wire that came from the blue box and goes about half way past the engine where it is spliced to three pink wires with black stripe and one goes to what looks like a temp sensor on the passenger side of the engine, after the sensor it changes to green and goes to the injection pump (probably high idle till warm up circuit) What do I hock that brown wire to after the blue box removal? I'm not sure where the other two pink with black strip wires go yet.
2) a black wire (assume ground to the A/C compressor clutch) can easily be hooked to ground but why is it going to the blew box to start with?
3) A few more wires on the passenger side of the engine that I have not followed yet.

I am going to get the injection pump installed and connect the wires that I know are needed but plan to attempt to get it running and see what doesn't work and troubleshoot from there. Any help would be appreciated.

I bought (2) new 12V LN alternators and plan on wiring the the upper alternator to the front battery (ground to chassis and pos to the pos terminal on the front battery) and the lower alternator to the back battery (ground to neg term on back battery and pos to 24V bus bar)

I think I am doing the upgrade that ChevyC-60 and @m38inmaine did...???

Any input on that would be helpful too.

Thanks
 

ballencd

Active member
157
54
28
Location
Columbus, NC
DUVAC removed and the new alternators installed. Wiring complete and the truck is running. Still has a fuel issue but hoping to get that sorted out on Thursday. I pulled the harness while I had the injector pump out and think I have all the wires disconnected that are not needed. I did have to install one ground and one 24 V back the the ground and 24V buss. I do have a few more wires left that I will sort out at some point but everything seems to be working OK with the disconnected. Time will tell.
 
Top
AdBlock Detected

We get it, advertisements are annoying!

Sure, ad-blocking software does a great job at blocking ads, but it also blocks useful features of our website like our supporting vendors. Their ads help keep Steel Soldiers going. Please consider disabling your ad blockers for the site. Thanks!

I've Disabled AdBlock
No Thanks