acthomp781
Member
- 79
- 30
- 18
- Location
- Massillon, OH
I replaced the core support bushings on my M1009. Not as daunting as I thought, not easy, but not horrible. I can think of much worse ways to spend a Saturday afternoon.
Steel Soldiers now has a few new forums, read more about it at: New Munitions Forums!


It is actually easier to understand you THAT way than if the annoying spell-check substitutes something spelled right, but that makes no sense at all.Wow so many spelling errors

Apply a direct 12 volts to the IP fuel solenoid-it should click. If not, it is probably bad. Could still be bad if it clicks, but next step try the following.Within the last month I have installed a new flex plate transmission and converter, new fuel filter and lines, electric pump running directly from a can of clean diesel, I have no fuel coming out of the lines going to the injectors. I have searched but I'm not seeing definitive ways of testing the IP while installed on the truck. Everything related to starting is new including glow plugs. Are there steps set to condemning this pump or am I missing something .. I have 3 days cranking and no start. Before I changed the glow plugs it would start easily on the smallest squirt of ether and now nothing. Does it require actual fuel in the system for the ether to work? It's my understanding that no fuel should not matter and it should still make something happen? I'm not wanting to buy an expensive pump without knowing how to diagnose this one first.
I have a spin on filter, new fuel lines, new glow plugs. It seems when it gets to the IP it stops, is there a way to clean this while installed? I've not had to mess with the IP since I got the trick 12 years ago. Any constructive advice is welcome and thanks in advance


As long as you use grade 10.9 12mm metric bolts, you'll be fine. You want the bolt to fit snug in the hole will no perceptible "slop" I like to ream the holes, gives the tightest fit over a drill bit..Too few hours in a day and too few days in a week... I hardly get around to working on my truck! I've been getting jobs almost every weekend! I did tell everyone no more jobs on weekends! Sundays and Mondays (my weekends are 1 day off) are now reserved for my truck (mostly).
Last Monday I got around to test-fitting the ORD shackles. Had to cut them a bit to fit around the D-shackle mounts. I ignored the ORD instructions and drilled out the holes to 12mm instead of 7/16" (11.1125mm).
View attachment 769635 View attachment 769634
It isn't much, but at least it's some progress...
I tested my media-blaster... Works great! But also makes a great mess!
View attachment 769636
I'm going to buy a blasting cabinet for parts and will probably send the frame to be blasted and coated when it's ready. Before it's ready I need to fit the K5 fuel tank in it first. For this, I will try to re-use the donor K5's rear crossmember(s), which I plan on removing next weekend.
Oh and I received the radiator isolator bushings, along with some Timberland boots! Thanks for reminding me cucvrus!
View attachment 769637


Can you use dry ice as a media for the blaster?I tested my media-blaster... Works great! But also makes a great mess
For test fitting I used 8.8 bolts. Will look into 10.9 bolts. There hardly is any slop. Actually, the M12 bolts, while thicker then ORD bolts, still had lots of slop on the original holes in the shackles...As long as you use grade 10.9 12mm metric bolts, you'll be fine. You want the bolt to fit snug in the hole will no perceptible "slop" I like to ream the holes, gives the tightest fit over a drill bit..
If you have the blazer crossmembers, by all means use them, but you can reuse all the crossmembers currently there, including the spare tire bracket. Attached is a picture of my rear tank install/mock-up. I installed 64" rear springs, so I lost the ability to use a 20 gallon tank, and 16 seemed too small. So I opted for the 31 gallon blazer tank. I did add a piece of flat stock and spacers to provide a better surface to push the tank against in the rear, as the stock rear member is smaller then the blazer equivalent. A 40 gallon will interfere with the upper rear shock mount.


I believe that requires (expensive) specialized hardware so that's not an option.Can you use dry ice as a media for the blaster?
It's supposed to be less messy than conventional media, but not sure how you feed it to the blaster....
Can you use dry ice as a media for the blaster?
I believe that requires (expensive) specialized hardware so that's not an option.


Nicely Done!
Thanks!Nicely Done!
Looks Great!
When is the next available appointment?


Looks great from the distance. Would be nice to see some close-up pictures and a description of the construction details.View attachment 770041
Built a bumper to mount my winch.
I'd put a link to my build here if I new how.
Here is the build thread:Looks great from the distance. Would be nice to see some close-up pictures and a description of the construction details.
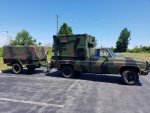
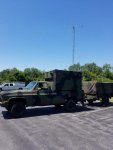
More new paint for Leonard, the S250 and the M101A2.
We get it, advertisements are annoying!
Sure, ad-blocking software does a great job at blocking ads, but it also blocks useful features of our website like our supporting vendors. Their ads help keep Steel Soldiers going. Please consider disabling your ad blockers for the site. Thanks!