


peakbagger
Well-known member
- 727
- 343
- 63
- Location
- northern nh
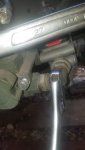
Use a magnet to check the tube material. Steel will stick, stainless will not.
There are far simpler alcohol injectors out there. The biggest PITA is matching up the threads.
There are far simpler alcohol injectors out there. The biggest PITA is matching up the threads.
![DSCN2398[1].jpg](https://www.steelsoldiers.com/data/attachments/515/515084-8765a8c914b9ff5faee0e14a5cb8bbde.jpg "DSCN2398[1].jpg")


![DSCN2412[1].jpg](https://www.steelsoldiers.com/data/attachments/515/515980-c5da93f382dc173399ad26fd157f2d10.jpg "DSCN2412[1].jpg")
![DSCN2414[1].jpg](https://www.steelsoldiers.com/data/attachments/515/515986-888606fee8b2e41bf2041bf76022aa2c.jpg "DSCN2414[1].jpg")


