• Steel Soldiers now has a few new forums, read more about it at: New Munitions Forums!

  • Microsoft MSN, Live, Hotmail, Outlook email users may not be receiving emails. We are working to resolve this issue. Please add support@steelsoldiers.com to your trusted contacts.


FLU419 SEE HMMH HME Owners group

alpine44

Member
397
16
18
Location
Asheville, NC - Elkton, MD
Exactly the kind of response I was hoping for. Thank you. Three questions, first what does letting it sit for a while have to do with anything? Second, Wouldn’t a plugged vent just make the cylinder sluggish but still functional? Third were you able to get at this vent and paint without tilting the cab?
Just tilt the cab. It gives easy access to a lot of items that need attention after these machines have been sitting around for decades.
You may be able to fix the 4wd issue while taking a lot of skin of your knuckles and then a few weeks later you'll have another pneumatic leak, or a busted brake line, or the plastic collar in the gearbox falling apart, or something else that will require the cab tilt.
 
Last edited:

Pinsandpitons

Active member
156
41
28
Location
Central Washington
Copy. Removing the loader actually is on my list as is the backhoe just for the purpose of really going through things. Incidentally, the TM's are quite frustrating. F-ing government decided that service procedures should be in a different book as the parts they require. Further they should never reference the proper name of the part, or the NSN #, or what the f-ing hose attaches to on the other end, only the most generic possible phrasing should be used. Wouldn't want to confuse anybody! :mad:

Breath......

I have (i think) the NSN's for all 4 hydro filters anybody got a shorthand of Wix (or other) equivalents?
 

The FLU farm

Well-known member
Steel Soldiers Supporter
3,284
1,205
113
Location
The actual midwest, NM.
Has anyone toyed with the idea of converting the front bucket into a 4 in 1 clam shell type?
I still haven't found a suitable blade for the front and even if I had, I would still have to fabricate a complete mount for it. And then there is the hassle of changing from bucket to blade and back.
A 4 in 1 bucket on the front loader may be enough for light leveling and grading since the FLU410 will never perform like a dozer anyway. Plus the 4 in 1 bucket would make moving brush and wood around much easier
Funny that you mention that. Just last week I was eyeballing Titan's 4 in 1 buckets.
But being that I already have a blade on one SEE and a bucket on the other, and a rock bucket with a grapple, I couldn't justify the expense.
 

Migginsbros

Well-known member
2,030
5,924
113
Location
Berlin-Germany
In need of some help...please
last year I replaced the rear rt hub seal..
was not real sure on how far to tap it in...
the manuals not clear..
View attachment 726402
the seal is slightly smaller than the ring it rides on...
when the caliper was leaking this year(looks like a rebuild)..
so.. after pulling it apart...the seal was lying to the outside of the ring..
View attachment 726403View attachment 726404
this is where I set it last year and have it that way again...
??? should I tap the ring in farther , so that the inside of the seal lips over to the inside of the ring?
View attachment 726405

Hi,
we changed some hub seals, too. We convert to Cassette seals. The dimensions off the inner spacer are different. You can mashine the spacer to specifications or buy(not cheap) the right one.
We try to come back to you tomorrow with closer informations. Like partno. and tool dimensions.
 

Migginsbros

Well-known member
2,030
5,924
113
Location
Berlin-Germany
anthkey, we noticed that we do the hubseal job on the 406 aircraft tug.
A few years ago.
Today we get out the tool ,the part no. and the selfmade instruction.
We assumed tha the SEE has the shortened 435 axels. Difference is in the Seal/Spacer. It would be neccecary
that you messure the hub spacer in diameter and thickness.
And send pics. Your old pics are valid, can´t see them.
We sure we solve the problem.
 
Last edited:

Speedwoble

Well-known member
606
296
63
Location
New Holland, PA
I wanted to use my hammer drill to drill a hole in my concrete block foundation. But first I had to figure out an electrical issue that was keeping the tool circuit from working. The last time I tried to use it, it didn’t work when turned on from the tool switch. So I switched the wires to the loader control valve and the tool valve and taped down the momentary loader rocker switch to engage the tools.
So I knew the hydraulics worked and needed to troubleshoot the electrical system. I determined I had wire continuity and power at the switch, but no power out of the switch. The tool circuit switch is a dual pole switch with one pole engaging the high idle and the other pole should engage the hydraulics.
I removed the switch and disassembled it. It is definitely not waterproof and had a small amount of corrosion on the contacts. Also worth noting, the cups that hold the contacts in the switch are indexed to the shaft with machines flats, so attempting to turn the shaft will damage them. I had to straighten mine. Polished the contacts, reassembled everything, and I had a working tool circuit!
Using the hammer drill on a horizontal block wall was a challenge. Even on the lowest setting, it would bounce away from the wall. Clearly made for vertical drilling. Eventually I got the hang of it and it was making quick progress. The hole punched through and I went to the basement to inspect. The solid block had a large blowout on the inside of the wall. Crud. I think this may have been because my 1” bit is dull and the carbide is missing, so it was hammering through the wall instead of drilling. I found a place that claims they can rebuild them and will update once I have one done.
 

lurkMcGurk

Member
55
17
8
Location
Bangor,Maine
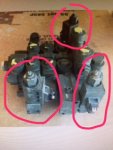
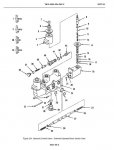
Question for hydraulic Savy folks out there. 90% sure I know this is a solenoid. Is the part I have circled in red, a Solenoid? As deduced by searching the TM-5-2420-224-20-1 Page 3-316. ? This picture shows a front loader stacking valve in its entirety but I am only interested in the pieces circled.solenoid.jpg
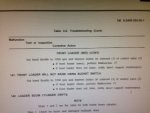
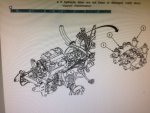
I know it controls the front loader and one of the pieces I have circled has a slow leak. the slow leak is out the top of it. Mine, like the picture are not capped as they are on other FLU419s. Uncapped is how they are sold , and how mine are on the Mog currently. I'm wondering if this is a broken seal or just find a cap for it type of fix, opposed to a complete replacement. I couldn't find it as a part number but found this diagram denoting as a part of a trouble shooting process.
man 1.JPGman 2.JPG


before I start twisting the nut down or off and/or unplugging things I figured I would ask. I am also curious to know if this is a common and replaceable piece (solenoid) or if I should tear it down and try to rebuild it. Where or how to find parts would be great. Any input is appreciated. Thanks
 

The FLU farm

Well-known member
Steel Soldiers Supporter
3,284
1,205
113
Location
The actual midwest, NM.
Way out of my league, McGurk, but I would guess that those parts are somewhat common. In other words, see if you can find some sort of identification number on them, then search for that part, regardless of its application.
 

Pinsandpitons

Active member
156
41
28
Location
Central Washington
If you're referring to the lock nut equipped allen shaft adjustments, those look an awful lot like load retention valves... though a little different that the valves I'm used to working on. In the red circled photo the one on the right is the loader boom control (why it has two electrical connections, one up one down from the rear controls) and the left one is the tool circuit valve and magnet/solenoid. The fix for a leak is definitely not a cap, there's an O-ring inside that's bad. I would get the parts book out and find the NSN for that valve and see who made it then go down that road like FluFarm said.
 

Pinsandpitons

Active member
156
41
28
Location
Central Washington
TM 24P-2 fig0237.jpg
Looks like the mil called it a check valve, and it seams like it might actually port pilot pressure to move the valve spool. Electric over hydraulic over hydraulic... weird.
The whole assem. ( 3-18 ) is NSN 4820-01-243-4805.
Part Target page is; http://www.parttarget.com/4820-01-2...16.html/-231C79DC-3658-4699-B62C-E898CF0BAE21
Look for parker valves using the Diamler SKU number there. This might take some digging and phone calls.

Edit;
Just found this too..
https://www.newcenturycomponents.com/nsn/4820-01-243-4805
 
Last edited:

alpine44

Member
397
16
18
Location
Asheville, NC - Elkton, MD
View attachment 727933
Looks like the mil called it a check valve, and it seams like it might actually port pilot pressure to move the valve spool. Electric over hydraulic over hydraulic... weird.
The whole assem. ( 3-18 ) is NSN 4820-01-243-4805.
Part Target page is; http://www.parttarget.com/4820-01-2...16.html/-231C79DC-3658-4699-B62C-E898CF0BAE21
Look for parker valves using the Diamler SKU number there. This might take some digging and phone calls.

Edit;
Just found this too..
https://www.newcenturycomponents.com/nsn/4820-01-243-4805
The loader and tool circuit valves are standard Parker items. I was going to buy the double solenoid one from a hydraulics supply house but MrSEE had a more attractive deal for the valve section (I am going to add a third circuit to the front for winch or 4 in one bucket)

I will post the Parker number tonight when I have a chance to look at my notes.
 
Last edited:

alpine44

Member
397
16
18
Location
Asheville, NC - Elkton, MD
Question for hydraulic Savy folks out there. 90% sure I know this is a solenoid. Is the part I have circled in red, a Solenoid? As deduced by searching the TM-5-2420-224-20-1 Page 3-316. ? This picture shows a front loader stacking valve in its entirety but I am only interested in the pieces circled.View attachment 727926
I know it controls the front loader and one of the pieces I have circled has a slow leak. the slow leak is out the top of it. Mine, like the picture are not capped as they are on other FLU419s. Uncapped is how they are sold , and how mine are on the Mog currently. I'm wondering if this is a broken seal or just find a cap for it type of fix, opposed to a complete replacement. I couldn't find it as a part number but found this diagram denoting as a part of a trouble shooting process.
View attachment 727927View attachment 727928


before I start twisting the nut down or off and/or unplugging things I figured I would ask. I am also curious to know if this is a common and replaceable piece (solenoid) or if I should tear it down and try to rebuild it. Where or how to find parts would be great. Any input is appreciated. Thanks
You may want to ask MrSEE what he wants for the tool circuit valve section he has in stock from parting out an SEE. That should give you the parts you need.

I am also posting the Parker number of these valves later.
 

alpine44

Member
397
16
18
Location
Asheville, NC - Elkton, MD
I wanted to use my hammer drill to drill a hole in my concrete block foundation. But first I had to figure out an electrical issue that was keeping the tool circuit from working. The last time I tried to use it, it didn’t work when turned on from the tool switch. So I switched the wires to the loader control valve and the tool valve and taped down the momentary loader rocker switch to engage the tools.
So I knew the hydraulics worked and needed to troubleshoot the electrical system. I determined I had wire continuity and power at the switch, but no power out of the switch. The tool circuit switch is a dual pole switch with one pole engaging the high idle and the other pole should engage the hydraulics.
I removed the switch and disassembled it. It is definitely not waterproof and had a small amount of corrosion on the contacts. Also worth noting, the cups that hold the contacts in the switch are indexed to the shaft with machines flats, so attempting to turn the shaft will damage them. I had to straighten mine. Polished the contacts, reassembled everything, and I had a working tool circuit!
Using the hammer drill on a horizontal block wall was a challenge. Even on the lowest setting, it would bounce away from the wall. Clearly made for vertical drilling. Eventually I got the hang of it and it was making quick progress. The hole punched through and I went to the basement to inspect. The solid block had a large blowout on the inside of the wall. Crud. I think this may have been because my 1” bit is dull and the carbide is missing, so it was hammering through the wall instead of drilling. I found a place that claims they can rebuild them and will update once I have one done.
I used the rockdrill recently to drill blast holes into a granite outcropping and was impressed how well that worked.
My Pionjar gasoline powered rockdrill is about 50% faster for the same 1-1/4" diameter but also a whole lot heavier and more tiring to work with. Plus the hydraulic hammerdrill is already on the machine I use to cover the blast with dirt and then for the removal of the fragmented rock.
Disadvantage of the SEE drill is the relative short bits. This pretty much necessitates high explosives in the small and short bore holes. I used 60% NG Dynamite in the first blast and then DETA sensitized Nitromethane in little plastic bottles. Both with great success and under ATF license.
 
Last edited:

The FLU farm

Well-known member
Steel Soldiers Supporter
3,284
1,205
113
Location
The actual midwest, NM.
alpine44;2130426 This pretty much necessitates high explosives in the small and short bore holes. I used 60% NG Dynamite in the first blast and then DETA sensitized Nitromethane in little plastic bottles. Both with great success and under ATF license.[/QUOTE said:
Man, that sounds like fun. Or having a blast, if you will.
 

alpine44

Member
397
16
18
Location
Asheville, NC - Elkton, MD
Man, that sounds like fun. Or having a blast, if you will.
There is a lot of grueling work (drilling) and preparation (loading and hook-up) needed before you can flip the switch or push the button. But I have noticed that even professional blaster who do this for a living will chuckle or laugh when a shot goes off. There is something inherently satisfying about unleashing a lot of energy in a very short time frame to get a job done.

I chose this tool because it was the more efficient and economical choice compared to breaking up several cubic yards of granite with a jackhammer. Once the new tool is there and mastered, you'll find other uses (up-rooting trees for example) and wonder how you could have managed so long without it. Very similar experience to owning a FLU419 (or in your case the whole family).

BTW: The ATF agent who came to inspect my storage magazines did not hesitate for one second to leave his SUV in our driveway and join me for a ride in the SEE. Big grins were had by all.
 

The FLU farm

Well-known member
Steel Soldiers Supporter
3,284
1,205
113
Location
The actual midwest, NM.
There is a lot of grueling work (drilling) and preparation (loading and hook-up) needed before you can flip the switch or push the button. But I have noticed that even professional blaster who do this for a living will chuckle or laugh when a shot goes off. There is something inherently satisfying about unleashing a lot of energy in a very short time frame to get a job done.

I chose this tool because it was the more efficient and economical choice compared to breaking up several cubic yards of granite with a jackhammer. Once the new tool is there and mastered, you'll find other uses (up-rooting trees for example) and wonder how you could have managed so long without it. Very similar experience to owning a FLU419 (or in your case the whole family).

BTW: The ATF agent who came to inspect my storage magazines did not hesitate for one second to leave his SUV in our driveway and join me for a ride in the SEE. Big grins were had by all.
Yeah, I didn't think that the actual drilling and prep work would be all that fun. That's why I would bring a camping chair and an umbrella drink if I ever came to watch you having a blast.

Oh, and a handheld CB, just to keep you on your toes.
 

Iowaunimog

New member
11
0
0
Location
Davenport/Iowa
CB71BF61-8772-44DC-98A8-BA46105F0DEE.jpg
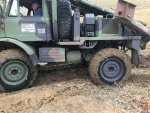
Bought two at county auction two months ago. One running and operating well, the other not running then, now running. Learning a lot and chasing down all the little issues. Great forum and great TM support. FLU Farm has been big help. Located in south east iowa. On the coast.
 
Top
AdBlock Detected

We get it, advertisements are annoying!

Sure, ad-blocking software does a great job at blocking ads, but it also blocks useful features of our website like our supporting vendors. Their ads help keep Steel Soldiers going. Please consider disabling your ad blockers for the site. Thanks!

I've Disabled AdBlock
No Thanks