• Steel Soldiers now has a few new forums, read more about it at: New Munitions Forums!

  • Microsoft MSN, Live, Hotmail, Outlook email users may not be receiving emails. We are working to resolve this issue. Please add support@steelsoldiers.com to your trusted contacts.


Artisan's M916

Artisan

Well-known member
2,762
227
63
Location
CDA Idaho
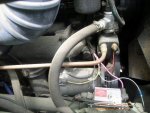
Near as I can tell the Compressor has #8 and #10 male, O-ring connections,
but you are running #8 and #12 hose to the compressor! OK well I think the
large charge-port 90 degree fitting, I think it is a reducing fitting, a fitting that is a
#12 EZ-Clip x #10 Female, O-Ring, charge-port 90. A horse of a different color.
I understand this because the system performs better w/ a larger return line.

So if you want to make the hoses go straight down I think one each of these
fittings will do the job, I ordered them, we shall see. If I am right this is really going
to clean up this installation nicely, moving the A/C hoses out from in front of
engine components and eliminating the potential for bending these charge-port
fittings while you work on the engine.


451-593
451-594

451-593.jpg
 

Artisan

Well-known member
2,762
227
63
Location
CDA Idaho
The instructions say to put the washer bottle on the PS floor
but it fits A-Ok w/o any issues on the DS of the Evap unit.
I mounted it w/ #10 x 1/2" hex self tappers.

The front-most edge of the vertical section of the bottle-bracket
touches the rear-most edge of the Evap units floor hold down
bracket and the bottom of the bottle-bracket sits down firm on the
floor mat.

Works well;


washer-fluid-bottle.jpg
 

Artisan

Well-known member
2,762
227
63
Location
CDA Idaho
As I eluded too past herein, these RD units come w/ 2 'sets' of Drier connections,
one at the condenser harness and one at the Drier harness. Electrical
issues are not a strong point w/ me but I found a very clean workaround.

Simply go to Ebay and buy one package of the Deutsch DT Series 2 Pin
connectors, just copy the part number off the empty package you
see in one of the following pictures.

You need a tiny screwdriver or like tool and a dental pick or like tool
and that is it!

First go watch this You Tube How To on Deutsch DT Series connectors;

https://www.youtube.com/watch?v=LIR9-ZdG958

Now take that knowledge and simply remove the green and black wires
from the existing 6 pin connector ends and reassemble w/ your new 2 pin
connector and you are DONE! You don't even need a crimper tool to
do this! All the pin-ends are present and built! Just disassemble and
delete the un-needed drier harness and cut in the 2 pin connector
and call it as good as store bought!

If you have a crimper certainly you can cut the wires and shorten them,
I might do that some day but for now I am going w/ it. I have a DMC AF8
crimper but I need a TH474 Turret or a whole new (preferred) HDT-48-00
tool.

Be sure to get the polarity of the wires correct so green goes to green
and black goes to black.

I have been replacing the battleship grey convoluted tubing w/ black
and it looks wayyyyyyyyyyy better. As soon as I get some black replacement
push mount cable ties I will button those wires up all tidy in hopes
of not snagging tree limbs. ( I might build an anti tree cage too)

Deutch-Topside-2.jpg Deutch-Topside-1.jpg Deutch-Topside-0.jpg

____The Removed Parts____________Tools and P/N______________Done-Deal
 
Last edited:

Artisan

Well-known member
2,762
227
63
Location
CDA Idaho
Alternator/Generator TRANSFORMER-RECTIFIER

I am not jumping into this Alternator issue head first yet but
I wanted to share and save some links I found that might be
important in the future.


CLICK HERE for info on the High Output Alternator

CLICK HERE for info on the TRANSFORMER-RECTIFIER
(If I read this right there are 3 different ALTERNATORS. 85, 105 and 130 AMP versions
but how do we tell what version TR we have OE? )
STOP, I THINK I MEANT TO SAY THE;
2500J=85 AMPS
2600J=105 AMPS
2700J=130 AMPS
...but I still ask how do we know what alternator we have?

CLICK HERE for the company that rebuilt these things in 2008
 
Last edited:

Castle Bravo

Hundredaire Socialite
Steel Soldiers Supporter
1,959
216
63
Location
Arizona
The -24P TM says its a Prestolite A001-09-0555

In your Transformer Rectifier document, it says the 85 Amp, 2500J, Negative Ground alternator is a 90555.

I haven't looked in my M916, but I'm pretty sure this is what I've got, too.

Some of the 2008 rebuild 916s (pictured) seem to have a different setup, but it probably does the same thing.
 

Attachments

Artisan

Well-known member
2,762
227
63
Location
CDA Idaho
So looks like there are indeed 3 different alternators and if you
search on Ebay for the 2700J, 130 AMP unit, you find it for $179.00
(They are all the same unit, you will see when you get to Ebay)
 

Artisan

Well-known member
2,762
227
63
Location
CDA Idaho
The -24P TM says its a Prestolite A001-09-0555

In your Transformer Rectifier document, it says the 85 Amp, 2500J, Negative Ground alternator is a 90555.

I haven't looked in my M916, but I'm pretty sure this is what I've got, too.

Some of the 2008 rebuild 916s (pictured) seem to have a different setup, but it probably does the same thing.


PER THE TM's I HAVE

The entire M916 Series of trucks uses a 5114TB TR / A001-09-0555 ALT

A M915A1 uses a 5114TB TR / A001-09-0555 ALT

The M915A2, M916A1, M916A2, M917A1 uses a 12280F VOLTAGE REGULATOR (VR) / 4626AA ALT

So looks like the smokin' TR demon was found and they switched to a ALT / VR combo perhaps.

SO now I would ask, has the ALT / VR combination ever been known to be problematic and could a guy
"perhaps" upgrade from the ALT / TR system to the ALT / VR system? Ugghhhh. Well, I guess the untimate
would be the OE TR being fixed so it never smokes if that could be figured out.

RE: The picture CB posted above;


We see I believe a Transformer-Rectifier (TR) that is mounted "divorced" from the alternator (ALT)
with cannon / amphenol type connections.

CB do you have access to that same truck to get a ALT
and TR P/N's ?

My brain hurts.
 

Castle Bravo

Hundredaire Socialite
Steel Soldiers Supporter
1,959
216
63
Location
Arizona
CB do you have access to that same truck to get a ALT and TR P/N's ?
No, but dozens, if not a hundred of those trucks are out there sold from GL and someone likely has one to get some numbers off of. My 916 looks to have the same 90555 alt that it came with in 1980.
 

Artisan

Well-known member
2,762
227
63
Location
CDA Idaho
PS Front Bubble Mirror & PS/DS Mirrors

Anyone who has driven one of these beasts will tell you quickly that the blind
spots on the PS are concerning. I added the obligatory 8" round mirrors to both
my PS and DS West Coast+ Style mirrors I that replaced new recently and
I started research on adding a decent PS very front blind spot round mirror.

My mirrors were installed upside down upon the rebuild in 2008, so when I
ordered a new PS mirror it arrived backwards, well I figured out mine
were upside down.

The center 3/8" solid round bar that is threaded on both ends
likes to rust on these and if you decide to snug things up or make adjustments
that rod just breaks, so I replaced both so I have fully functioning adjustable
mirrors, additionally the compression adjustment parts were rusted up as well.

You need some "L" brackets to add the round bubbles.

PS-Mirror.jpg

I found the RETRAC catalog (Retrac supplies the majority of MV mirrors to
the DOD) and I scanned thru it and found a triangulated leg bracket on a
KW that was VERY similar to the headlight surround on M916 fender. After
some himhawin' around I ordered one, I think it was about $65.00 or so
from FleetPride City of Industry, CA. It is Rectrac P/N 604677 .

I got it and started to fit it up and walked away flustered, the next day w/ a
clearer head I realized that there is a .4" or so dia. hole under the top of
the fender in a fender-brace. It was the perfect place. So if you do this, first drill
out that hole from below and affix the top most kick-back brace to it, then fit the
kick-back brace to the engine cowl, then fit the last hole thru the headlight
surround after you remove the headlight (do not disturb adjustment screws, just,
remove the whole bucket via the 5/16" hex head self tappers)
all the while making sure the flag pole is plumb and square to
the world. I positioned my geometry so that if I were to hit a branch it
should collapse cattycorner towards the DS rear of the truck, hopefully simply
collapsing and not tearing things up. Tighten to stout, not too tight.

All holes drilled were painted prior to assembly.

Consideration was given to the rear kick-back brace being in the way
of engine repairs, oh well, just unbolt things and move it out of the way...

PS-Front-Mirror-1.jpg PS-Front-Mirror.jpg
 

Artisan

Well-known member
2,762
227
63
Location
CDA Idaho
NOTE: Thank U Castle bravo for the P/N for the turn signal roll bars! SWEET!
(See above pics) The body of the turn signal is made out of plastic and
the 2- 5/16" thru bolts that hold the lights and roll-bars :) to the flat-fender
will go by-by quickly if it takes any kind of stout hit, but they sure look cool!
makes me feel safer to!

Which reminds me, I have a functioning roll bar swimming around my head
possibly some day for this truck. (insert over the top cool factor here)
I have done it in the past w/ halo to a tractor, it came
out simply awesome if I do say so myself. Before I started hangin' out on this
forum I was a regular over at TBN.
I was MOTM there, yes, it is/was cool... very proud of that I am to be picked
out of a pool of back then 170,000 members. The grapple I fabbed up was fun too.
The tractor is now used to haul tools, tires, oil, grease for the MV's ;-)
 
Last edited:

Artisan

Well-known member
2,762
227
63
Location
CDA Idaho
NOTES:

Just spoke to a Prestolite guy about the ALT / TR on my truck and he had no
knowledge of TR's smoking in the past. I told him what I wanted to do and what
I had and his reply as if he owned my rig was to;

Swap out the 24V Starter for a 12V

Swap in a properly sized 12V ALT like perhaps a 110-555-JHO

Swap out the 24V A/C bits for 12V, I "think" that would be the;
Condenser fans (2)
Compressor Clutch
Evap Blower Motor
( Would anything else need to be changed to make the A/C system 12V? )

Rewire batteries to 12V out everywhere.

_________________________________________________

So if the 5114TB TR only puts out xxxx Amps

So if the A/C w/ everything draws xxxx AMPS

Can we just kill the condenser fans and remove 12.4Amps from the 24V side?
Can we swap out the 24V Condensor Fans for 12V and install a manual switch?
Can we keep the 24V Condensor fans and run them off 12V?
Can we make an air scoop where the fans were?


The fan clutch is 1.7Amps
The condenser fans are 6.2A EA = 12.4Amps (I think these fans are what would fry the TR, delete them or make them run off the 12 Volt side perhaps???)
The blower motor is xxx Amps

The OE starter pulls xxAmps
 

R Racing

Active member
2,767
15
38
Location
St. Leonard, MD
Don't forget the fuel solinoid is 24v and I beleive some of the relays in the relay box . but I'll have to check I could be wrong it's been a few years since I was in mine. Lol
 

Artisan

Well-known member
2,762
227
63
Location
CDA Idaho
I am seeing that now R R , unfortunately in retrospect, but I think there
is a work around w/o huge $ someplace. I am no electrician but seems to me that
if the starter pulls lets say 15AMPS off the 24V side of the TR , it seems to me that I should have
that many 15Amps to use (so long as I do not spin the starter w/ the A/C on.

I was told the problems start when you draw more amps off the 24V side than what it puts out.

So if I turn the condenser fans into 12V and run them off the 12 volt side I might be ok.


I have a request into Prestolite asking how many amps the 5114TB TR puts out.
I have a request into Prestolite asking how many amps the M001094125 starter uses.

I need to try to figure out how many amps the A/C blower motor uses to.

Once I get these 3 numbers I might be somewhat closer.

I wish I had unlimited funds to jus hire an electrical engineer!


Now........which 24/12 V alternator that is bigger will fit in there if I have to do that!

My brain hurts again.

Gawd I wish there was a forum dedicated to just M915 Series of trucks...
 

R Racing

Active member
2,767
15
38
Location
St. Leonard, MD
Unfortunately for me mine was just enough to cook my transformer in about the first 30 min of use if not less. And man when they go. They really go !!!!! If I had it to do over again I'd buy a Comercial 12v unit for 2 reasons. 1 the power issue. 2 temperature control. The military units are off or on . So your either freezing or burning up lol . Having a window down does help some lol.some guys on here have been lucky and had no issues. I wasn't 1 of them. The reason the starter doesn't really come into the equation is the starter isn't really turning much time while the gen and transformer are charging if that makes sence. They are just used to keep the batteries topped off and not anything else other than fuel solinoid .
 

Artisan

Well-known member
2,762
227
63
Location
CDA Idaho
NOTES;

5-11. BATTERY CHARGING CIRCUIT.
a. Description. Charging of the batteries is accomplished by a 14-volt, 85-ampere, self-load
limiting alternator with an integral transformer rectifier providing 24 volts for the cranking batteries
and 12 volts for other vehicle electrical loads. This system uses two sets of 12-volt batteries in series
to provide 24 volts for cranking. The cranking batteries are charged by the transformer rectifier unit,
and as the load demand on these batteries is cranking only, the 15 amperes available from the transformer
rectifier’ is more than sufficient for this application. As the cranking batteries become charged,
the output current gradually drops to approximately one ampere when the terminal voltage of the
battery reaches 13.8 volts (adjustable). The charging circuit is shown in figure 5-28.

Charging-Circuit.jpg


2. RELAY (K6). Normally open contacts; energized by 12-volt power from operation lamp

switch when in NORMAL and headlamp switch is in on position. When relay is closed,

24-volt power is applied to trailer tail lamps, through circuit breaker and tractor receptacles.

3. ClRCUIT BREAKER (CB-8). Protects electrical components of 24-volt relay circuit by

opening when load exceeds 20 amps. Automatically recycles until overload is removed.


2. RELAY (K6). Normally open contacts; 12-volt power energizes relay when operation

light switch is in NORMAL and headlamp switch is ON. When contacts of relay close, 24

volts from circuit breaker CB-8 is supplied to tractor chassis receptacles.

3. ClRCUIT BREAKER (CB-8). Protects electrical components for 24-volt tractor receptacle

circuits by opening when load exceeds 20 amps, Automatically recycles until overload is removed.

4. 24-VOLT TRAILER RECEPTACLE (M915, M916, M917, and M920). 12-pin connector
for 24-volt power used for Iunette-towed vehicles.

OK so we have 15Amps on the 24V Side from the TR.


Artisan

Well-known member
2,762
227
63
Location
CDA Idaho
NOTES:

Here is the Amperage draw for the 3 items (are there more?) that use 24V power in the RD-2-4530-0 kit;

Condenser Fans (2) = 6.2Amps EACH = 12.4AMPS
Evaporator Blower Motor = 14.5AMPS
Compressor Clutch = 1.7AMPS
+________________________________________
Total Amperage Draw = 28.6AMPS

There is a 30 AMP breaker on the PS of the Evap Box FWIW.
 

R Racing

Active member
2,767
15
38
Location
St. Leonard, MD
Well I'm not sure I'm reading all right but from my notes and such I think the limitations of the transformer is 15 amps please correct me if I'm wrong. Actually my notes say 18 amps but that's close . They must have upped the alternators and transformer on the trucks with ac I'm guessing. If I get some time I'll if you guys, want share with you the mods I made to get mine to work. I don't want to hijack the thread .
 
Top
AdBlock Detected

We get it, advertisements are annoying!

Sure, ad-blocking software does a great job at blocking ads, but it also blocks useful features of our website like our supporting vendors. Their ads help keep Steel Soldiers going. Please consider disabling your ad blockers for the site. Thanks!

I've Disabled AdBlock
No Thanks