• Steel Soldiers now has a few new forums, read more about it at: New Munitions Forums!

  • Microsoft MSN, Live, Hotmail, Outlook email users may not be receiving emails. We are working to resolve this issue. Please add support@steelsoldiers.com to your trusted contacts.


Schutt Industries 1CSL0-SLC-T-1000 Self Loading Trailer

Artisan

Well-known member
2,762
227
63
Location
CDA Idaho
Has anyone installed a 3 Light ID Bar on the back like is required for
trucks and trailers over 80" wide, that these trailers do NOT have?

Has anyone installed a locking device for the almost $1000.00 spare tire yet?

I am working on both, the lights I want anti-smash protection. I am thinking about
3 separate Truck-Lite LEDS w/ Anti-Smash protection all screwed to a bracket
so there is only one hole needed to be drilled for the wires then two smalls
for mounting.

I may have kits for both if you guys are interested.
 

painter paul

Member
181
1
18
Location
Fairbury, Ne
I believe one can mount the 3 lights in the center of the rear cross member, in between the taillights and rollers and they will be sufficiently protected. I unhooked one of my front latch switch plug in connectors and the bed works great. Wow it literally jumps up. Must have a reduced size office designed into the down function to slow the descent for safety.
Does anyone know how the latch switches function?
Mine looks to have a red led light in it????
If you haven t looked at your upper switch panel closely look up and find the 3 little led night lights. Abundance of cool!
Still no go on my work lights!
My solargizer/charger has enough power restored to my batteries to start it. Wow.... 5 year old Interstates that probably sat dead for over 3 years!
Working on my deck plans now. Thanks, Paul
 

Radiogeek99

Just Another Guy
Steel Soldiers Supporter
113
54
28
Location
Homer Glen, IL
What are you guys thinking about for decking the trailer? I am thinking about 1/2 inch aluminum plate about 24 inches wide up against the existing rail for the container and leaving the middle open for access. I am worried about adding too much weight and lowering the amount of weight it can carry.
 

Artisan

Well-known member
2,762
227
63
Location
CDA Idaho
RE: 3 Light ID Bars

Looks like Truck-Lite has some hidden parts. These bars have anti-smash bars top and
bottom to help protect them from dirt when the trailer is tipped up.

The 12 Volt is an Aluminum bar part number 35740R 17” bar or 35741R 23” bar.

The 24 Volt is a 35749R at 17" , I think all are black w/ red LED's.

Has anyone checked, what do we have back there? 12V or 24V ?


I thought about drilling a stud but decided to make a crossbar out of 1/2"
Aluminum w/ a center bracket made of .25" steel welded in, then a padlock.
I have it drawn in CAD and it will get cut when I do my front and rear decks.


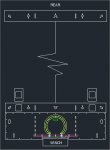
VERY FRONT

My very front will be aluminum w/ a round, aluminum hinged access panel. The
yellow part of the access panel will be .25" steel. On the far left and right are
GUIDE stowage holes. I will be able to use the supplied wrench and tighten them
to the deck and where the side slot drops thru the deck I will drill a hole in it
and padlock them down. (That part of the deck will NOT take big weight guys)
Then left and right of the access hole you see some rectangles, thus keyways
are where I will weld vertical aluminum bulkheads to make it stronger and
help seal off the storage box underneath. The hinge is 1" solid bar stiffening
things up more.

VERY REAR
This plate is all steel w/ banjo slots for chains and a place to weld some additional
backing over the frame rails. I plan on massaging the steel just a little underneath
to make the chains less likely to get cut by the slots.

MIDDLE FRONT
This plate is all steel w/ banjo slots for chains and a place to weld some additional
backing over the frame rails. I plan on massaging the steel just a little underneath
to make the chains less likely to get cut by the slots. There are two square holes
left and right where I will be able to mount my removable LMTV LMHC
(Light Material Handling Crane) which will be powered from the slave port on
the Perkins.

Today I made a metal box under that access panel where I can stow the winch
bridle and I can stow all my chains and straps as well. There are lots of little
parts not shown, the hinge loops and hinge pins lock rings. The steel deck parts
will be welded to the trailer and the aluminum part will be screwed just like the
rails.

I too am looking real hard at Aluminum. It is either that or make planks that
are easily removed so I can use the trailer as intended for containers.

It probably will not "jump up" w/ a load on and yes I am sure the way down
is restricted for safety. Once you put 15,000 pounds on it, it will have a
lot of gravity pulling it down to earth!

I am gettin' excited here! I sent drawings for some test banjo fittings to
the water-jet cutter today along with a file to cut a part so I can hang
a 5 gallon Jerry can of fuel on the trailer opposite the spare tire. These
things are sweet!

front-rear-deck-schutt.jpg
 
Last edited:

Artisan

Well-known member
2,762
227
63
Location
CDA Idaho
The latches that hold the deck down when driving have little sensors
in them wired to the controls. They disallow the bed to tilt up unless
the latches are OPEN. They do work on mine. If you think you see
a red light, on the deck latches at the top where the loop latches onto
I think that is the sensor.

I have not tried the work lights yet. Did you try w/ the genset running?
Did you try w/ the trailer plugged into the truck (that is probably the ticket)

I got to get my Solargizer connected...!
 

Artisan

Well-known member
2,762
227
63
Location
CDA Idaho
I figured out how to get the rear work lamps to work.
There neat, they are RED or WHITE LED's.

Tell ya what, I will reveal the secret if someone finds WHERE
to buy these light assemblies. The light assemblies themselves
are kinda fragile or maybe the flood got to them. Some worked
on the left, others worked on the right and when I touched
one of them less lens it feel apart.

I see these numbers on the lights;

GROTE #9040 (On the lens )

#8238 MADE IN CANADA #081024 (ON THE BACK)
 

Artisan

Well-known member
2,762
227
63
Location
CDA Idaho
I guess no one is interested...

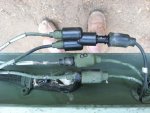
Here is how to make your rear Red/White work lights work.

At the very rear of the trailer on the PASSENGER SIDE there is
a cluster of electrical connections tie wired up. Look and you
will see one FEMALE PLUG is not connected to anything.
Alls you have to do is heat up that Empty Connector.


Now understand when I say FEMALE CONNECTOR I am talking
about what is INSIDE the rubber, NOT what is on the outside.
The outside of a female military connector is actually a MALE rubber.


Just use a Y and a double adaptor, I think all are available from
Ericks Mil Supplys

I "think" the hot wire was #21

When you look at this picture the front of the trailer is the top,
the right of the picture is the passenger side of the trailer.

schutt-work-light-wiring.jpg
 

Artisan

Well-known member
2,762
227
63
Location
CDA Idaho
Guys are any of you well versed enough in Metal to tell me exactly
how to spec out the 4" T x 1.5" W x .xx Thick pieces of channel
that are used as deck crossmembers? I want to find that material
EXACTLY. It has a taper that starts at about an 1/8" or so and expands
all the way to web if I am calling it that right. I want the same EXACT stuff.

I just confuses the heck to of me as to how to order the EXACT same stuff!
 

quickfarms

Active member
3,495
22
38
Location
Orange Junction, CA
Guys are any of you well versed enough in Metal to tell me exactly
how to spec out the 4" T x 1.5" W x .xx Thick pieces of channel
that are used as deck crossmembers? I want to find that material
EXACTLY. It has a taper that starts at about an 1/8" or so and expands
all the way to web if I am calling it that right. I want the same EXACT stuff.

I just confuses the heck to of me as to how to order the EXACT same stuff!
If it is a standard channel they are speced by weight per foot or web thickness.

http://www.engineeringtoolbox.com/american-standard-steel-channels-d_1321.html
 

PATRIOT1

Member
88
0
8
Location
Southeastern Ohio
I want to really thank Artisan, aheilmann68 and Rusty Nut for taking the time to share their findings. Because of you guys, I was able to replace the starter (after filing from a new one), and rework the fuel pump (instead of rebuild or replace), and it started right up yesterday! These Perkins are strong-running motors!

The winch works perfectly but, alas, the hydraulics to the bed lift do not... I did unlatch the two forward hold-downs, but no luck. I am still re-reading through the 2nd half of these posts, and I may find my answer here. This is quite the excellent resource. Thanks guys, again!
 

Artisan

Well-known member
2,762
227
63
Location
CDA Idaho
Make sure you pull the bed latches AWAY from their cradles, there
is a little proximity switch that disables you from going BED UP unless
the latches are completely moved out of the way. I would follow those
proximity switch wires and look for a smashed wire too.

Try w/ the remote and w/o, and you prob need a new battery in the remote as well.

Additionally if you are standing on the PS of the trailer in front of the motor
w/ the door removed, right there on the PS front inside the box there are wire looms w/
connectors. Make sure those connectors are all good and seated. I had one that was
not seated and just fell apart when I wiggled it.

The oil pressure has to build up before these motors will start, it needs to come up to
6PSI if I remember right before the engine will start. That is why it starts much faster
after running for even just a few seconds, because the oil pressure is already up. If
you disconnect that oil sensor it starts immediately but not advised...
 

PATRIOT1

Member
88
0
8
Location
Southeastern Ohio
Hey Artisan,
Also, for the work lights... I could not find the "Y" double adapter at Erik's. Any chance you can tell me/link to where you got that part? Many thanks!
 

PATRIOT1

Member
88
0
8
Location
Southeastern Ohio
It works! I got the bed up with no problems after I took off the sensor plug (oddly, it only took the starboard side to do it) out. And thank you again, Brad (Artisan)! You are truly a generous contributor here!
 

Artisan

Well-known member
2,762
227
63
Location
CDA Idaho
Sweet! Another piece of military history lives! Ha! Fun Stuff indeed!
The first time you see that bed rise is something you will remember!

Say did you ever get all the info, model numbers and parts numbers and
etc etc for the axles, brakes, air bags, etc so we can hammer the manufacturer for how to's etc et al
and have our ducks in a row for WHEN, not if but WHEN, we have to service brakes
and axles and air bags? (wink-wink) ;-) I think you know who has the stuff yes?

I have not bothered them.
 
Top
AdBlock Detected

We get it, advertisements are annoying!

Sure, ad-blocking software does a great job at blocking ads, but it also blocks useful features of our website like our supporting vendors. Their ads help keep Steel Soldiers going. Please consider disabling your ad blockers for the site. Thanks!

I've Disabled AdBlock
No Thanks