• Steel Soldiers now has a few new forums, read more about it at: New Munitions Forums!

  • Microsoft MSN, Live, Hotmail, Outlook email users may not be receiving emails. We are working to resolve this issue. Please add support@steelsoldiers.com to your trusted contacts.


The Long Road

Valence

Well-known member
Steel Soldiers Supporter
2,131
605
113
Location
Davis County, UT
Title of this thread is typical of most of my undertakings - the long way of doing things. I think I fuss to much over the details when it really doesn't matter, won't be noticed, or could have done it a simpler way but I just didn't know any better!

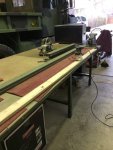
I was going to wait to post all this once I got my troop seats installed, but I've been too thrilled with the outcome of painting the wood of the troop seats.

Last August (2013) I spent about 6 hours disassembling everything and learned (after I had to cut off 4 very rusted bolts) that the impact wrench was my friend.

So here is a few shots showing the deteriorated wood/paint/uprights and disassembly.

ImageUploadedByTapatalk1399373916.729655.jpgImageUploadedByTapatalk1399373926.832501.jpgImageUploadedByTapatalk1399373854.396484.jpgImageUploadedByTapatalk1399373958.910329.jpgImageUploadedByTapatalk1399374012.331613.jpgImageUploadedByTapatalk1399374021.672622.jpg
 
Last edited:

Valence

Well-known member
Steel Soldiers Supporter
2,131
605
113
Location
Davis County, UT
Then came the long process of sanding that I started with a belt sander (40 grit) and a very poor hand electric sander. I spent about an hour on each board to get the paint off. After the initial roughest sanding I finally invested in a Dynabrade pneumatic sander like I have used before. Was able to sand all the boards twice more (80 then 120 grit) in a single day. Beautiful.

I realize it would have been a lot quicker, and heck, probably cheaper to buy new boards. Well, I might as of yet have no (or little) knowledge/experience with metal working, but from my time working in the cabinetry industry, wood, glueing and sanding I know! Also I didn't want to just chuck the wood, I felt it was still good, with proper care and glue, lots of glue and clamping.

ImageUploadedByTapatalk1399374638.891246.jpgImageUploadedByTapatalk1399374669.660124.jpg

Nearly every end of every board was split and cracked. A couple broke out sections from the carriage bolts being sunk so deeply. I love those Irwin hand clamps!

ImageUploadedByTapatalk1399374738.293120.jpgImageUploadedByTapatalk1399374753.194249.jpgImageUploadedByTapatalk1399374764.111998.jpgImageUploadedByTapatalk1399374835.835631.jpg
ImageUploadedByTapatalk1399374848.002464.jpgImageUploadedByTapatalk1399374870.638409.jpgImageUploadedByTapatalk1399374890.840336.jpg
 

Attachments

Last edited:

Valence

Well-known member
Steel Soldiers Supporter
2,131
605
113
Location
Davis County, UT
In the mean time one of my brother hooked me up with the industrial sand blaster at his work. Took care of all 10 uprights.

The thing was way cool, used little graphite beads.

ImageUploadedByTapatalk1399375332.628923.jpgImageUploadedByTapatalk1399375351.481838.jpgImageUploadedByTapatalk1399375364.663257.jpgImageUploadedByTapatalk1399375376.327230.jpgImageUploadedByTapatalk1399375395.797377.jpg

As a payback , I helped him acquire and unload his new MEP-701. ;^D

ImageUploadedByTapatalk1399375473.638537.jpgImageUploadedByTapatalk1399375482.589565.jpg
 
Last edited:

Valence

Well-known member
Steel Soldiers Supporter
2,131
605
113
Location
Davis County, UT
Another of my brothers introduced me to Alex Shepherd, owner and operator of Cache Valley Coating. Great guy. He finished up the sand blasting of the troop seat legs and powder coated everything. (Color number: Fed 34094 Green)

I had a hard time deciding whether or not to refinish them too - their CARC was still in good condition, minus fading and some scratching. But in the end I thought it was best now instead of later - and everything would match and age together.

ImageUploadedByTapatalk1399375780.943005.jpgImageUploadedByTapatalk1399375890.027654.jpgImageUploadedByTapatalk1399375877.616789.jpg
 
Last edited:

Valence

Well-known member
Steel Soldiers Supporter
2,131
605
113
Location
Davis County, UT
Finally the day came to actually paint this big wood working project.

As a one man show with a single 3" roller it took me about 1 hour to do a surface or edge. Worked out perfect for the paint drying time. Two surface coats, one on the edge, flip the wood over and repeat. Took me about 5 and 1/2 hours for the two coats of primer, followed by a half hour of clean up. I let the primer dry overnight followed by the green the next morning.

The texture is awesome, smooth, yet flat paint, and already feels so strong and durable well before the full week cure!

I'm doing the happy man dance at just how awesome the restored wood is. It's all been worth it!

The one mistake I made is I wish I had put something between the wood and the saw horses, as the paint was still a little soft, even if dry. The saw horses left some marks but it'll be okay.

Still, God has blessed me well for how it has turned out so far!

ImageUploadedByTapatalk1399376301.642273.jpgImageUploadedByTapatalk1399376309.474028.jpgImageUploadedByTapatalk1399376327.812311.jpgImageUploadedByTapatalk1399376368.381423.jpgImageUploadedByTapatalk1399376345.012572.jpgImageUploadedByTapatalk1399376378.001960.jpgImageUploadedByTapatalk1399376385.850900.jpgImageUploadedByTapatalk1399376395.738199.jpg
 
Last edited:

Valence

Well-known member
Steel Soldiers Supporter
2,131
605
113
Location
Davis County, UT
Thank you very much. I most certainly will.

At the moment I'm experimenting on with some spray on plasti dip to help protect the nicely powder coated uprights once in the deuce bed slots. Only testing on one upright at the moment. (It shouldn't be visible if I don't like it.)

Maybe the layered rubber coating will help dampen their rattling around too? Time will tell.

ImageUploadedByTapatalk1399379672.111894.jpgImageUploadedByTapatalk1399379680.334675.jpg
 

Carlo

New member
1,364
20
0
Location
palazzago italia
Thank you very much. I most certainly will.

At the moment I'm experimenting on with some spray on plasti dip to help protect the nicely powder coated uprights once in the deuce bed slots. Only testing on one upright at the moment. (It shouldn't be visible if I don't like it.)

Maybe the layered rubber coating will help dampen their rattling around too? Time will tell.

View attachment 491946View attachment 491947
Live used that rubber coating and had good results. I even used it as under cab protection. Nice work!
 

M35A2-AZ

Well-known member
Steel Soldiers Supporter
3,213
381
83
Location
Tonopah, AZ
I just redid a set of troop seats on my deuce so I know how much work it was. Very nice job!!
When you get the powder coat number could you post it?
 

Valence

Well-known member
Steel Soldiers Supporter
2,131
605
113
Location
Davis County, UT
I just redid a set of troop seats on my deuce so I know how much work it was. Very nice job!!
When you get the powder coat number could you post it?
Fed 34094 Green

ImageUploadedByTapatalk1399515674.354570.jpg

So far that original 5 lb bag has powder coated all 10 bow corners, all the troop seat hardware, a license plate mount, and a few other misc brackets and parts and I still have that much left. A crooked place in Ogden, UT tried to tell me to powder coat the troop seat hardware I'd need to pay for 25 lbs of powder coat.
 
Last edited:

Valence

Well-known member
Steel Soldiers Supporter
2,131
605
113
Location
Davis County, UT
I decided to go ahead an invest the time in putting the plasti-dip spray on all the up rights.

For the troop seats I covered 2" from the bottom and 1" below the center "collar" - or whatever that bracket welded to the center is called - most importantly including the underneath side because that's where it rests on top of the bed side.

It was not difficult, but a bit time consuming to mask off, spray several times (about 3-4 heavy coats) then gently cut with a razor blade when I pulled the tape off. Without cutting the plasti-dip, it would pull up when I removed the masking tape.

Took just over 1 spray can of plasti-dip and about 2/3 to 3/4 of a role of masking tape (counting the one upright that I had experimented on previously).

ImageUploadedByTapatalk1399950222.412252.jpgImageUploadedByTapatalk1399950231.289665.jpgImageUploadedByTapatalk1399950239.976175.jpgImageUploadedByTapatalk1399950246.721599.jpgImageUploadedByTapatalk1399950256.135143.jpgImageUploadedByTapatalk1399950264.467133.jpgImageUploadedByTapatalk1399950272.482905.jpgImageUploadedByTapatalk1399950293.248942.jpg

Not seen are the two headache rack center posts. I'm waiting to spray those for when I have the headache rack all reassembled because since they don't rest on any thing (they just hang in the front holes) I'm not 100% sure where to spray them at. However, that'll make them significantly more awkward to spray at that point so I may try to figure it out ahead if time.
 
Last edited:

Valence

Well-known member
Steel Soldiers Supporter
2,131
605
113
Location
Davis County, UT
Just in Ace Hardware, looks like I could have avoided the black Plasti Dip and had a much more closely matched color!

Oh well, what's done is done and it won't be seen anyway.

ImageUploadedByTapatalk1400199249.039064.jpg
 

Valence

Well-known member
Steel Soldiers Supporter
2,131
605
113
Location
Davis County, UT
I finally wised up about where to put the plasti dip on the two non-load bearing posts for the headache rack. I thought to myself: "Self, well the top of them should be level, regardless of the length."

22 1/8" down from the top.
Bingo.

That's again 2" strips

ImageUploadedByTapatalk1400434012.462842.jpgImageUploadedByTapatalk1400434028.943008.jpg
 

Valence

Well-known member
Steel Soldiers Supporter
2,131
605
113
Location
Davis County, UT
I saw another fellow on here who had painted all the metal (uprights, legs etc) black. I liked the look do I decided to paint my bolts black.

It's just rattle can but looks good.

On the down. side I didn't realize that the tolerances were so tight on the fat bolt attaching the legs to the seat support bracket. I'm sure the powder coat on the metal exasperated the problem. My thought had been since the whole bolt will be visible to paint its shaft too. Wrong idea. I guess I could have tried removing the paint from the bolt but I was just too tired with it and just wanted the seats together. I used a rubber mallet to force the suckers in (peeling off the paint). I did that first on the thick seat bracket so it wouldn't bend the thinner loops at the top of the legs.

ImageUploadedByTapatalk1400434139.093123.jpgImageUploadedByTapatalk1400434146.022487.jpgImageUploadedByTapatalk1400434572.326031.jpgImageUploadedByTapatalk1400434583.244913.jpg
 
Top
AdBlock Detected

We get it, advertisements are annoying!

Sure, ad-blocking software does a great job at blocking ads, but it also blocks useful features of our website like our supporting vendors. Their ads help keep Steel Soldiers going. Please consider disabling your ad blockers for the site. Thanks!

I've Disabled AdBlock
No Thanks