• Steel Soldiers now has a few new forums, read more about it at: New Munitions Forums!

  • Microsoft MSN, Live, Hotmail, Outlook email users may not be receiving emails. We are working to resolve this issue. Please add support@steelsoldiers.com to your trusted contacts.


Bonedoc's M35A2 modification thread

bonedoc

New member
502
1
0
Location
Bangor, PA
Happy Father's Day to all the Dads out there.

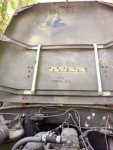
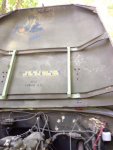
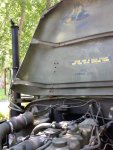
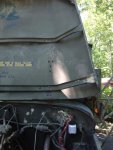
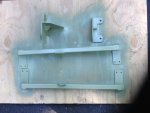
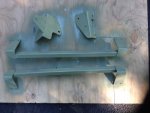
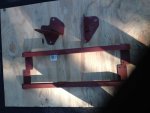
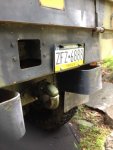
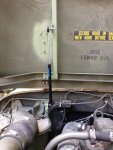
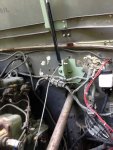
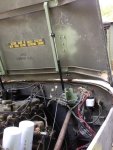
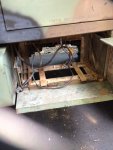
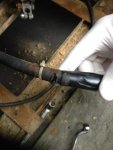
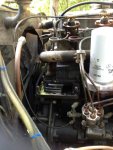
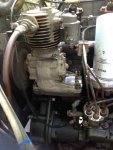
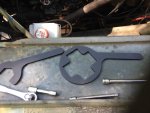
Got some things done today. Removed my compressor to replace the base gasket. I had intended on removing the compressor mount as well and replacing that gasket also but there is one bolt down under the mount that I found I could not access as the injector pump and the front of the motor block access to it so I left it and just did the compressor base gasket. Have to say, not a difficult job but some of those bolts are very tight to get with big hands but it went smoothly otherwise, glad I bought a compressor wrench set, definitely came in handy.
 

Attachments

bonedoc

New member
502
1
0
Location
Bangor, PA
Also started to install my hoodlift kit from SS member BBQROD. Have to say the kit is very well built and everything fit perfectly or rather the pieces I installed today did. Here are some pics of the pieces bfore and after paint, then installed.

I will have the other parts installed and the kit completed another day, unfortunately I didn't have an extra set of hands to hold the incab sides of the bolts.
 

Attachments

bonedoc

New member
502
1
0
Location
Bangor, PA
Got them from a vendor on Ebay. Was $35.00 for the set but they worked great. It was the first time I had ever done the air compressor and the belt. A bit interesting tightening up that pulley for the belt, took a couple tries to get it right. Having the wrench set was a big help. I'm sure I could of done it with an adjustable wrench or pipe wrench, this one was a perfect fit and made the job a bit easier.
 

Valence

Well-known member
Steel Soldiers Supporter
2,135
605
113
Location
Davis County, UT
The eBay compressor wrenches could be the same SteelSoldier's member (I don't know) but there's an ad in the SS classifieds for longer handled ones by comdiver. Same fellow I bought mine from (older style) 3+ years ago.
 
Last edited:

Valence

Well-known member
Steel Soldiers Supporter
2,135
605
113
Location
Davis County, UT
Also started to install my hoodlift kit from SS member BBQROD. Have to say the kit is very well built and everything fit perfectly or rather the pieces I installed today did. Here are some pics of the pieces bfore and after paint, then installed.

I will have the other parts installed and the kit completed another day, unfortunately I didn't have an extra set of hands to hold the incab sides of the bolts.
What paint did you use? I have some "light forest green", just like this:
http://amzn.com/B008I6WKNS

But I find it far too light colored to match the "383 Green". Usually end up just using the Krylon Olive Drab. Your color looks like it matches better in the photos.

---
A second person sure makes it go a lot faster. I put masking tape on the nuts inside the cab, this made it a tight fit for the wrenches and they "stayed" on while I was in the engine compartment turning the bolt head. Only 1 of them gave me a problem (lower bolt on the air cleaner) where I had to swap sides and tape the wrench in place under the hood with me in the cab.

It was definitely a poor use of time (takes forever) but better than me not being able to get anything done alone.

The part I found the most difficult (possibly dangerous) was attaching the gas lifters to the hood as you have to hold the weight of the hood while needing both hands - 1 to put the nut on the gas lifter, the other to hold the torx (I think it was like a size 17) attached to the gas lifter. I used bungee cords to hold the hood, I only needed to pull it down some to get it where I wanted. Probably was not the best move ever.
 
Last edited:

peashooter

Well-known member
1,039
204
63
Location
Hanover, minnesota
What paint did you use? I have some "light forest green", just like this:
http://amzn.com/B008I6WKNS

But I find it far too light colored to match the "383 Green". Usually end up just using the Krylon Olive Drab. Your color looks like it matches better in the photos.
.
I've been getting lots of the Rapco 383 green both in spray cans and gallons over the last couple years. Here is the link on the off chance you weren't aware of it... the match is perfect and the price is good. http://www.rapcoparts.com/manuals.html
 

bonedoc

New member
502
1
0
Location
Bangor, PA
The eBay compressor wrenches could be the same SteelSoldier's member (I don't know) but there's an ad in the SS classifieds for longer handled ones by comdiver. Same fellow I bought mine from (older style) 3+ years ago.

I wish I had known. Would of rather of supported a member than an Ebay vendor.
 

bonedoc

New member
502
1
0
Location
Bangor, PA
What paint did you use? I have some "light forest green", just like this:
http://amzn.com/B008I6WKNS

But I find it far too light colored to match the "383 Green". Usually end up just using the Krylon Olive Drab. Your color looks like it matches better in the photos.

---
A second person sure makes it go a lot faster. I put masking tape on the nuts inside the cab, this made it a tight fit for the wrenches and they "stayed" on while I was in the engine compartment turning the bolt head. Only 1 of them gave me a problem (lower bolt on the air cleaner) where I had to swap sides and tape the wrench in place under the hood with me in the cab.

It was definitely a poor use of time (takes forever) but better than me not being able to get anything done alone.

The part I found the most difficult (possibly dangerous) was attaching the gas lifters to the hood as you have to hold the weight of the hood while needing both hands - 1 to put the nut on the gas lifter, the other to hold the torx (I think it was like a size 17) attached to the gas lifter. I used bungee cords to hold the hood, I only needed to pull it down some to get it where I wanted. Probably was not the best move ever.
Thanks for the heads up I'm looking at finishing it up with my sons this morning. The paint is Rustoleum 'camouflage' rattle can paint. I'll get the number off of it. It did match some of the lighter spots very well. I wasn't to worried about a perfect match as the truck does have a paint job coming in the future, I mainly wanted the primer red covered.
 

bonedoc

New member
502
1
0
Location
Bangor, PA
Here is the paint can of the paint I used. Didn't get to finish my hood lift today. Plan on Thursday a.m. Degreased my motor undercarriage a bit and installed my lighted license plate holder from those military guys. Will get pics later. ImageUploadedByTapatalk1403034028.625145.jpgImageUploadedByTapatalk1403034047.183135.jpg
 

bonedoc

New member
502
1
0
Location
Bangor, PA
Also finished my hood strut kit as well. Kit works very well and is solid. While I had my glovebox out I cleaned it up, gave that a fresh coat of paint, new stainless screws and gaskets on the box and the door. It is nice to have my door stayed closed now while driving.
 

Attachments

Pugsley

Member
92
4
8
Location
NW Indiana
How did the hood struts work out? I was thinking of doing something similar but instead using some pneumatic cylinders and a valve at the front of the truck to help lift the hood.
 

bonedoc

New member
502
1
0
Location
Bangor, PA
How did the hood struts work out? I was thinking of doing something similar but instead using some pneumatic cylinders and a valve at the front of the truck to help lift the hood.
I like it. It is very easy to use, works very smoothly. I don't let it go up on its own as I feel doing that regularly would damage things. I will go up fast if you let it go so I either use the cable that came with it to open it smoothly or get up on the bumper and guide it up. It doesn't open as wide as when you set it back onto the cab but for most maintenance items it is plenty fine and if you did have something where you needed to have it open more it would take only a quick moment to disconnect it from lower mounts and lay it back on the hood.
 

bonedoc

New member
502
1
0
Location
Bangor, PA
Oh, So they are strong enough to lift the hood themselves. Ill have to look into doing something similar.

Yeah, they are pretty much just like what you would find on any automobile or truck. When the hood is closed and you initially unlatch it they are pretty weak, a little lift and they start to raise the hood but they get stronger and faster as they open further and the angle give them a better mechanical advantage. I wouldn't let it fly up on its own....definitely hits it full open position with force and abruptness.
 

bonedoc

New member
502
1
0
Location
Bangor, PA
Well took the deuce out to Lowes, about a 45 minute plus ride each way today and showed the significant other that it is useful plus great exercise for the deuce....lol. Picked up some 1x4x12 pressure treated and new stainless steel hardware. My troop seats are all fiberglass except for 2 boards that were on top on the passenger side. They were badly rotted and falling apart. Removed the top 2 boards on both sides and placed one fiberglass on each side and did the top one in wood on each side so they will match. Cut and ripped the 1x4x12 to the right dimensions and then used the fiberglass one for each side as a template and drilled the holes. Then everything was reinstalled with new stainless hardware. Pretty simple fix with the worst part being the removal of the old hardware. ImageUploadedByTapatalk1404091198.293773.jpgImageUploadedByTapatalk1404091208.331930.jpgImageUploadedByTapatalk1404091218.049891.jpgImageUploadedByTapatalk1404091228.449937.jpg
 

bonedoc

New member
502
1
0
Location
Bangor, PA
Well finally got started on my battery box and storage box. Cleaned out the driver's side storage box, it is actually in good shape, all ready for primer and paint. The battery box was another story. I had planned on re-doing my box from the get go because it was not securely set up plus I wanted to add a battery disconnect. I had found a battery box set up done by SS member Peashooter and that was exactly what I wanted to do. Pulled the box out and it was rusted and rotted pretty bad. Thanks to Mike at Big Mike's Motor Pool I have a replacement on its way. It is a used plastic battery box in really good shape, my original was obviously metal, so hopefully there isn't a lot to change in the compartment to accommodate the different latch system of the plastic box. If anyone knows I'd really appreciate the head's up.
Anyway my cables appeared in decent shape, there are a couple of nicks in the insulation that I'm going to tape good and them wrap all the cables in plastic wire loom for further protection. Also installing new terminals and terminal covers. The whole compartment is going to be ground down/needle scaled to clean it up, then primed and painted before the new box goes in.
Also ordered new front shocks for my Deuce as well. Ordered Monroe 34787, these have the 1/2" stud like the military issued ones.
 

Attachments

Top
AdBlock Detected

We get it, advertisements are annoying!

Sure, ad-blocking software does a great job at blocking ads, but it also blocks useful features of our website like our supporting vendors. Their ads help keep Steel Soldiers going. Please consider disabling your ad blockers for the site. Thanks!

I've Disabled AdBlock
No Thanks