• Steel Soldiers now has a few new forums, read more about it at: New Munitions Forums!

  • Microsoft MSN, Live, Hotmail, Outlook email users may not be receiving emails. We are working to resolve this issue. Please add support@steelsoldiers.com to your trusted contacts.


Bonedoc's M35A2 modification thread

bonedoc

New member
502
1
0
Location
Bangor, PA
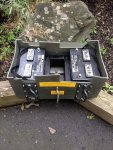
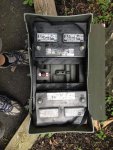
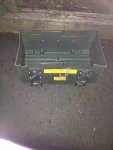
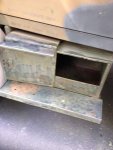
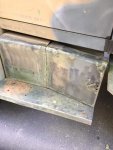
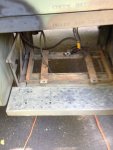
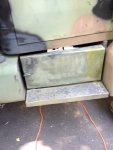
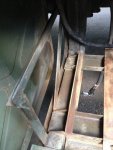
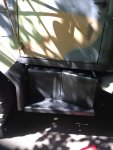
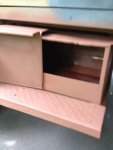
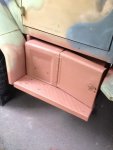
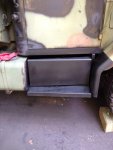
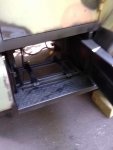
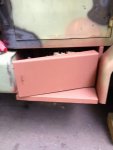
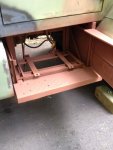
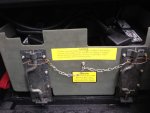
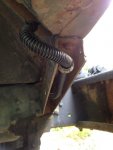
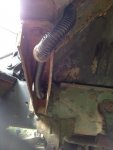
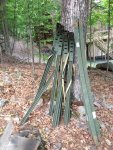
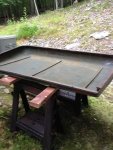
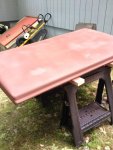
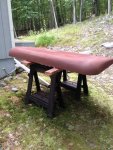
There is the typical surface rust issues but fortunately no other rot that I have found. In this case it was just the box, the area where the box goes is very solid, just has surface rust.
 

Valence

Well-known member
Steel Soldiers Supporter
2,131
605
113
Location
Davis County, UT
I'll definitely be interested in how that plastic battery box fits with the different latch system - I've always wondered...

bonedoc, what kind of tires did you choose (or where already there) on your truck? Any rubbing issues on the front when making "sharp" turns? Do you carry a spare in the bed, or no?

I'm in the process of considering and weighing the options of the 49 in. "395's" vs ability to put tire chains in the rear, carry a spare etc.
 
Last edited:

bonedoc

New member
502
1
0
Location
Bangor, PA
From what I've seen the difference in boxes appears to just be the latches. The steel box uses latches that are bolted to the box mount and they swing up and then there are T-shaped bolts that lock the latches into place. The plastic box doesn't use those, which is no biggie as they easily un bolt from the mount on the truck. The plastic box uses a slide bolt that is mounted on the box and drops into a hole/slot in the mount. I haven't received my battery box, will be here today, but it looks like I'll just have to drill a hole in the mount for each slide bolt and that is it.
As for the tires, I have the Goodyear MVTs. I have no rubbing issues but I will say my truck turns much tighter to the left than to the right. That is one thing I need to look into, I'm assuming the steering stop is adjusted out further on the right but still need to crank it to that side and get out and inspect to see why, it may have just never been adjusted or it may have been to prevent a rubbing issue. I carry a spare in the bed but the previous owner, FORD MECHANIC fabbed up and installed a removable hoist for the bed to get it in and out.
Now that the rain...and humidity have stopped for a few days, hopefully I'll get everything cleaned up, primed, and painted over the next few days.
 

bonedoc

New member
502
1
0
Location
Bangor, PA
Okay, Well got my battery box and fabbed up a wood system to secure the batteries and hold my disconnect switch. I did mine similar to SS member Peashooter's battery box. It worked out very well. The difference between the plastic and metal box was an easy fix and required just drilling 2 holes in the end of the flat brackets that the box slides on.
 

Attachments

bonedoc

New member
502
1
0
Location
Bangor, PA
Then I went forward with needle scaling and some grinding on the battery box area and storage box area so I can get them ready for primer and paint. This all went well except for the fact that I had a little mishap around the fuel tank. There was some light rust and old dirt build up on the front lip of the gas tank and I lightly hit that with the needle scaler. Cleaned it right up but then shortly after wards when I was wiping everything down with thinner to get ready for paint I noticed a damp spot on the fuel tank lip. My heart sank....lol. I was like dam....what now? I must of either dislodged dirt or rust that was plugging a small hole. Fortunately is was only seeping and not dripping out. Fortunately Permatex makes a fuel tank repair kit that can be used with seeping and slow leaks, no draining necessary. Put that on yesterday and so far it is good!! Here are some pics of the leak area and the box areas ready for primer and paint. One of the pics of the battery box area shows the seeping spot, that was when I noticed it.
 

Attachments

bonedoc

New member
502
1
0
Location
Bangor, PA
Well the fuel tank repair was a fail. Guess a new tank is in my very near future. So besides draining the fuel is it a really difficult job? It didn't appear to be to bad.
 

bonedoc

New member
502
1
0
Location
Bangor, PA
Ah man it didn't work?
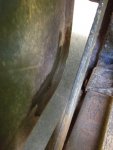
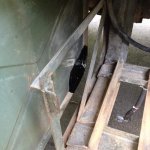
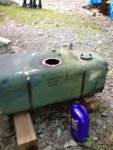
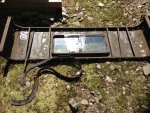
Nope!! Looked real good after it was done. Resin hardened up real nice, everything was clean. I'm thinking that it is possible that where I was seeing the seepage was not where the leak was, that maybe it was traveling from a slightly higher area....who knows, all the seams on the tank are rusted....not sure if I should try a repair or just buy a new one and be done with it.
 

bonedoc

New member
502
1
0
Location
Bangor, PA
Also wrapped all my cables, put on new terminals and cover before installing the battery box and got the storage box wrapped up as well. The battery disconnect switch works perfectly as well. Thanks Peashooter for your info on that!! Storage box has a jack, air hose and chuck, some rags, an extra pad to kneel on and room for wheel chocks and a couple 6x6 blocks.
 

Attachments

Last edited:

bonedoc

New member
502
1
0
Location
Bangor, PA
The last thing I did this weekend was replace some seriously rotted wire insulation on the front parking lights. Not only was it rotted badly but whatever was left was packed with dirt.

Quick update on the fuel tank issue. Located a good takeout through Ken at Kublos. Spoke to him Saturday morning and will be going to pick one up from him the next week or so. Then I'll do a POR 15 tank seal on it just to be sure the inside is well cleaned, sealed, and protected from corrosion before installing it.

My next thing to get started on is refinishing my extra windshield and hardtop. Then the whole cab interior will get taken apart to be repainted, seat refinished and reassembled with new seals, electric wiper kit and heater install.
 

Attachments

bonedoc

New member
502
1
0
Location
Bangor, PA
Well I hope everyone is enjoying there summer. I'm steadily progressing on my deuce. I installed my new front shocks and adjusted my tire air pressure, definately improved the truck's ride quality.
This weekend I got several parts disassembled, cleaned up and primed. I disassembled my extra windshield only to find that one of the windows was rusted bad enough that is was swelling the frame. Ultimately I made the decision that between glass, hardware, and labor time I opted to just buy 2 new window panes for the windshield.
Here are some pics of the disassemblyImageUploadedByTapatalk1406563936.433875.jpgImageUploadedByTapatalk1406563956.749399.jpgImageUploadedByTapatalk1406563971.392994.jpgImageUploadedByTapatalk1406563983.177628.jpg
 

Ford Mechanic

Active member
1,805
6
38
Location
Edenton, NC
Looks like your coming along nicely with the truck. That sucks about the tank, I hope the new one didn't set you back too much. The in tank fuel pump flange was sealed with the grey rtv so you'll find it harder to remove but it seals a lot better than the old paper gasket that was originally on it.
 

bonedoc

New member
502
1
0
Location
Bangor, PA
Looks like your coming along nicely with the truck. That sucks about the tank, I hope the new one didn't set you back too much. The in tank fuel pump flange was sealed with the grey rtv so you'll find it harder to remove but it seals a lot better than the old paper gasket that was originally on it.
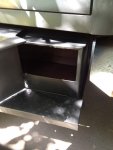
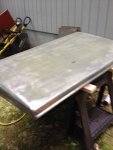
Thanks Mike, it is coming along well. The tank is no biggie. Going to get a good take out from kublo's for 80.00. Then I'm going to do a por-15 tank seal on it just as a precaution going forward. It is getting there. Next thing it to strip and prime the hardtop.
 

bonedoc

New member
502
1
0
Location
Bangor, PA
Alright, well yesterday I took a ride to Kublo's surplus which is about 2 hours from me. Great place and Ken was great to deal with. Very accommodating and knows his stuff. So I went up to get a replacement fuel tank and Ken allowed me to pick from what he had. I also have to install a heater in my truck and picked up the bracket to install it in the engine compartment. I actually plan on putting it in the cab under the dash but just in case I fail at that...lol. Last but not least got a nice set of bed bows from Ken. Fiberglass and steel in really nice shape. Going to clean everything up and respray them. I started to clean out the fuel tank, need to do the Por-15 clean and degrease, then etch it and seal it.
 

Attachments

Last edited:

bonedoc

New member
502
1
0
Location
Bangor, PA
Okay, have some more progress. Over the weekend I start the sealing process of the fuel tank I got from Kublo's. I had ordered all the parts needed, cleaner, etcher, and sealer from Por-15 for up to a 50 gallon tank. I have to say it isn't a difficult process but is tedious and time consuming as it takes time for the cleaner and etcher to do its job. But I must say it does a great job. The metal inside my tank looks like a new tank. I didn't get any pics of it but I will. Right now it is drying with a hair dryer blowing warm air into it to ensure thorough drying of the inside. Tomorrow morning I'll be putting the sealer in. then have to let it cure for 4-5 days before adding fuel. The tank I received from Kublo's didn't leak...I'm doing this sealing process trying to be proactive. Figuring most of these tanks are old and seams can be corroded I would seal it and hopefully head off any near future issues.
I completely dismantled my hardtop. Took everything off and out of it except for the rear window. Stripped the foam insulation off of the back and top as well as all the seals, then sanded and primed the top, support straps, and seal mounts. Didn't get the back sanded and primed yet. Came out pretty well, will hopefully be shooting green by next weekend. Got all new hardware for the top and new windows courtesy of Big Mike's. The only issue I had was where to get the replacement foam insulation. I've seen/read guys buying anti fatigue mats and cutting them up, thought about doing that till I came across these military sleep mats. These should work perfect. They are 24" x74" x3/8" thick. Exactly the same dimension as what I removed. The foam I removed was a closed density foam just like these pads and bonus....the pads are green so no worry about color or painting the foam. Found them for 8-9 bucks on Ebay and I figure I need 4 to do the entire hardtop and hardtop back.
 

Attachments

bonedoc

New member
502
1
0
Location
Bangor, PA
I plan on using either contact cement or heavy duty spray adhesive. Good question on the hardtop...I took the word of the seller that is was the correct top. The top had a metal tag in the roof with a build date and what it fit. The roof looks very different when disassembled. Once I get it painted and foam installed all the straps you see in the 2nd picture checker board the top. I don't think they offer any support to me they look more like what holds the foam up there if it was to sag. There are also 2 pieces of a press board about 1/8" thick that were 2 feet wide and the length from front to back that fits over the foam in the 2 center most sections of the cab hard top. I didn't take pics of those but I will. Actually you can just see them leaning against the house behind the hardtop.
 
Last edited:
Top
AdBlock Detected

We get it, advertisements are annoying!

Sure, ad-blocking software does a great job at blocking ads, but it also blocks useful features of our website like our supporting vendors. Their ads help keep Steel Soldiers going. Please consider disabling your ad blockers for the site. Thanks!

I've Disabled AdBlock
No Thanks