• Steel Soldiers now has a few new forums, read more about it at: New Munitions Forums!

  • Microsoft MSN, Live, Hotmail, Outlook email users may not be receiving emails. We are working to resolve this issue. Please add support@steelsoldiers.com to your trusted contacts.


1952 M35 Gasser repair and build

Kaiser67M715

Member
699
26
18
Location
NH
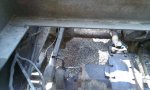
cleaned up everything a little bit, bearings cleaned up nicely and they look rather good, no pitting or gouging, so that's a plus.

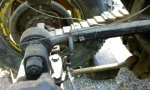
pulled the wheel cylinder, very dirty but actually not bad within the bore, should take a lite hone to clean up the tiny bit of rust/imperfections. picked up a set of rebuild kits from Eriks', wheel seal sets and Lock tab washers from Memphis, I would guess Monday for those.

also received My parts from George @ White Owl. got all ignition tune up parts, thermostat, upper radiator hose, and oil pan gasket, great guy to deal with
 

Kaiser67M715

Member
699
26
18
Location
NH
picked up a couple Jerry cans today, one is pretty decent, little bit of rust internally, but should clean up quickly, came with a holder, strap, and screw on spout.

Also got a second can, gonna use as tool box, cut it up. bottom was toast. Only paid $30 for the set, so not bad I think
0418151805.jpg0418151807a.jpg0418151807.jpg

cleaned a little more, picked up some spray Red Oxide Primer, Majic, Tractor Supply Brand so I can spray at some point. wire wheeled the wheel cylinder, looks good, bore is not as bad as it looks. and my box of cleaned parts, one of the rear bearings, cleaned up nicely
pics M35 001.jpgpics M35 002.jpgpics M35 006.jpgpics M35 005.jpg

cleaned spindle and backing plate, little nicks from previous users, need to clean that up with file. wish I could remove backing plate to paint, but not cutting the rivets
pics M35 003.jpgpics M35 004.jpg


should there be a guard for the rear line too? Don't know if I like it, looks like it rubs a bit, don't need to cut through a line
pics M35 009.jpg

also needed to fix my parking brake arm. used a set screw and JB weld, the new pin just slid in and out...that was after I cleaned the old pin before pressing it out

pics M35 007.jpgpics M35 008.jpg

that was all I did, ended up working most of the day to help fatten up the next paycheck. These MV's are fun, even if they like to eat cash
 

Kaiser67M715

Member
699
26
18
Location
NH
Thanks, I took a closer look, and if you look really close at my photo, you can barely make out the line where it contacted the bar

So with my day job under full steam now, I have less and less time to this project. And I lost Half a day Sunday when I went to go get some parts for my M715 so the going is much slower then I wish, plus waiting for parts, but got the backing plate clean enough to paint, also sprayed the stud ring for the hub to drum. gave my dad my oily brake shoes, his shop can clean shoes pretty good, if they don't clean up good enough I'll just replace them.

I actually started lining the fuel tank too, using Red Kote, seems like good stuff, so we shall see

pics to come in next few days, gets too dark when I finish to take any, and I don't always remember to take them when I'm working
 

Kaiser67M715

Member
699
26
18
Location
NH
Red Oxide Paint.jpgClean up.jpgWheel cylinder bore.jpg

second coat of paint, that pics makes it look rather red, is more orange...but I guess that depends on how your computer perceives it. Paint is just a Red Oxide

also honed the wheel cylinder, can't feel anything, but I can't seem to get rid of any of the coloring-it's smooth, can't feel any scratches, may just throw on one of the new ones I got with the truck, save this cylinder for later if needed.

what is used to flush brake lines? just more fluid? kind of a waste, I assume there has got to be something I can throw down the tubes that work? I can use air, but air and some sort of fluid always works better
 

rustystud

Well-known member
9,071
2,388
113
Location
Woodinville, Washington
View attachment 555804View attachment 555803View attachment 555805

second coat of paint, that pics makes it look rather red, is more orange...but I guess that depends on how your computer perceives it. Paint is just a Red Oxide

also honed the wheel cylinder, can't feel anything, but I can't seem to get rid of any of the coloring-it's smooth, can't feel any scratches, may just throw on one of the new ones I got with the truck, save this cylinder for later if needed.

what is used to flush brake lines? just more fluid? kind of a waste, I assume there has got to be something I can throw down the tubes that work? I can use air, but air and some sort of fluid always works better
At the shop we just use "Brake Kleen" brake cleaner. Then a lot of air to dry it out.
 

Kaiser67M715

Member
699
26
18
Location
NH
M35 Brakes 001.jpg

started work on the front rear wheel, had to cause I forgot which way the the spring retainer went on for the brakes. Honed out that wheel cylinder, looks much better then the other one. Used Rebuild kits from Erik's Surplus. at $4 a kit, its not bad, but does not match the pic on site, its the same NewStar **** that everyone sells, but I figure if they leak I'll just get new Cylinders, at least by going through everything now, I can swap the cylinder easier.

but same news as rear, lost all the grease due to oil penetration, bearings look good though, so a little more money saved. at least this axle had a cork gasket in the slot.

Tomorrow I should have both done, then I can work on the other side. leaving all the lines disconnected so I can flush them, still need to replace that line that got a kink in it too
 

Kaiser67M715

Member
699
26
18
Location
NH
uploadfromtaptalk1430065856416.jpg one down, 5 to go

After packing the bearings, I filled the hub with about a pound of grease, and coated the spindle, I do still have to adjust the brakes being I haven't flushed the system yet. I believe the TM calls for adjusted brakes before bearing adjustment, but I know a couple old timers who say that if you adjust the brakes and they are too tight, you can get a lousy read on your bearing adjustment
 

Kaiser67M715

Member
699
26
18
Location
NH
uploadfromtaptalk1430086345197.jpguploadfromtaptalk1430086363064.jpg

Got second hub done, gonna adjust brakes next on these two, then go to the next two, probably the other two rears
 

rustystud

Well-known member
9,071
2,388
113
Location
Woodinville, Washington
View attachment 556416 one down, 5 to go

After packing the bearings, I filled the hub with about a pound of grease, and coated the spindle, I do still have to adjust the brakes being I haven't flushed the system yet. I believe the TM calls for adjusted brakes before bearing adjustment, but I know a couple old timers who say that if you adjust the brakes and they are too tight, you can get a lousy read on your bearing adjustment
That's how we do it too. Always adjust brakes last.
 

gimpyrobb

dumpsterlandingfromorbit!
27,785
747
113
Location
Cincy Ohio
View attachment 556416 one down, 5 to go

After packing the bearings, I filled the hub with about a pound of grease, and coated the spindle, I do still have to adjust the brakes being I haven't flushed the system yet. I believe the TM calls for adjusted brakes before bearing adjustment, but I know a couple old timers who say that if you adjust the brakes and they are too tight, you can get a lousy read on your bearing adjustment

Bearings first, brakes second!

I agree with what the other guys posted.
 

Kaiser67M715

Member
699
26
18
Location
NH
So I am trying to adjust the brakes, but am getting nowhere. I've tried reading up more on it but I got the same results.

So I did the following on both wheels-

Went from the left bottom to top, .010" on bottom, .020" on top-can't turn drum, back off, go to bottom, smaller then .010(didn't try to figure out how small) retry for .010" then to top again, locks drum

So I go to right side, .010" bottom, .020" top, drum locks up, retry, still locks up.

What am I doing wrong? I can't imagine the drum is out of round, since it happens on both sides(different points in the drum)

Thanks guys
 

cattlerepairman

Well-known member
Steel Soldiers Supporter
3,173
3,095
113
Location
NORTH (Canada)
Had a similar issue. Backed bottom adjusters up all the way. Adjusted top for slight drum drag. Drove truck. Re-adjusted to specs. Not sure what the issue was. Maybe aftermarket brake shoes not exactly matching. Next step would have been pulling drums again to see if shoe slipped off adjuster.
 

rustystud

Well-known member
9,071
2,388
113
Location
Woodinville, Washington
So I am trying to adjust the brakes, but am getting nowhere. I've tried reading up more on it but I got the same results.

So I did the following on both wheels-

Went from the left bottom to top, .010" on bottom, .020" on top-can't turn drum, back off, go to bottom, smaller then .010(didn't try to figure out how small) retry for .010" then to top again, locks drum

So I go to right side, .010" bottom, .020" top, drum locks up, retry, still locks up.

What am I doing wrong? I can't imagine the drum is out of round, since it happens on both sides(different points in the drum)

Thanks guys
What most people don't understand is the brake shoes and drums must be "fitted" together. This means the shoes are ground to the contour of the drums on a machine. In todays modern society with automatic adjusters and disc brakes this is rarely done anymore only on big riggs . Our busses also must have the shoes and drums fitted to each other. When this truck was first introduced fitting shoes and drums was a standard job. You turned the drums and then fitted the new shoes. So "cattlerepairman's" idea of driving the truck is actually doing the same thing.
 

gimpyrobb

dumpsterlandingfromorbit!
27,785
747
113
Location
Cincy Ohio
I've adopted doing 15thou top and bottom. It helps if you pull the inspection cover on the drum so you can see the brake pad while adjusting them. Bottom first top second.
 

Kaiser67M715

Member
699
26
18
Location
NH
thanks for input,

Well this is what I did, adjusted bottom out, then adjusted top till I felt the brake drag, then let out on the bottom a little, kept moving top out, till I got a .015" gap on top, check bottom to .015" back to top, adjust to .015" if needed

Don't know if because I had set the adjusters all the way in(max brake gap) that the shoe was getting cocked in the drum, causing it to lock when trying to get the gap set correctly. Course I also don't know if by jumping back and forth I am screwing up the way the brakes work.

But logic tells me that the bottom is only a pivot, therefore all the work is at the top, allowing the show to rotated out and down, meaning that when I adjust for drag on the top, it pushes the shoe down and out, so the 5 or 8 o'clock position would contact first and have a high initial wear, but as the brakes get used, the wear would rotate up towards the 10/11 o'clock position, which by that time means another major adjustment.

I guess I shall see how it works
 

Kaiser67M715

Member
699
26
18
Location
NH
Well, I apparently got one frozen adjuster on the bottom. Moves maybe 1/4 turn. But there isn't a huge gap between the shoe and drum. I might let it slide. Or I may tear it all down. This wheel didn't require all that much adjustment, and I do know one set of shoes was thicker, so probably was this wheel.

I do have to order an air pack rebuild kit (peace of mind) anything I should look out for, recommended vendors/ don't get this brand etc.?
 
Top
AdBlock Detected

We get it, advertisements are annoying!

Sure, ad-blocking software does a great job at blocking ads, but it also blocks useful features of our website like our supporting vendors. Their ads help keep Steel Soldiers going. Please consider disabling your ad blockers for the site. Thanks!

I've Disabled AdBlock
No Thanks