• Steel Soldiers now has a few new forums, read more about it at: New Munitions Forums!

  • Microsoft MSN, Live, Hotmail, Outlook email users may not be receiving emails. We are working to resolve this issue. Please add support@steelsoldiers.com to your trusted contacts.


Gama gama hey!

quarkz

Supreme Galactic Cleric
Steel Soldiers Supporter
805
71
28
Location
Kennewick, WA
Since it is becoming all the rage, all the cool kids are doing it, and since the gama goat website doesn’t look like it will be revived any time some, let me post up my gama goat recovery.

I too have been enamored by the ugly mug of the gama goat, a mug that only certain ‘muthas’ could love. I too had cried upon seeing the stacked walls of goats put out to pasture by the forest service and drooled over the videos posted up on youtube.

During recovery from five separate retina re-attachment surgeries I had plenty of time to check the various vendor sights and auction houses. Then one day, the week before I had to drive to Portland, OR for my sixth surgery, Boyce Equipment put one up for auction and I won.

So the weekend before surgery I arranged to drive down and pick the M561 up. Hoping Murphy would show his face as I drove 600 miles in the opposite direction from my surgery appointment.

Drove down on Friday after work, Met Mark & Debbie early on Saturday. The pickup went great, As Debbie was getting all the paperwork together Mark had plenty to show off in the new facility. Boyce had moved since my previous visit where I rebuilt my M813’s brake system in their parking lot before driving it to Burley, ID where the fan blade milled away the inner core of its radiator, L

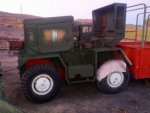
The goat was painted red and was previously a Wyoming Search & Rescue vehicle. It was a 1971 and the odometer read 281 miles. The unit was just about complete. The tractor had a hard top but was missing the rear glass. Also needing replacing on the tractor were the mirrors and mirror arms, 2) the horn and horn protection, 3) the handles on the engine cover, 4) the inspection plate for the transmission fluid level. On the trailer I had the front surf shield frame, both of the fold down troop seats, the interior control panel, and a water tight, but rusty, tailgate. Only things missing from the trailer were: 1) the side cargo rails, 2) bows, and 3) the mechanism for rigidly attaching the tractor to the trailer for ‘five wheel’ operation.

The search and rescue folks attached a square tubing roll bar, It was removable and attached to the front bumper mounts and mounts for the ‘five wheel’ lock out device.

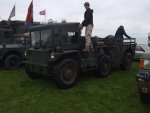
With the original steering wheel I wasn’t able to fit in the drivers compartment. So one of the Boyce guys drove it out of the lot and up onto the trailer. He had two of his kids there for the occasion and they got to go along for the ride during the loading onto my trailer. The width of the goat wheels was ½ inch wider than the deck on the 18 ft. car hauler trailer. So I had made removable trailer fenders for just this purpose. The goat loaded right up and was lashed down without incident. Mark Boyce loaded me up with some logo’d promotional merchandise and my paper work and I was off as he went to his office to follow some trucks on an online auction.
IMG_20130907_085720.jpgIMG_20130907_085731.jpgIMG_20130907_101858.jpgIMG_20130907_101948.jpgIMG_20130907_101921.jpg

I left Ogden about 11AM and made it back to the Tri-Cities Saturday evening before sundown. At the rest area just outside of Ogden, I stopped to check the straps, chains and binders along with the trailer and tires. I was instantly approached by a fellow who informed me that he had worked on the gama goats whilst he served in the Army. I only had it for 20 minutes and the gama goat was already drawing attention.

IMG_20130920_145705.jpgIMG_20130920_145718.jpgIMG_20130920_145736.jpgIMG_20130920_145818.jpg

On Sunday morning I swapped out the M561 steering wheel with an after market 12” wheel, which I had welded to a Deuce steering wheel center for use in one of my 5 tons, and drove the goat off of the trailer and put it out in the pasture. I then went inside and packed for my trip to Portland for retina surgery.

After a couple weeks recovery I started to put the gama goat in order. I took the paper work down to the county assessors office to transfer the title and registered it with ‘Classic’ plates. Then a quick call to Hagerty to add it to my collector’s policy and she was ready to go.

Next installment – cosmetics…
 

Attachments

quarkz

Supreme Galactic Cleric
Steel Soldiers Supporter
805
71
28
Location
Kennewick, WA
Next it was time to shed the Search & Rescue roll bar. So I drove it into the pole barn, strapped the bar to the chain fall hanging from the reinforced truss overhead and raised the bar until it cleared the cab. Then backed the goat out of the pole barn. Then used the tractor to move the roll bar into storage behind the pole barn.
IMG_20131020_181235.jpg
The red paint job on the goat was quite good. SO after scuffing up and a wire wheel & primer to some rusty looking areas the base coat was Behr exterior latex in the color of 383.
View attachment 550768IMG_20131020_181306.jpgIMG_20131020_181321.jpgIMG_20131029_081321.jpg
Next she was brought back into the pole barn and marked up with the 3 color camo scheme using chalk. Then the various area were filled in with more Behr in Black & Brown.

Then I replaced the front turn/marker lamps & headlights with LED versions.

IMG_20131103_214932.jpgIMG_20131103_214932 (1).jpg
I also has a rather rusted and dented tailgate. So I ordered a replacement from RivRad Mutt parts. I also found a fellow in MV magazine listing some spare parts for the goat. So I was able to get a set of antenna mounting brackets for the front of the trailer section, the plugs for swimming and the binders used to secure a communications shelter into the trailer section. But more pictures on that later.
 

Attachments

Last edited:

mkcoen

Well-known member
Steel Soldiers Supporter
5,637
380
83
Location
Spring Branch, TX
Looks good! We've now got 3 threads going on Goat restoration! For something as rare as these are that's pretty amazing. I guess now that the demil code has changed and the States are giving them up we'll see a few more trickling in.

I'll be removing my overhead cover this weekend but unfortunately don't have any type of cab cover for it so will be going topless for the foreseeable future. Good thing it's warming up.
 

quarkz

Supreme Galactic Cleric
Steel Soldiers Supporter
805
71
28
Location
Kennewick, WA
I too had soft brakes.
I had replaced the rubber lines, even having to remove the coil spring on the passenger rear for access.
I cleaned up the brake quick disconnects between the tractor and trailer.
None of it helped.

So I had the same master cylinder (MC) that you used sitting on the shelf and managed to swap it out after ordering a new boot, since my MC did not come with one.
I wasn't able to find a gama goat boot, but the boot from an M809 5 ton was a very very close cousin.
Part# M54, M800 Master Cylinder Boot, 7409313, 2530-00-740-9313

I decided not to climb into the drivers seat to work on it, still sore & recovering from ACL & MCL surgeries.
Instead I had the middle wheels on jack stands and the front windshield & gauge panel removed.
It was fairly easy to work on everything through the access panel on the top of the dash.

This should be good for you...
I was looking for M151 shackles for my SAS jeep project and accidentally received a more narrow shackle.
So since my goat's front shackles were missing I tried it there, and it worked.

It has a more narrow throat than the M151 shackle and the needed 3/4" pin.
The part# was 8754044, 4030-00-678-1342. It looks a lot like a M37 shackle.

Today I am off to try and bleed the thing. I built the bug sprayer brake bleeder that I saw here on SS for my m35s and 5Ts back a few years ago. And last fall I made an adapter plate to match the MC. So the hardest part will be jacking things up.

I am also looking to fabricate some bows for my cargo area. I don't have racks or bows for my goat. So if anyone is willing to take some measurements and to lay one of the corners on a sheet of paper and trace around it between the straight sections it would be appreciated. I would gladly cover postage if it couldn't be scanned 1 to 1.
 

dmetalmiki

Well-known member
5,523
2,026
113
Location
London England
That is one nice looking clean tidy goat, I think it will serve you well, I am well satisfied with mine, being the only vehicle that young members can drive from age 16 (tractor license) so we aim to keep it for a while.
 

Attachments

mkcoen

Well-known member
Steel Soldiers Supporter
5,637
380
83
Location
Spring Branch, TX
Good luck on the brakes.

I believe the shackles are the same as the M37. I was thinking of stealing the ones off the wife's M37 but if she takes retribution for that then she'd inherit the Goat and all I'd get is a pine box (or clay urn).
 

quarkz

Supreme Galactic Cleric
Steel Soldiers Supporter
805
71
28
Location
Kennewick, WA
Well that made a world of difference. The new MC has stiffened up the brake peddle. I bled the rear and there was a bit resistance at the end of the peddle. The after bleeding the center the peddle became really hard. I will get to the fronts tomorrow.

I think I remember reading that the front & rear brakes are on the front chamber of the MC and the center axle is on the rear chamber of the MC.
 

quarkz

Supreme Galactic Cleric
Steel Soldiers Supporter
805
71
28
Location
Kennewick, WA
I am trying to hook up a slave cable socket to the Gama Goat's electrical system.

Who can tell me the secret to removing the buss bar cover that is located below the radiator? I can reach the driver's side cut out in the cover. Got a 9/16 wrench on top of the lock. But I think the bolt is spinning. And the head of the bolt is under a panel on the other side of the radiator.

As for the passenger side but, I haven't found a way to snake a socket or wrench to it.

Any secrets?. I am tempted to either put another hole in the hull an go to the +24 battery post, or connect to the rear of the starter relay, or cut & re-terminate the +24 battery cable, after it enters the engine compartment, an add it there to a new, isolated terminal block.

I also did the corn head grease transfusion. Thank for that tip. The rear took 1/2 a tube an the front about a whole tube, using the grease gun. Should it be the same amount as spec's for the gear oil?

I jacked up the front and rear wheels and turned the steering wheel lock to lock. It seemed a bit easier. My steering gears weren't leaking, and the oil didn't look milky/wet. I suspect where the steer shaft goes from the front gear into the first tunnel through the body towards the rear is rubbing on the tunnel.

I had the front drivers side axel shaft shear at the u-joint when assisting a braking situation, using the hand brake, during an emergency atop. Looks like the drive shaft's may have whacked the angle bracket that supports the first steering shaft bushing. And that rubbing is causing the hard steering.
 
Last edited:

BillIdaho

Member
417
7
18
Location
Caldwell, Idaho
Don't you already have a slave cable receptacle near the pintle hook?


Edit:
Oops, as soon as I hit send, I realized you said "slave cable", and I was thinking trailer receptacle. My bad. (Age, the final frontier)
 
Last edited:

frenchman

New member
62
2
0
Location
sacramento california
just to let you know i remouved the 2 small rubber washer in my master cylinder on my goat that will prevent the wheels from locking up the hole in the washer are to small and prevent the fluid from returning fast enough to the mc easy to do disconect one line at the time on the side of the mc remouve the washer reconect then do the same for the other line bleed both line at the mc and done no more problem
frenchman
 

quarkz

Supreme Galactic Cleric
Steel Soldiers Supporter
805
71
28
Location
Kennewick, WA
Well I got lucky and found one of the accessories I wanted for my goat.
The s250/g communigations shelter.
It was on about1.5 hour trip each way.
So I loaded up some straps and 1-1/4" pvc pipe and headed towards Ellensburg.
The shelter was on camper jacks and facing toward the road (that was they way it set as the PO stripped the interior).
That worked for me. So with the help of the PO, we jacked it up, I took off the tailgate and back the pickup under the shelter.
It needed a 2x4 under each skid to clear the sidewalls of the truck. Strapped it down and hurried back home.

IMG_20150731_135401.jpgIMG_20150731_135437.jpg

Next backed the truck into the pole barn, marked the projected center of gravity on the roof. using one chain made a "V" from the top left front lifting eye, to the CG point back to the top right front lifting eye. The repeated the steps for the rear top lifting eyes, looping the chain through the front chain at the CG. Then using a couple shackles hooked the chains to a chain-fall hoist and lifted the shelter above the bed a few inches.

IMG_20150809_170344.jpgIMG_20150809_170332.jpg

Then after tied off the shelter, so it would not spin, I drove the truck out from under the load. Then untied the guide rope and slowly spun the shelter around so the door was facing the rear.

Next I removed the gama goat's tail gate and backed the Goat under the hanging load, using a baby monitor camera & monitor to get an up close view of alignment. Then lowered the shelter into the cargo section of the goat.

Next I attached all of the other dress-up parts I had piled in the barn to bling the goat out in all its como / ratt rig glory. It has a winter hard top sitting in the pole barn. If anyone knows where to get a long oval rear window for the winter top let me know. Mine is missing.

IMG_20150809_165526.jpgIMG_20150809_165551.jpgIMG_20150809_183513.jpgIMG_20150809_183550.jpg

2nd to last picture shows the horn protection I sourced from "popacom". Yup! checked another one off of the wanted list.

Now the question is whether to paint the shelter 3 color camo like the goat or leave it like the hodge-podge that results from military re-configurations ......

I also need to add a metric cr@p ton more antennas to the commo box. Looking to make something that looks akin to the mesh FAAR radar dishes. I have seen some HD TV antennas that are close.

IMG_5028_FAAR_edited-XL.jpg06990082.gif
 
Last edited:

m38inmaine

Well-known member
2,090
44
48
Location
Maine USA
Looks great, I have a rear window but I will have to check to make sure it's not broken, I recall one of the pieces on the top were broken.
 

BillIdaho

Member
417
7
18
Location
Caldwell, Idaho
You guys are killin' me here. I am going to have to figure out how to post pics of my comm-rig after all.

BTW: I have an extra articulating antenna mount that bolts on top of the S 250 shelter, if ya' need one.
 

m38inmaine

Well-known member
2,090
44
48
Location
Maine USA
Bill, we are going to have to send a recon patrol to your place for those pictures. Break out that digital camera and get busy. Find a kid on the street and have him help you.
 
Top
AdBlock Detected

We get it, advertisements are annoying!

Sure, ad-blocking software does a great job at blocking ads, but it also blocks useful features of our website like our supporting vendors. Their ads help keep Steel Soldiers going. Please consider disabling your ad blockers for the site. Thanks!

I've Disabled AdBlock
No Thanks