• Steel Soldiers now has a few new forums, read more about it at: New Munitions Forums!

  • Microsoft MSN, Live, Hotmail, Outlook email users may not be receiving emails. We are working to resolve this issue. Please add support@steelsoldiers.com to your trusted contacts.


816 Jakes and Turbo !!!!

wcuhillbilly

Member
421
4
18
Location
Devils Tower, WY
Trying to upload the pics to Photobucket but its being a butt. 2hrs and only one pic is up,,, sizes are correct. Electronics will insult your intelligence, but nothing rubs it in like a computor.

IMG_20150406_190535_828.jpg
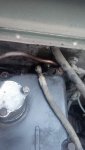
here is the beast as it sits. Truck weighing in at 36k and the dozer/trailer, putting the combo up near 60K+ I felt it was time to invest in some whoa and go. As some of you know I scored an old NTC 350 sometime back for scrap. This gave me manifolds, turbo (VT50) 25A Jakes and alot of fittings etc.

NTC 350 Rt side.jpg
After scrapping the turbo, I talked to Blaylock Turbo in KS and settled on a Schwitzer 4LHR for a good deal. Rebuilt the jakes with a kit from Cummins and one new solenoid. I finally got around to attempting to put this mess together this past week.
25A jake.jpg
jake rebuild 1.jpg
Scored the aftercooler/ watercooled intake as well.
Jake & Aftercooler.jpg

So being I had 4 days off last week I decided to start into just put the jakes on last tuesday, I could not have known how wrong I would be thinking this would be about a day, and some wiring........aua

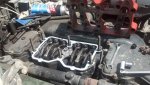
So I got the rocker boxes off and swapped the crossheads,(for those who dont know, this is the bar that rides on a post allowing the rocker to push both valves at the same time. The Jake version is wider so the jake can push the valves while allowing the rocker to follow the pushrod)
Checked the plugs in the intake/head, (plugged already whoo hoo!):D
started re-assembly of rocker boxes (mind you I was only going to do the rear heads as the original plan was to only be down a day.....)
IMG_20150526_115124_921.jpg

IMG_20150526_124824_556.jpg

Once I had the middle jake in place I started working on the rear head. Figured this would be the closest I would get to the plug for the duel fuel mod, thus it would be wise to get the plug moving now versus later. after torturing a 3/16 allen key almost to a 90* twist and a bend, the plug was moving enough for my satisfaction.. the return plug would not budge... no worries,,,

IMG_20150526_135211_202.jpg
 

Attachments

Last edited:

wcuhillbilly

Member
421
4
18
Location
Devils Tower, WY
Cont.

system really does not like me today,, it has taken multiple restarts, and 3 hrs to post up these pics/text.

So, the oil line switch had to be moved, the 15/16 bulkhead fitting was easy enough to pull and move, however the copper line running from this switch to the gauge under the dash was another story, good time to replace it with some thing flexible. Fittings was a mess of SAE to NPT, cleaned it up with some -4JIC/AN fittings.


IMG_20150526_170111_627.jpg

Once the jakes were on, I fired it up and was greeted by an awful sound.. rough idle and a very unhappy engine..... I thought maybe I needed to get oil through the jakes and free up the passages, so I used a remote starter switch, some jumper cables hooked to one battery (12v) to hot wire the jakes one by one, To my surprise I was not getting any oil to the jakes... SOOOO,,,, the jakes come back off.... Fired the engine and the trouble was gone.... Hmmmm.... so the jakes go back on, and the trouble ensues... But Im still not getting any oil to the jakes... In my head and arse scratching I figured out that the oil passages in the top of the rocker boxes have plugs that need removed and replaced with the pass through plugs from the NTC 350 rocker boxes.

(side note brought up by 73M819 the civy jakes use 12v solenoids, there are 24v solenoids if you want to ease your installation, the 12v are $103.00 ea, I have no idea on the 24v. but the 24v are usually a special order item thus resulting in down time. I used the 12v and am wiring them up to a 12v fuse block in order to simplify my replacement parts availibility in the future.... I would like to convert to 12v eventually being that I haul civy equipment trailers and dont want to buy a $700.00 adapter for military 24v to civy 12v.)

IMG_20150526_202052_046.jpg


IMG_20150526_202121_608.jpg

What turned out to be the trouble was that the jake on the #2 head was holding the front exhaust valve open just a smidge. I finally found this after I had adjusted the valves twice, checked the jake lash, fired the engine with the open jake plugs with rags over the holes(which soon moved themselves) fountaining oil toward the heavens and drowning all my workspace in oil... And removed the middle jake to see if the problem continued. I ended up running two jake gaskets to allow a couple thousandths clearance raising the jake up, this cured the open valve issue and I was allowed to proceed. total time elapsed,,, lets just say it is now mid-late day Wednesday and this was started Tuesday morning.......aua

Ok,,, well lets just put it all back together and since the week is shot Ill just pull the exhaust manifold and put the Turbo manifold up before dark... Oh, the plans of mice and men.......
Turns out that my manifold contacts the thermostat housing this a minor tweek of the grinder on the front port should suffice. Alot of tweek later, and Im grinding on the Thermostat housing to gain clearance. Hmmm my manifold must be differant than the rest... according to pics here on SS it is a bit differant, but still mounts the turbo in the same location.
IMG_20150528_174009_886.jpg


IMG_20150528_174001_189.jpg

IMG_20150528_153440_765.jpg


The thermostat housing is quite thick so I really dont think I harmed anything by taking off approx 1/16 of an inch ....... I will likely be on the lookout for the correct manifold for the future incase this one cracks. I can now get a feeler gauge between the tstat housing and the manifold. Another cure for this if you happen to be a machinist is to mill 6 1/4" spacers for the water line and raise it just enought to clear the housing off the manifold without putting undo stress on the upper radiator hose.

Broke two turbo studs off in the manifold thus delaying me even more, endmill on a bridgeport in a neighbors machine shop later, I was putting the manifold on in the rain....
Finally got the turbo mounted and started figuring out where to run the lines for the coolant tank. Its now Friday afternoon..........

IMG_20150529_135144_287.jpg


IMG_20150529_204321_984.jpg

Attempted to install the intake, however Cummins gave me the wrong gaskets so Im set back a few days to a week.

IMG_20150529_204224_125.jpg

Couldnt work on it last nite,,, as I was informed that I had to exicute an executive order from the WIFE, that her Greenhouse had to be up ASAP..... (yes dear.....) The next few days I have off from work and will be trying to button this thing up, as soon as some more parts come in from Summit.
 
Last edited:

73m819

Rock = older than dirt , GA. MAFIA , Dirty
Steel Soldiers Supporter
In Memorial
12,196
314
0
Location
gainesville, ga.
Did you use the jake push rods, they are the same length, but THICKER, the stock will bend under heavy jakeing, the thicker push rods come with the jake kit, these ARE 24v solenoids that you are using, the reason I ask is that you state you only changed 1, the stock ones are 12v .
 

wcuhillbilly

Member
421
4
18
Location
Devils Tower, WY
The jake push rods were not an option, if you look at the pic of the jake pre cleanup,,,, you can see that they look like they were on the bottom of the ocean. the rods had fur growing on them. The solenoids are the 12v solenoids, I am wiring up a seperate block for 12v off a single battery. I hope to some day convert to 12v all the way around, but time and money.

Something was up with the internet or the computor the morning I started this thread, and I was only able to upload about a third of what I had intended to post. I have since uploaded and fixed some of what got left out of the original post.
I am scribing the hood tonite for the body work.... No I am not going to just bolt a loaf pan on the hood.... I have some schooling in body work.
 
Last edited:

wcuhillbilly

Member
421
4
18
Location
Devils Tower, WY
Got some more done the other day..
Cummins got me the correct gaskets for the intake and thus the aftercooler intake was able to go on, ended up turning the rear after cooler port upside down for eas of getting to it to plug it off. my donor NTC 350 has the plumbing on the back of the block to route the rear of the aftercooler to the passenger side and re enter the block, I may hook this up later but for now the aftercooler is being pressure tested and cleaned up..... dont want coolant down the intake.....

intake prep.jpg

intake install.jpg

Intake line clearance.jpg

Intake compressor line 1.jpg

had to use the compressor line off the NTC 350 unless I wanted to cut the NHC 250 down and lose the ribbs.
Line clearance is a little tight but Im planning on doing a dual fuel mod really soon with flexible 4AN line thus the copper will be gone shortly, the Emergency fuel shutoff line from the dash was in the way but the copper flexed just enough to allow the new intake in. This inconveince will be eleminated with the new duel fuel lines. I also plan to replace the copper air supply line from the compressor. The NTC 350 cam with the adapter on top of the compressor to offset mount the air regulator,,, this may come in handy in the future.

intake complete.jpg

Intake w- horn.jpg
 
Last edited:

wcuhillbilly

Member
421
4
18
Location
Devils Tower, WY
mounted the coolant tank, after re-routing the horns and moved the blow off valve over inbourd some. Fabbed up a bracket for the tank. I may run a support from the tank over to the engine, but we will see for now how it does, as the 1 1/4 line from the lower tank to the engine is acting as a mild support as well. I swapped the fittings in the tank from SAE to JIC/AN, the tank is actually NPT pipe, 1/4 and 3/8 if I recall correctly, the fitting ont he radiator petcock is 1/4 NPT and the coolant passage on the top of the engine is the same I think,, I adapted these to JIC to allow me to run braided nylon hose with AN fittings from Summit. Same goes for the oil line from the oil cooder wich was 1/4 npt, now 3/8 or 6AN suppling the turbo with oil... The turbo drain I used was from the NTC 350 but I beleive its 3/4 NPT plug, (1/2 ratchet head plug)

Horns pre.jpg
Air duct route.jpgPre, Moved the blow off inbourd to the next set of bolts, then mounted the horns vertical next to it,,, had to replace the copper line from the regulator to the horns, as the fittings were not good,,,, ad that one to the list of lines to swap out in the future...

Tank brkt aka mailbox post.jpg
welded the studs in for both the firewall and the tank itself, to ease one man instalation, Future note, it would be wise to cut a plate to bolt to on the inside of the fire wall for vibration in the future.

Tank mounted post.jpg

Sorry for the weird glow. it was sunset and the sheen from my wrenches was playing havoc on the flash.


Air can relocated.jpg
Got the air can relocted and plumbed, used the stock intake pipe turned and rotated some, (will get a pic of it as it was dark when finished) the 4LHR turbo has a 5 1/2 inlet, the rest of the boots are 5" I forgot about this when I was at NAPA, thus a little massaging with a torch and the rubber loosened up enough to slide it on the turbo inlet...

Hood scribing.jpg
rough scribing of the hood to cut and open up the center while trying to keep the original profile of the hood. Will try and get another pic to show lines and areas in relation to the new add ons, and the current engine configuration.

While firing it up I found an interesting situation. We usually pump the fuel primer pump while starting our trucks. I didnt know it till I tried to start my rig after then new intake was on. I always thought the fuel primer pulled fuel from the tank and primed the line to the injection pump.. this is not the case. the primer pump pulls fuel and squirts it directly into the intake..... thus I hosed my engine bay down once again only this time in diesel instead of oil....

More to come....... Wife said the grass had to be mowed thus it will likely be Sunday or Monday before I can make anymore headway...
 
Last edited:

73m819

Rock = older than dirt , GA. MAFIA , Dirty
Steel Soldiers Supporter
In Memorial
12,196
314
0
Location
gainesville, ga.
Take a look at a Canadian 809 hood, all there trucks had jakes
 

WillWagner

The Person You Were Warned About As A Child
Super Moderator
Steel Soldiers Supporter
8,386
2,391
113
Location
Monrovia, Ca.
There is no difference between jake and non jake pushtubes. Lotsa work man, but it looks good. Is your truck an automatic or stick?
 

wcuhillbilly

Member
421
4
18
Location
Devils Tower, WY
There is no difference between jake and non jake pushtubes. Lotsa work man, but it looks good. Is your truck an automatic or stick?
Currently the spicer 5. really would like to stuff a 10spd Fuller/eaton in there but with the front winch being a driveshaft on one side and the front axle drive shaft on the other, Im kinda stuck for now... Hope to make the front winch hydraulic sometime soon,(Ive seen a few threads on that) But being I use it commercially I cant just mickey Mouse something together.
Other wish list mods include an 1138 air shift transfer case, and a air disconnect front axle, air brakes and lockers.... to start off with.
 
Last edited:

US6x4

Well-known member
Steel Soldiers Supporter
1,182
2,066
113
Location
Wenatchee, WA
wcuhillbilly, in regards to making a plate to attach to your studs inside the firewall, make the plate bigger or smaller than the plate with the studs on it. One thing I learned as a Freightliner test engineer is that two plate with identical footprints will crack sheet metal or fiberglass really easy from natural vibrations.
 

wcuhillbilly

Member
421
4
18
Location
Devils Tower, WY
wcuhillbilly, in regards to making a plate to attach to your studs inside the firewall, make the plate bigger or smaller than the plate with the studs on it. One thing I learned as a Freightliner test engineer is that two plate with identical footprints will crack sheet metal or fiberglass really easy from natural vibrations.
Yes, Im well aware of this from working on and fabricating vehicle modifications over the past 20 years. Good way to learn what does and doesnt work is to spend some time in the salvage yard poking around.
 

wcuhillbilly

Member
421
4
18
Location
Devils Tower, WY
Been plugging away but life gets in the way.
well the photo upload isnt working,,, I will try to edit this later and insert more pics (6-13-15 16:30hrs, photo upload is still acting up.....)
Hood Scribe II.jpg

marked out where the underhood components were in relatation to the hood.

Hood Clearance II.jpg

Clearance is tight, but Im trying to keep as low of a profile as possible. Got word from the radiator shop that the aftercooler has internal leaks,,, thats a $1000 part thus I will likely be capping off the ports and running a super big intake untill I can figure out a way to take the cooler apart and fix it......


hood build.jpg
Hood build II.jpg

Basically cut the top of the hood off at the edges of the bends and added about 2" in the front and tapered back to meet the stock hood at the hinges.


Lapped some sheetmetal I had laying around in behind and welded it up. ( I am not performing as good of a job as I normally would, as this is a work truck not a show princess) THus Im not too concerned about getting all the dents out.... just in retaining the stock appearance from a moderate distance.
 
Last edited:

wcuhillbilly

Member
421
4
18
Location
Devils Tower, WY
24v conv.jpgWired up a 24-12v converter to run the jakes, and some 12v ports in the cab,
Got the jakes wired up to the stock switches, (they are SWWWWEEEETTTTT!!!!!!) (side note... I wired the jakes temporarily to be on/off... I have the Inj pump switch but due to needing the truck for a job next week I bypassed the Inj pump switch to save on time and opperate the dash switch manually ) I will be wiring in the Inj pump and clutch switch soon.
Took it for a short test run, and its still a slow pig but certainly it climbs up to speed faster and will hold a hill longer, need to monkey with the fuel button in the Inj pump, and finish the dual fuel mod.

Jake switchs I.jpg

Jake Switches II.jpg
 

wcuhillbilly

Member
421
4
18
Location
Devils Tower, WY
A short video w/ audio in operation would be cool! Baaaaaaaadaaaaa....
I will try sometime soon... took the wife on the test ride the other nite..... she told me later that she always wanted to find a husband with a big truck,,,,, she just never thought she would have a 19ton military truck in her driveway.... "everyone has Petes and Macks,,, but we've got an M816 !!!!" I got a good woman........
 

wcuhillbilly

Member
421
4
18
Location
Devils Tower, WY
Ok,, had to use the truck for a job this past week thus I had to get the hood back on ASAP.. tossed some fiberglass at it and some OD paint. I still need to finish the body filler work but these pics will give yall a taste of what the final result is, or will be......

IMG_20150615_102147_338.jpg
IMG_20150615_102209_782.jpgWorking it with the jakes and turbo is really an asset. the truck builds speed faster and slows much better. I was still climbing the really bad hills at 10mph, (granted I was weighing in at 60K+) but as soon as I would crest the hills the rpms would come up and the shifting would start. Tryed to keep the RPMs while climbing at around 18-1900 as I have no gauges right now. The temp would climb from 150* to about 190* and as soon as the crest hit it would instantly cool back to 150*..... So far Im pleased. I will try and post up a video soon, but I will be out of town this week.
When ever I can I will finish the dual fuel and the PT pump fuel button, I just have to dive into the old 350 and see whats in it for a fuel button.
GRRRR I need a 10spd trans to hold the RPMs in a managable range.. this 1200RPM drop per shift really hurts.


Heres a taste of what this past weeks job was.......
IMG_20150617_144646_586.jpg
took 2 days to jack, lift and haul this old one room school house from Sundance Wyo to Devils Tower. friend of mines 379 Pete.
 
Last edited:

wcuhillbilly

Member
421
4
18
Location
Devils Tower, WY
Well I know its been a while since I updated the project. School house got moved with no problems. Truck ran great, had more usable power from the turbo, but was still chugga luggin up the hills at 15-20mph with the trailer and dozer. Once on the top it picked up speed and rolled on. Temps would climb to about 200*F then cool off once on top.. I have yet to raise the fund (thinking go fund me,,, but????) for a pyro or boost, but I drive with alot of due care.
So,,,, I pulled the donor PT pump off the old NTC 350 last nite... as its locked up an only good for parts I pulled the Idle Plunger (aka fuel button) out to see what I have. The NHC 250 (now turbo/jaked) has the stock pump with not alterations. Thus Im looking to bump the plunger and maybe do the screw mod.
The 350 PT has a #17 plunger/button, and Im guessing the 250 has the usual #27.
IMG_20150710_205646_234.jpg

IMG_20150710_205733_068.jpg

So.. I have a job with the dozer next week where Im gonna have to climb a really narrow steep gravel road and was contimplating swapping this #17 into my pump over the weekend.....
Thoughts,,,, you Gurus of the OD iron????
 
Top
AdBlock Detected

We get it, advertisements are annoying!

Sure, ad-blocking software does a great job at blocking ads, but it also blocks useful features of our website like our supporting vendors. Their ads help keep Steel Soldiers going. Please consider disabling your ad blockers for the site. Thanks!

I've Disabled AdBlock
No Thanks