• Steel Soldiers now has a few new forums, read more about it at: New Munitions Forums!

  • Microsoft MSN, Live, Hotmail, Outlook email users may not be receiving emails. We are working to resolve this issue. Please add support@steelsoldiers.com to your trusted contacts.


HMMWV accessories/mods?

jake-cutter

Member
297
13
18
Location
League City, Texas
Well I am working on my minor mechanical issues and have been ordering accessories. So far, I have the rear seats done, LED marker lights, and an Ibis Tek light bar coming in.

I was wondering what everyone is using to wire additional accessories, is the Pulsetech Power Distribution system the way to go or are there other options?
 

Suprman

Well-known member
Supporting Vendor
6,839
652
113
Location
Stratford/Connecticut
What accessories are you planning on wiring? I would independently fuse or breaker each accessory. If you have 12v accessories a power converter from 24-12 might work well. Small stuff like adding a cig lighter socket is fine tapping between the batteries.
 

theman10k

Member
40
0
6
Location
London
Can someone explain to me the point of 24 and 12 bolt wheels
Do they actually keep the wheel on the axle or just for show?

Also in regards to a Airlift bumper what the difference to a normal one?
Upgrading the lights to LED easy or hard for someone who isn't very mechanically minded
 

KansasBobcat

Member
641
8
18
Location
San Antonio, TX
Heavier HMMWVs required higher tire pressures and more bolts to hold the wheels together. The airlift bumper was stronger and has outboard shackles for hoist/airlift. In civilian application it gives much better protection to the rear of the HMMWV and is well worth the cost, I feel.
 

jake-cutter

Member
297
13
18
Location
League City, Texas
What accessories are you planning on wiring? I would independently fuse or breaker each accessory. If you have 12v accessories a power converter from 24-12 might work well. Small stuff like adding a cig lighter socket is fine tapping between the batteries.
I have been looking at adding the LED clearance lights that are in the classified section. How would I wire those?
 

Blackmagic94

Member
468
9
18
Location
Oro Valley/AZ
The 24 bolt bead lock wheels are designed for an increase weight load of the up armored hmmwvs. For a M998 its just an un needed heavier rim which decreases acceleration but, they look cool.


The A2 air drop bumper is the rear bumper, the others do not really have any bumper at all, this is a big rectangular bump that covers the entire rear of the vehicle and allows tire carriers to be bolted on and other accessories that the non bumper style A0 and A1s did not have.
 

DatGuyC

Member
537
20
18
Location
Essex, Maryland
Figured I'd add some of my more worthwhile mods I've done. First is the reverse lights and conspicuity tape. The reverse lights are dually diffused lights from rigid industries and are super bright. Not only can you see whats behind you, but others know you're backing up also. There is already a hole in the body on each side so no drilling is required and the rhino tire carrier doesn't hit them when its opened. The conpicuity tape helps make the truck visible at night on dark roadways. With it being a flat color so it disappears into the night and a top speed of 55 I don't want to be run over by other motorists. Some trucks from the military already have this tape installed for the same reasons.

20150827_112155[2].jpg

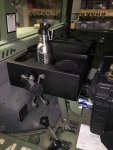
I also made my own brake light switch bracket and used the brake switch from an old jeep to make something much better than stock. When I switched to LED tail lights I couldnt get the stock switch to reliably function between the brake light never coming on or always being on, now they work perfectly. Part number for the switch is J5352620 and is about $12 so much cheaper to replace. I'm not sure if the switch could handle the draw from regular tail lights but it wouldn't be hard to make it activate a relay. I know the bracket is rough, its still in its testing phase :p
20150827_112231[2].jpg

20150827_112240[1].jpg

I also installed some overhead lights from thosemilitaryguys or something like that, they post in the classifieds here. It is really bright and the wiring is quality. I have one installed in the front and one in the rear on the cargo cover. You can also see the sun visors which are actually pretty decent when you need them.

20150827_112307[1].jpg

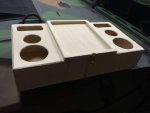
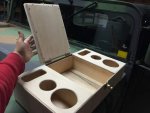
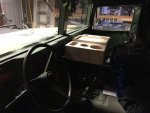
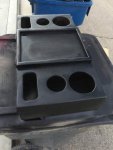
The 4 man divider (not the 2 man which is longer) and radio rack come in handy with storage and keeping things where they belong. The rubber mat with holes came from Lowes and is really nice once your truck stops smelling like rubber. I thought of using stall mats but I like how these have holes so they wont trap any moisture underneath them if/when water gets in the cab. The high back seats are also pretty nice but expensive.
20150827_112342[1].jpg
20150827_112626[2].jpg

edit: adding something I just thought of. I had problems with water coming in through the small opening under the tail gate when it was raining. There is actually a piece of weatherstripping available that goes into that area and solves the issue, part number 12340780. I was going to fab something myself till I found out it already existed haha
 
Last edited:

Predator42

New member
142
5
0
Location
Pleasant Grove Utah
Center Console for Radio Rack

I purchased a HMMWV and am in the final stages of getting it to me. It is a basic M998 with troop seats in the back. I am planning on keeping it in this configuration and adding a 4 man soft top later.

Does anyone have any must have accessories or mods that they recommend?

I recently installed this custom made center console unit to hold misc items, drinks, and have a spot for lockable storage. It works as intended.
 

Attachments

Predator42

New member
142
5
0
Location
Pleasant Grove Utah
I really like the pickup configuration but I also dislike not having 4 seats with belts at all times, so I made a few modifications that allows me to add people as I need to but still keeping the overall look of the 2 man in place. a few simple cuts to the inside of the fixed panels, a rear seat belt kit, and I am set.
IMG_0648.jpgIMG_0649.jpgIMG_0651.jpgIMG_0653.jpg
 

Predator42

New member
142
5
0
Location
Pleasant Grove Utah
Another really useful mod I have done that keeps me from accidentally knocking my parking break down and having the HMMWV roll down the drive (yes that happened...ONCE) is this simple 2x6 notched to fit and painted to look somewhat like it belongs...hey, it works. I also employ wheel chocks. when not in use I just lift it up and set it next to me on the center divide.
IMG_0654.jpgIMG_0655.jpgIMG_0656.jpg
 

KansasBobcat

Member
641
8
18
Location
San Antonio, TX
Another really useful mod I have done that keeps me from accidentally knocking my parking break down and having the HMMWV roll down the drive (yes that happened...ONCE) is this simple 2x6 notched to fit and painted to look somewhat like it belongs...hey, it works. I also employ wheel chocks. when not in use I just lift it up and set it next to me on the center divide.
View attachment 579471View attachment 579472View attachment 579473
Nice job. I believe there is an Army MWO that does the same thing. It is made out of light chain and a loop that goes around the parking brake handle.
 

DatGuyC

Member
537
20
18
Location
Essex, Maryland
From what I've seen they are around $100 and you have to drill the hole where the start/run switch is a little larger to fit the keyed part. Really I don't see it as much security since you can just reach under the dash and easily access the wires, a kill switch in a hidden place seems a much better alternative to me.
 
Top
AdBlock Detected

We get it, advertisements are annoying!

Sure, ad-blocking software does a great job at blocking ads, but it also blocks useful features of our website like our supporting vendors. Their ads help keep Steel Soldiers going. Please consider disabling your ad blockers for the site. Thanks!

I've Disabled AdBlock
No Thanks