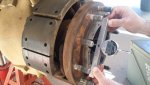
I made a tool like the military uses out of aluminum. I will remake the pedestals for the stand out of steel, since the aluminum I bought seems to vary with temperature. I will have a machinist mill the steel pedestals to 2.170 for the mean measurement when the depth indicator is on the stand.
This tool is very easy to build. I bought the depth dial indicator from Amazon for around $64, and some aluminum from Industrial metals. I find that this is the easiest solution to get the correct measurement.
I agree, this tool and approach is trivial. A halfway competent person with decent measuring tools could make a passable version with a bit of ground bar stock, a couple NF bolts, a file and an appropriate tap. Could make it adjustable for different setting depths too.
Don't even really need the indicator for a poor-man's version: Just make the tool bridge the spindle instead of going beside it, instead of the indicator put in a pair of 3-4" long threaded bolts that can drop down and touch the nut. Fasten the thing tight to the hub face, drop the long bolts down until they contact the nut at diametrically opposite points, then take it to your pedestal stand, stand it on the long bolts and build a shim pack that fits between the 2.170 pedestal and the bar.
Still...
My biggest problem with the military way is it does not take into consideration any wear or variances in machining. With steves ring tool method you are no longer hoping but know.
This seems like a good argument for setting it up based on the lash, rather than based on the depth of the pocket to the nut.
The counterargument is that 10 to 20 thou lash gives a pretty large margin for error, and the spider and/or gears would have to wear a /lot/ to change that measurement significantly. With a bit of hand-waving, and potential math errors induced by inadequate coffee so far this morning, the lash should change by roughly
(some constant) * sin(gear pressure angle) * change-in-pocket-depth * sin(bevel angle) [for bevel angle taken as zero in planar planetary configuration)
As a result, a 10-thou change in pocket depth makes much less than a 10-thou change in lash, and I'd call 10-thou of wear pretty extreme. Still, the lash method eliminates a whole bunch of variables...
The inside face needs re-set every time the hub is apart because the nut can change positions. If the nut always clocked to the same place, the shim pack wouldn't (almost ever) need to be changed. This is probably why they didn't bother making the outside adjustable.