• Steel Soldiers now has a few new forums, read more about it at: New Munitions Forums!

  • Microsoft MSN, Live, Hotmail, Outlook email users may not be receiving emails. We are working to resolve this issue. Please add support@steelsoldiers.com to your trusted contacts.


M211 crew cab crusade

snowyrivers

Member
138
1
18
Location
Newberg Oregon
Hello to all.

I am new here, but not to truck forums.

A bit of history.

My son in law got the itch for a project and invited me to help.

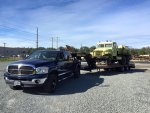
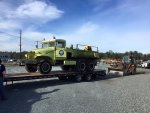
We found a 1953 M211 close and hauled it home, then within a week found another that is complete.

The second one had been a Fire Dept brush rig and has a huge tank on it.

We have a possible third rig lined up for parts or ????

The plan is to rebuild the cab using existing parts and added sheet metal to come up with a crew cab truck.

There is talk of stretching the frame about 2 feet, but we shall see.

We are re powering the little beast with a 6.2 GM diesel V8
Tranny will be a Turbo 400 with a gear vendors overdrive on the back side (maybe)

Stock transfer case and axles.
Drive lines may need lengthening if frame gets a stretch job.

The subject of tires, wheels and brakes came up and we have decided to replace all the 6 bolt wheels with 22.5 x 12.25 ten hole Alcoa wheels and run 385/65/22.5 tires all the way around.

The old juice brakes and related nightmare of parts are going to be replaced with a complete full air brake system of a more recent vintage.

We dis assembled a rear wheel hub, axle and brake set this weekend and got the area cleaned up.

The current endeavor is to get started on the design work for the air brake and 10 bolt wheel conversion.

We are going with a 15 x 4 S cam brakes as the factory stuff was 15 x 3 and the additional inch of shoe will only make life better.

Currently we have preliminary sketches done for the wheel adapter plate and are waiting for the air brake sets (Shoes, spider, drums and hardware) to arrive

We found some good used set ups reasonable.

The conversion is an easy task, just time consuming.

We have a mill and a lathe so its just all about time to make the parts.

I am a retired machinist turned heavy trucker, so our involvement with this stuff is extensive.

Current plans are to re plumb the truck using a schematic from a Pete 359 that I had.

This will keep standard parts in use all the way.

This is a great project for us, and will give me an oportunity to pass on skills to my son in law and the grand kids.

The engineering of the conversion items is proving to be far easier than I had first suspected it would be.

For those interested, this will not be a restoration, but more of a one off custom truck.

Happy to have found this site.

Looking forward to hearing comments and such.

One quick question so far.

After cleaning up the rear hub, ???? does anyone know for sure if the hubs are steel or cast iron.

They are a casting, but what material ???

Thanks

Snowy
 
Last edited:

snowyrivers

Member
138
1
18
Location
Newberg Oregon
As my health has not been great of late, I want to get the design work done on the adapters and such so that the kid can carry on even if I can't.

We will certainly make any and all materials available to adapt the 10 hole wheels and the air brakes to the M211

This is not going to be a simple scrounge up and bolt on, but for anyone with some machining experience it will be fairly straight forward.


Snowy
 

Section8

Member
503
6
18
Location
Little Fort, B.C., Canada
Welcome to the site!
I would be highly interested in your ten bolt adaptors if they are made for a reasonable price once you get them figured out.
As far as I am aware the hubs are steel, unless you are referring to the drums. These I would say are cast.
The spindle is steel as well with brass bushings.
Of course I am not a metallurgust. Some else may know for sure.
 

snowyrivers

Member
138
1
18
Location
Newberg Oregon
Thanks

The adapter for the 10 hole wheels looks at present to be a 13-1/2 inch x 1-1/4 inch steel plate with the two different bolt patterns located.

There will be counter bored holes for both sets to allow studs for both bolt circles

The 6 hole hub will have swage lock nuts on the inside to hold the adapter to the hub.

We will use a longer version of the original stud with the serrated shank to hold the adapter and hub together

The adapter will also be machined to pilot to the hubs original diameter at the baser of the flange.

This will maintain a real good weight transfer to the hub, rather than relying on just the studs alone.
Probably overkill, but that's just me. (Make it with good safety margin)

We will start with a hunk of steel plate and burn a 13-3/4 circle with a 4 inch or so center hole.

Next it goes in the lathe and gets the inner bore machined to fit the 211 hub.

Once this is done the OD and the faces will be trued up.

We have an old 10 hole budd wheel hub to use as a fixture for locating the holes accurately.

After the holes are located they will be counterbored from the back to allow the new studs to register below the surface between the adapter and the original hub.

After all the holes are done then the entire assembly can be fitted with the needed studs and pressed together, nuts tightened on the back of the hub and DONE DEAL.

Currently we need the brake equipment to be able to calculate the offset of the hub, drum, brake spider and such to allow the entire assembly to fit with the brake shoes sitting where they need to be in the drum.

There is plenty of room between the backing plate flange and the springs to allow all the new parts to sit nicely where they need to be.


IF we run into an issue with the backing plate flange we can simply cut it off the axle, machine new flanges with whatever diameter and offset we need and weld them on.

I don't want to weld in that area unless it's the only option.

Preliminary measuring suggests that an adapter plate that bolts to the original backing plate flange and then to the air brake spider will be fine ???????????

Until I get parts here to measure with real accuracy its all still an educated guess in that area.

The final arrangement for the mounting of the spider will dictate the actual thickness of the wheel adapter.

We can increase or decrease the wheel adapter thickness a bit to get the final position right where it needs to be.

I am guessing at this point that the final wheel adapter thickness will be in the 1 inch to 1-3/16 range.

It will take only a very short time once we have parts here to get dimensions for this stuff worked out and the final print drawn up.

Sadly the dims I need are just too hard to get from OEM so we gotta do it manually.


I will say this, unless you can do your own machine work, the cost is gonna be $$$$$$$$$$$$$$$$$$$$$$$$$$$$$$$$$$$$$ to hire it done.

Snowy
 

srodocker

Well-known member
6,549
68
48
Location
Lacey, Washington
Cant wait for pictures!!!

We have a annual PNW campout 3rd weekend in July in Napavine washington.

You are welcome aboard. Join our PNW Info thread tons of PNW around!
 

dmetalmiki

Well-known member
5,523
2,026
113
Location
London England
Welcome to the craze. And thank you for an exelent and descriptive write up. It would be great to see pictures of your ongoing project, And also your future write ups.
 

snowyrivers

Member
138
1
18
Location
Newberg Oregon
My son in law will be all over the piccy and write up thing.

Last night I stopped by a friends house and showed her our 84 Pete air schematic, she works in the printing and graphics business and is going to blow it up to about 19 x 30 or ???

The schematic is essential to running the air lines and locating valves etc.

I had been in heavy trucking for over 20 years and did nearly all of my own repairs (other than heavy stuff like tranny, rear ends and such.

I did all the brakes, wheel bearings and other repairs, but never had to start from scratch with a complete air system.

Really very simple, just need to be able to see the drawing good enough for old eyes ya know.

Now that this part of the equation is a go, its time to start gathering parts.

Dash mounted air brake parking control valve (Red and yellow knob valve) MV3
Foot valve (treadle valve)
Quick release valves
Double check valve
relay valve

And more little goodies.

Using the 84 Pete as a source for the schematic was a good deal. The parts are all standard and readily available all over.

The 15 x 4 brake shoes are also a standard.

Been thinking that we will carefully remove all the original brake equipment such as lines, complete baking plates with shoes etc and make this stuff available for sale.

Be a shame to toss it, as it is in great shape. The brakes look nearly new, including the drums.

Back to snooping for parts

Snowy
 

Section8

Member
503
6
18
Location
Little Fort, B.C., Canada
I am totally looking forward to your write up on the complete air brake build. I am interested in how the S cam and drum set up is going to go. If you are using the stock drums I think you will have a hard time squeezing the shoes into them.
I am also not aware of any modern drums that would work on these old GM Corp axles.
This also brings into play your hub adaptors.
I am not sure if you are meaning to swap the whole hub or just the bolt/load face in order to run a 10 bolt pattern.
If you are just looking to use the stock drums or not changing the whole hub assembly, there are some good reputable guys in the "Deuce Hot Roding Modifications " forum that could save you some time and effort.
A quick search for wheel adaptors will net you 2 or 3 threads on such conversions.
Three guys making the adaptor plates for 6 bolt to 10 for different rims are, Kohburn, 13Mike, and Peashooter.
Their prices are quite reasonable and may save you some time and effort if that's the way you were planning to go.
Check out the threads and see what you think.
Just an option.
Thread: 6 bolt to 10 bolt wheel adaptors, Hemmt wheel adaptors?
Wish I knew how to post the relevant thread titles. The foremost is correct though.
 

snowyrivers

Member
138
1
18
Location
Newberg Oregon
Yesssss

The trip to Seattle area yesterday went well.
Outta here at a skosh after 5am and on our way.

Met up with Bob at his place about 9 and after some glad handing and chit chat we got after the loading process.

The Big Tex trailer was quite up to the task and put her shoulder to the wheel and took the heavy load in stride.

Getting "Fort Sumner" loaded was a bit more work than "Fort Dallas" (Our nicknames to differentiate between the two)

The complete truck with the fire tank, pump and gear was a buttload heavier than just the shell (Dallas)

Bob brought his backhoe over and pulled the rig up close to the trailer, then we tried pulling from along side of the trailer to get it up and on.

Ended up having to push from behind to gitterdone.

Once on the deck things were pretty mundane, chain it down and ready it to roll.

EXCEPT ONE CAVIAT

In my infinite wisdom I decided to crank down the landing gear on the trailer to stabilize it during loading, oooops, dropped the feet a bit too far before cranking the gear down and once loaded there was not enough room to crank them up.

Hard on the ground :oops:

The kid made a quick go with a shovel and dug the feet out and we were good.

Sorry guys, I blew that one.

The trip home was uneventful other than about 4 miles from the ranch the check engine light on the tow rig came on. ARRRRRRGGGHH

Still have no clue what that was about, as it went out after we were all done unloading.

Did I ever mention I hate electronics on rigs "Sits eyeing soap box"

We did take time to scale the outfit and lets just say this was a HUSKY load.
 

Attachments

Last edited:

snowyrivers

Member
138
1
18
Location
Newberg Oregon
We have the possibility of a third truck.
If it comes to fruition it will be complete LESS AXLES

The owner is using the axles for some project and does not want the truck.

Things are in a holding pattern right now, so we will see what shakes.

The scuttle butt is this third truck is very nice with no rust (desert rig)
If this turns out to be true we will likely transfer the axles from "Dallas" as well as other parts to finish the crew cab conversion.

We are tossing ideas all over at present and will decide what to do as we get there.

Maybe a restored rig and a custom truck, for two toys.

Or sell one to help pay the bill
Or maybe a whole field of old soldiers to irritate the neighbors eh ??? :grd:
 

USMC 00-08

Well-known member
1,162
126
63
Location
Skiatook, OK
We have the possibility of a third truck.
Or maybe a whole field of old soldiers to irritate the neighbors eh ??? :grd:
It has been said these trucks are herd animals. See my signature. Somehow ended up with four.

M1010plowboy is way worse than me though. When the lady of the house starts complaining, I break out pictures of his herd and tell her it could be worse. :wink:
 

snowyrivers

Member
138
1
18
Location
Newberg Oregon
Hmmmm, I like it.

The Daughter is all over my Son In Law about this truck thing.

Well now, she has 3 horses that eat constantly, need shoes, worming, a spendy barn to live in and sundry other things.

Three trucks don't eat constantly and can sit outside.
 

m1010plowboy

Well-known member
Steel Soldiers Supporter
3,803
2,350
83
Location
Edmonton, Canada
Some of the pictures are on post #451 for when you need them.

http://www.steelsoldiers.com/showthread.php?52255-G749-preservation/page46

Kinda threw you under the bus there M1010plowboy.....knew you could handle it though.
It's all good, I'm looking forward to the progress in the build and if I need to take one for the team to see an air-brake, crew cab, I'm all in.

Had the M207 moving on the weekend and just got back from a run in the 135 so I can't keep all the fun to myself.

Having a spare 'parts' truck without the axles could make for a nice engine / trani test stand so a guy isn't wasting a thing picking up a few extra trucks. 9 trucks is a nice even number.....and I'll take full responsibility.

fall 023.jpg
 
Top
AdBlock Detected

We get it, advertisements are annoying!

Sure, ad-blocking software does a great job at blocking ads, but it also blocks useful features of our website like our supporting vendors. Their ads help keep Steel Soldiers going. Please consider disabling your ad blockers for the site. Thanks!

I've Disabled AdBlock
No Thanks