• Steel Soldiers now has a few new forums, read more about it at: New Munitions Forums!

  • Microsoft MSN, Live, Hotmail, Outlook email users may not be receiving emails. We are working to resolve this issue. Please add support@steelsoldiers.com to your trusted contacts.


6CTA8.3 engine rebuild for Sur Móvil

Mos68x

Active member
825
30
28
Location
Seligman,AZ
Ok, it’s been a bit but things have progressed at least. Other than waiting on fastenal for a shipping authorization everything for the head have been worked out between me and the seller.

Started pulling the pistons yesterday. Got all the rod caps removed and marked for locations. Got the #2 piston full removed before it started pouring rain yesterday afternoon. Still not sure how I’m going to remove these liners though. I was scratching my head for a bit and then this mornin I had a thought. I used my air hammer to remover the rod caps from the assembly yesterday, can I use the air hammer to remember be the liners as well? Assuming I have enough room to get up past the crank that is.
 

Mos68x

Active member
825
30
28
Location
Seligman,AZ
Well the air hammer idea didn’t work, it didn’t even budge the #1 or #2 liner with full pressure in the tank. I think I may have to go back to my original plan of a threaded rod since I just don’t have enough area for a good solid swing, especially on #3 &#4 where the front diff is in the way.

if anyone has any different ideas I’m all ears. I got plenty of time till the motor is ready to go back together.
 

simp5782

Feo, Fuerte y Formal
Supporting Vendor
12,095
9,256
113
Location
Mason, TN
Well the air hammer idea didn’t work, it didn’t even budge the #1 or #2 liner with full pressure in the tank. I think I may have to go back to my original plan of a threaded rod since I just don’t have enough area for a good solid swing, especially on #3 &#4 where the front diff is in the way.

if anyone has any different ideas I’m all ears. I got plenty of time till the motor is ready to go back together.
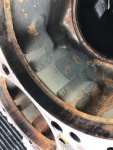
http://www.yesterdaystractors.com/cgi-bin/viewit.cgi?bd=toolt&th=309303

I have always used the bottle jack and puck methods.
 

Mos68x

Active member
825
30
28
Location
Seligman,AZ
Ok, I got the #5 & #6 liners out as well as all of the pistons. The #5 #6 pistons are junk, and #3 might be as well. I didn’t get out and work on the engine today since the rain showed up and hasn’t gone away yet. I also borrowed a cylinder honing tool from the neighbor and I’ll put new crosshatching in the old liners that are still good. I’ll see if I can save the #5 & #6 liners with the honing tool but if I can’t then I’ll just throw new ones in. I’ll probably also reuse any of the good pistons that I can. Hopefully this way I’ll have enough parts next time I have to dive into this motor.

On a side note, what causes the valve seats to drop in these engines? I did have cracking in the head in every cylinder, so I’m curious if what caused that may have caused the valve seats to drop. It never overheated on my watch over the last year, so I’m guessing any overheating was done by one of the previous owners, private or military.
 

simp5782

Feo, Fuerte y Formal
Supporting Vendor
12,095
9,256
113
Location
Mason, TN
Ok, I got the #5 & #6 liners out as well as all of the pistons. The #5 #6 pistons are junk, and #3 might be as well. I didn’t get out and work on the engine today since the rain showed up and hasn’t gone away yet. I also borrowed a cylinder honing tool from the neighbor and I’ll put new crosshatching in the old liners that are still good. I’ll see if I can save the #5 & #6 liners with the honing tool but if I can’t then I’ll just throw new ones in. I’ll probably also reuse any of the good pistons that I can. Hopefully this way I’ll have enough parts next time I have to dive into this motor.

On a side note, what causes the valve seats to drop in these engines? I did have cracking in the head in every cylinder, so I’m curious if what caused that may have caused the valve seats to drop. It never overheated on my watch over the last year, so I’m guessing any overheating was done by one of the previous owners, private or military.
Do it right the first time while it is apart. If you can afford to replace what you believe to be bad then do it while you have it apart. Do you really want to go thru it again? Likely not as you are not having to much fun with this one. Do it right the first time cause you don't want it to be that "one" you thought would be ok to come back and bite you.
 

Mos68x

Active member
825
30
28
Location
Seligman,AZ
Do it right the first time while it is apart. If you can afford to replace what you believe to be bad then do it while you have it apart. Do you really want to go thru it again? Likely not as you are not having to much fun with this one. Do it right the first time cause you don't want it to be that "one" you thought would be ok to come back and bite you.
Oh no worries, I won’t be “that guy” and engines aren’t where I allow any kind of redneck engineering lol

I’ll use the piston rings to measure gap while I hone, if the gap gets too big I’ll just scrap the liner or save it for ESOTR (emergency-side-of-the-road) repairs.
 

74M35A2

Well-known member
4,145
312
83
Location
Livonia, MI
Overheat usually causes both. Drops seats due to head expansion, and causes the narrow piece between the intake and exhaust valve to crack, especially if cold water was poured in with engine off and then started and sucks it in. Largest thermal difference between the two valves, across the smallest amount of metal.
 

someoldmoose

New member
583
2
0
Location
Lancaster, PA
Overheat usually causes both. Drops seats due to head expansion, and causes the narrow piece between the intake and exhaust valve to crack, especially if cold water was poured in with engine off and then started and sucks it in. Largest thermal difference between the two valves, across the smallest amount of metal.
Yup, wut he said.
 

Mos68x

Active member
825
30
28
Location
Seligman,AZ
No bueno! I tried to salvage the #5 & #6 liners, but as I originally thought, but they are too badly damaged. I tried to hone the rest of the liners but two things happened to make me change my mind about reusing them. There is a slight ridge at the top and I don’t think I can hone it out. And besides that I accidentally hit the webbing for block, or the crank counterweights, and destroyed the stones on the honing tool. At this point I’m just going to put all new everything in and later I’ll take the liners to a shop and see if they think they can salvage them. We are in our monsoon season finally so the only time I can work on the engine is in the morning. Bad thing is I’ve already got a couple spots on the crank where moisture sat and caused a little rust, but a little bit of grey sotchbrite ought to fix that.
 

Mos68x

Active member
825
30
28
Location
Seligman,AZ
Thanks for confirming my thoughts about the overheating causing my current issues. I supspected that was the cause as it generally is for most motors, I just wasn’t sure if these motors were somehow a bit more resilient than most.
 

WillWagner

The Person You Were Warned About As A Child
Super Moderator
Steel Soldiers Supporter
8,386
2,391
113
Location
Monrovia, Ca.
Mos, this version of the C was.....growing pain.....for Cummins. Theses were prone to head cracking and dropping seats, and the dreaded block crack between liners. Can't tell you how many garbage trucks I did head jobs and block replacements on. Most likely nothing anybody let happen. If you use it hard, there is a greater than 50% chance it will happen again, head crack anywho, high temps, +200, have a big to do with the block thing

Don't hone the liners, send them to the scrap pile, we tried that to try and save out of warranty customers a little money and it ended up costing the Co because the engine turned into a giant oil pump in short order. We built it so we had to stand behind it.

As someone posted up a bit ago, do it the right way the first time. Also, if there is ridge at the top of the liner, the engine has had a dirt diet sometime in it's life, check ALL of your intake hoses/piping and put a filter in it, make sure the filter seats in the housing.
 

Mos68x

Active member
825
30
28
Location
Seligman,AZ
Mos, this version of the C was.....growing pain.....for Cummins. Theses were prone to head cracking and dropping seats, and the dreaded block crack between liners. Can't tell you how many garbage trucks I did head jobs and block replacements on. Most likely nothing anybody let happen. If you use it hard, there is a greater than 50% chance it will happen again, head crack anywho, high temps, +200, have a big to do with the block thing

Don't hone the liners, send them to the scrap pile, we tried that to try and save out of warranty customers a little money and it ended up costing the Co because the engine turned into a giant oil pump in short order. We built it so we had to stand behind it.

As someone posted up a bit ago, do it the right way the first time. Also, if there is ridge at the top of the liner, the engine has had a dirt diet sometime in it's life, check ALL of your intake hoses/piping and put a filter in it, make sure the filter seats in the housing.
I was hopin you chime in soon. I’ve already decided not to reuse anything I have replacements for, but thanks for the heads up on your experience with trying to reuse the liners.

Is there anything we can do to prevent the head cracking issues? Aside from keeping the engine as cool as possible I can’t think of anything. How are people who turn up their pumps, or change out to the P7100 getting away with no cracking? How does the marine version avoid it? Considering that the marine version is about 160hp/300ftlb more than ours you’d think they’d be goin through heads like crazy, unless it’s because of the marine version using lake/sea water to cool it instead.

As for the dirt diet, I’ll be going through intake system next and replacing every seal I can find since I’ll be doing some “fording” with it soon. Not really fording, but the intake air filter will be under water, so I’ll be checking the intake or just replacing it completely, as well replacing the axle vents and plumbling them to a common line.
 
Last edited:

Mos68x

Active member
825
30
28
Location
Seligman,AZ
Grrr this website is getting irritating, won’t let me upload pics


I got the remaining liners out, #4 was being a real PITA until I gave up and cut the angle iron I was using and just set my bottle jack on the axle instead of trying to fight it. I took pics of the webbing between cylinders so that if y’all saw something I missed I could still address it while it’s apart.
 

Attachments

WillWagner

The Person You Were Warned About As A Child
Super Moderator
Steel Soldiers Supporter
8,386
2,391
113
Location
Monrovia, Ca.
That hole looks OK.
Turning the fuel up in these early engines might be OK for non daily commerce use, the duty cycle is not like a garbage truck.

Marine versions of this engine weren't released until mid 90's IIRc and the build change for these engines, thick decks, better head castings, etc was the 1991 product. The best years for these engines....ones that I would consider having power a MH would be 1994 product. Mfgd between 1994 and 1997
 

Mos68x

Active member
825
30
28
Location
Seligman,AZ
#1/#2 cylinder webbing
9A823D32-1CFF-46B1-95B5-2C07F8F85C90.jpg
#2/#3 cylinder webbing
519746C9-8BBF-4D64-83D9-F9A41F1602C9.jpg
#3/#4 cylinder webbing
5B96F083-1665-4718-A49D-401D10D3D3B1.jpg
#4/#5 cylinder webbing
0354D4E2-E314-4602-B419-6606B6610C47.jpg
#5/#6 cylinder webbing
85AAE01C-CFC4-4023-ADD0-5CBE9C19CB07.jpg

Cylinders 1&2
56EB0A49-9A5C-4597-829C-479E6187BED4.jpg

Cylinders 3&4
CA1855BC-510B-49BF-9BA3-B5B536F1194D.jpg

Cylinders 5&6
56EB0A49-9A5C-4597-829C-479E6187BED4.jpg

This is is how I had to get the #4 liner out
915FEE33-C164-49D6-B6AA-AC9D61BA943A.jpg


Today I’m planning on tackling the rust in each liner bore and replacing my main bearings, we’ll see how far I get on that before the rain shuts me down.

... in other news ...
It looks like rebuilding my replacement head just got pushed back a month or longer. My RV fridge that I’ve been using has given up the ghost so I’m gonna have to get a new unit this coming month. I don’t forsee having enough extra money to deal with both at the same time. Hopefully next month I can deal with my inadequate power supply. Right now I only have a 12v to 110v inverter, and I have to change the batteries it is attached to pretty often. I was hoping to get a new 24v to 110v inverter to fix that next month, but we’ll see what can be done when the time comes.
 
Last edited:

WillWagner

The Person You Were Warned About As A Child
Super Moderator
Steel Soldiers Supporter
8,386
2,391
113
Location
Monrovia, Ca.
From the pics, all looks good. Use a wire wheel on a drill motor to clean the liner bores and lower receivers, a block of wood with 320 paper on it for the deck, avoid those spinning disc things, they remove material. After it is all clean, no need to polish it, just remove the chunks, spray rust penetrant, WD, PB, or your favorite flavor on the deck. Let it sit for a couple of mins, wipe off and with the ball end of a pall peen hammer, GENTLY tap the block, from the liner bore side, between the liner bores and at the head bolt holes closest to the liner. IF there is a crack, it will appear as a line of penetrant that you sprayed and wiped off. It only takes 1 or 2 slight taps for it to show up. If nuttin shows up, you are GTG. Liners can be tapped in with a chunk of hard wood or aluminum....aluminum is what the driver is made of...gently, just until you hear the tone of the liner change, this will tell you it is seated. Protrusion IS important. .000 to .003 is spec., it should be closer to .000. A hint, you can put the liners in w/o toe o-rings first to check protrusion and they will pull out easy so you can install the o-ring.
 

74M35A2

Well-known member
4,145
312
83
Location
Livonia, MI
I find particular interest and respect those who do this on such a budget (or nearly none at all). I throw money recklessly at my truck in random spurts, it is all sitting around as parts in piles of dreams to install, which is the worst situation possible. No $, and no fun stuff installed. Just a waste of both. I really should take one of my vacation weeks from work once the kids are back in school, and see how many of my upgrades I can get done in a week.

Cold beer in the air for you, Mos. You're rat-rodding (spending no $ on it) forward with every post. Keep going. Love the bottle-jack tower of power. Can't wait to re-hash rocker arm nuts again once you get there. :)
 
Top
AdBlock Detected

We get it, advertisements are annoying!

Sure, ad-blocking software does a great job at blocking ads, but it also blocks useful features of our website like our supporting vendors. Their ads help keep Steel Soldiers going. Please consider disabling your ad blockers for the site. Thanks!

I've Disabled AdBlock
No Thanks