-
Steel Soldiers now has a few new forums, read more about it at: New Munitions Forums!


1986 CUCV M1009 Decade after being wrecked.
- Thread starter cucvrus
- Start date

More options
Who Replied?- 134
- 14
- 18
- Location
- Battle Ground/WA
Following this thread is inspiring me to work on my M1009, it has been a very reliable driver for years. But what I have found is lots of little things are beginning to add up. Sharing what I am doing on this site helps, I posted a picture of a nut that was loose on my power steering bracket taken with my phone. I held the phone up by the radiator to get enough distance to focus and kind of "snapped a blind" shot. Anyway I felt the picture showed the nut I found loose, but it also showed a missing bolt on the water pump under the sheave that I couldn't see from any angle because I couldn't get my head in that small a space. I was only looking at the nut in the picture but "cucvrus" mentioned the missing bolt so I was able to correct that issue. I appreciate the approach of returning things to stock when possible, these vehicles were abused while in service with the military and survived 25 to 30 years to be sold to the public. If the original design can last under those conditions, perhaps repairing them with that in mind is the best place to start. That being said, I am as guilty as anyone in making changes but before I do, I want to know how the original system worked and if it failed, why, how long did it last before failing? If it's not broke, why "fix" it?
cucvrus
Well-known member
- 11,274
- 9,601
- 113
- Location
- Jonestown Pennsylvania


 The old frame is out of the barn and outside. I have it staged about waist high on some steel horses so I don't need to crawl in the dirt to remove all the plumbing. I have all the brackets blasted primed and painted for the new frame and just need to remove and paint all the plumbing before I attach it to my new frame. After that it will be torch time. I plan on cutting all the rivets and retaining all the cross member and frame brackets. Tomorrow the work will begin. I have about 8 hours to spend on it.

 I have both axles bolted in and the frame up about waist high to make the transfer of the plumbing and brackets a bit easier. I don't like crawling in the dirt and working low. I have a wheeled office chair and that suits me just fine. I will post progress pictures tomorrow. I work in the AM. I hope you enjoy the pictures and get a chance to complete something on your projects. Have a Great Day.
- 3,669
- 2,486
- 113
- Location
- Peoria, Illinois
Thank you Sir for the photos and explanations that go with. Ya give us a lot of your time posting both! You're an inspiration to many, whether they say or not. Would be a pleasure to see and help with one of your creations. Keep it simple and do the next right thing!
Merddin
Member
- 91
- -1
- 6
- Location
- Cape Girardeau, MO
What paint do you put on the frame? A gloss black or some special coating? Looks good.
cucvrus
Well-known member
- 11,274
- 9,601
- 113
- Location
- Jonestown Pennsylvania
I had the frame sand blasted/primed and painted with automotive paint and primer. It is a bit dusty in the pictures from leaning against the wall of my shop since March. I am not worried about the light dust. After it is built and complete I can give it a wash job. I am sure it will get dirty again during normal use even if it is a show piece. I plan on keeping for a while and marketing it. I hope today is a good day for all and I am able to complete the plumbing and attachment of all the frame brackets. Have a Great Day.
Merddin
Member
- 91
- -1
- 6
- Location
- Cape Girardeau, MO
Nice weather here in SE MO. I plan on doing more body work on my bed. Been filling holes drilled by US Forest service for 3 days. There were about 50 holes on bed from those idiots and whatever they mounted in bed.
Also plan on getting a final coat of high build primer on my front bumper and some more regular primer on my rear bumper. Maybe mow 3 acres later today too.
Good luck on your projects for the day!
Also plan on getting a final coat of high build primer on my front bumper and some more regular primer on my rear bumper. Maybe mow 3 acres later today too.
Good luck on your projects for the day!
cucvrus
Well-known member
- 11,274
- 9,601
- 113
- Location
- Jonestown Pennsylvania


 Today I could have done more if I would have just W

 ham Bammed the plumbing from the wrecked frame to the new frame. But I didn't. I removed the plumbing and cleaned and scrubbed it all. Used DX330 to clean and wash it and then painted it with blue spray paint I had on hand. Nice sunny day so I gave it a few coats and went right in and installed it before I forgot where it went. It looks really nice on the black frame. I bolted the motor perches in place and installed the new brake hoses on the front and fastened all the brake lines. It took most of the day to wrap it up but I am satisfied with the progress.


 Thanks for looking I had a great day. I was by myself all day and enjoyed the solitude and my XM radio. The chickens were trying to help or just being nosey. All is well.
cucvrus
Well-known member
- 11,274
- 9,601
- 113
- Location
- Jonestown Pennsylvania


 The old frame is pretty well stripped of anything I need. It is twisted and scrap as far as I am concerned. I will cut it up for the mounts and cross members. The last picture it is starting to take shape again. Being built by hand and cleaning and painting every piece takes lots of time and patience. More later. Have a Great Weekend.
- 1,845
- 51
- 48
- Location
- Berkeley CA
Post 228 pic 7 (DSCF5468.jpg) Is it me or just a picture artifact. It looks like rust on top of the bracket. Not being critical of your magnificent work, just trying to help. Painting the lines blue really helped to see what was done and how it is laid out. Your work is truly inspiring!
cucvrus
Well-known member
- 11,274
- 9,601
- 113
- Location
- Jonestown Pennsylvania
I seen that. It is a new anodized gold plated hose clip/clamp that holds the hose into the bracket. I did a double take on tat when I posted. Rust? No way. But good call. It caught my eye also. Thank you.
cucvrus
Well-known member
- 11,274
- 9,601
- 113
- Location
- Jonestown Pennsylvania

 Today after work I went out and salvaged some more parts for my current build. I have a few core supports in my barn but I wanted to get the last one I had out in the field and get the core support put to use. I also removed a bunch of bolts from parts I want to install on the current build. It makes it easier and gets the parts put to use. The core support is in excellent condition and it is a genuine GM one that is 35 years old.

 After some sanding and cleaning I will paint it and it will last 50 more years as long as it is not wrecked and gets reasonable care and maintenance. It has been sitting in my field attached to the M1009 since 1999. The M1009 never ran it had 13K on it and the hood was off when I bought it at DRMO. The seized engine is still under the hood with out the heads. I suspect it would still be a salvageable block. I have a lot of other projects I am working on and just getting a few parts lined up for painting and under coating. Thank you for looking. Have a Great Day.
cucvrus
Well-known member
- 11,274
- 9,601
- 113
- Location
- Jonestown Pennsylvania
 Tonight was a slow progress night but it is something that needs to be done. I cleaned all the bump stops and reinstalled them on the frame. I installed my remanufactured power steering gear box on the frame and painted the new drag link assembly. I will install the drag link tomorrow, install the cross member and the energy suspension motor mount inserts. I will photo the process so if someone wants to do the same. I like this point in the build. I have many parts setting around. The pile goes down a little each day. Take Care and have a Great Day.
cucvrus
Well-known member
- 11,274
- 9,601
- 113
- Location
- Jonestown Pennsylvania


 Tonight was a good productive night. I installed the front shocks the steering stabilizer and the energy suspension motor mount inserts. I also removed all my bins full of parts from a storage bin outside. I brought them inside the barn and I can ;look at them and reassemble them parts till they are all gone. Have a Great Day.
corvette9
Member
- 184
- 3
- 18
- Location
- new haven ct
Looks good Rick. I'm about in the same place as you are on my project. Just finished painting the frame and the rear diff. Installed all brake lines ft and rear. The ft diff is also all done. The cab should be all in primer next week. Nice just fixing dents instead of rust on the cab, I like the blue shocks. Mine are all yellow. Keep up the nice work.
Brian G. PS you have an email.
Brian G. PS you have an email.
cucvrus
Well-known member
- 11,274
- 9,601
- 113
- Location
- Jonestown Pennsylvania


 Today was a very productive day and I was able to get a lot of work completed. I wish I could get more but that is the way it always goes. I did take a break and go to a carnival with my family. That counts.
  I cleaned up the rubbers for the front cab and hood hinges. I installed the hood hinges. I will be taking them off to remount the body on the frame. I was also making great progress on the front fire wall getting it back together.


 I cleaned the hood hinges oiled and greased them. This is the only way to get to the actual pivot point on the hood hinges. I also cleaned and oiled/greased the wiper linkage / transmission and installed that also. I have a long way to go but am making progress everyday. Have a Great Day. Slow but steady gets it done.
- 1,845
- 51
- 48
- Location
- Berkeley CA
If you make it any nicer, you will have to replace the body with a transparent one.
cucvrus
Well-known member
- 11,274
- 9,601
- 113
- Location
- Jonestown Pennsylvania
Tonight I was replacing the fuel lines and the front axle vent hose. I pulled the engine out and prepared to reassemble it. I have a few bolts and parts to run thru the parts washer. Tomorrow is another day/night. Have a Great Day. No pictures today.
cucvrus
Well-known member
- 11,274
- 9,601
- 113
- Location
- Jonestown Pennsylvania
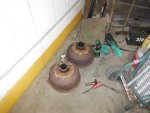
 Today I broke from the schedule and worked on the M1028 wood hauling truck. It has been dragging the rear brakes on and off for the last year. Last night it was locked up tight and would barely move. All 3 off the brake cables were rusted fast.
  Mostly from not being used most of the time and then using it a few times when pulling logs. I have a few new parts to get and that will fix it up. New brakes, wheel cylinders, axle seals, hub seals, all 3 new brake cables and a differential cover gasket. That was easy. I have to order the parts from a local parts store. Maybe even Autozone. Just depends where tomorrow takes me. Have a Great Day. The heavy rear drums get heavier every time I have to lift them. Is the correct size 3" X 13" for the brake shoes? I guess I should have measured them. Oh well.
Attachments
-
 74.2 KB Views: 30
cucvrus
Well-known member
- 11,274
- 9,601
- 113
- Location
- Jonestown Pennsylvania
Update. I never had any luck getting any parts yesterday. So I spent my time randomly cleaning engine bolts and brackets so I can reassemble the engine like clock work. I have so many bins of parts I also have duplicate bins of the same parts. I was picking and accounting for all the parts as I cleaned and prepared to paint the parts. Nothing photo worthy but time consuming. I was short a few gaskets so Amazon was my source for Fel-pro gaskets and seals. More later. And I know the frame looks good enough to have a transparent body. Reminds me of a cutaway vehicle for display purposes. Raining today so rest is on the schedule.
- 108,250members
- 163,582threads
- 2,301,773posts
- 1,745online users