• Steel Soldiers now has a few new forums, read more about it at: New Munitions Forums!

  • Microsoft MSN, Live, Hotmail, Outlook email users may not be receiving emails. We are working to resolve this issue. Please add support@steelsoldiers.com to your trusted contacts.


Another LMTV RV Build

BuiltMFG

Member
148
5
18
Location
Denver, CO
I've been lurking here for a while and wanted to thank the the SS folks for their knowledge as well post my slow-roast of a build.

I bought a 2002 1078A1 just over a year ago and between my day job and fighting with the county about where I can park it has made things difficult when it comes to working on it. So I can only work on this thing when weather permits making progress slow (but Denver weather hasn't been too bad). I am currently building out the cab while planning for the habitat. I'm a designer/creative director so my occupation allows me to develop graphics for the truck as well as have the knowledge of mediums to build some parts. I am not, however, a diesel mechanic nor do I posses the knowledge to build some of the things I want to. So I have to lean on some vendors and friends to make things happen.

The truck was missing a cover where the 50 cal was so I created a moon roof to let some more light in.
roof_gal5.jpg

Currently I have removed the dash and powder coated it and hope to install it this weekend. This process was brought on by a new AC system which made sense to tear it down at the same time. I've done a little electrical based on this teardown as well as some sound deadening (both behind the dash and to the interior).
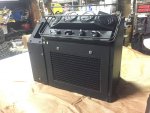
IMG_9847.jpglaser_etch_crop.jpg

The electrical I have done was to create a simple switch so that all of the lights can be turned on at once.
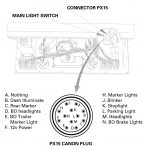
canon_plug1.jpg

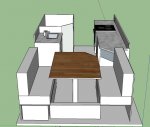
So the habitat portion is pretty far out of my wheelhouse but I'm going to purchase plans from Overland Adventure Truck to build the subframe. I've slowly been learning about building campers and I'd really like to build a HiLo style camper on the back of the truck. I've used sketchup to layout some of the bottom portion of this style of camper. These are just some rough preliminary images so I can figure out what will fit and what won't. Still sorting this out but currently there is a queen size bed, wet bath and refrig/freezer. The oven is probably coming out and I've yet to really finish this enough to build the top. The ultimate goal is to make this a live work space for me, the date to finalize this is still undecided but i was hoping for Summer of 2019.
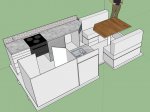
Screen Shot 2018-01-12 at 9.20.24 AM.jpgScreen Shot 2018-01-12 at 9.20.36 AM.jpgScreen Shot 2018-01-12 at 9.20.48 AM.jpg
Love to hear your suggestions on how to lift the top of this guy. As well as any concerns you might have.

I'll regularly been sharing what I have learned as well as some of what I already know on builtmfg.com. Please let me know if you see anything that doesn't add up, I don't want to put any misinformation out there.
Thanks
 

Aernan

Member
510
19
18
Location
San Jose/California
So the habitat portion is pretty far out of my wheelhouse but I'm going to purchase plans from Overland Adventure Truck to build the subframe. I've slowly been learning about building campers and I'd really like to build a HiLo style camper on the back of the truck. I've used sketchup to layout some of the bottom portion of this style of camper. These are just some rough preliminary images so I can figure out what will fit and what won't. Still sorting this out but currently there is a queen size bed, wet bath and refrig/freezer. The oven is probably coming out and I've yet to really finish this enough to build the top. The ultimate goal is to make this a live work space for me, the date to finalize this is still undecided but i was hoping for Summer of 2019.
You are farther ahead of your build then I am. (still sorting out mechanical problems). Thank you for sharing this design. I really like it. It's great to visualize how much you can pack into the space.

When you say HiLo style camper. Do you mean a lifting roof or a 2nd bed that descends from the ceiling or something else?

Regarding the sub frame. In the rear there are some large frame rails, a 2nd set of rails then the bed cross beams. Do you intend on removing that 2nd set of rails to reduce the overall box height or retaining them and adding a sub frame at that level? Will the sub frame be a 3/4 point pivot design or are you doing direct(hard) mount?

In the sketchup it looks like everything is mounted clear of a central isle. Where do you intend on mounting the fresh water tank? It looks like it might fit under the bench seats but that would put all the weight on one side.

Re: toilet. Are you doing a cartridge or black water tank? Any ideas where to mount that?

One last thing. Where do you intend on putting your house battery and main electrical stuff?
 

Aernan

Member
510
19
18
Location
San Jose/California
When you did your powder coating of the dash. Is there any kind of kick plate to cover up the air lines under the dash going to the floor near the steering column? Mine are exposed.
 

BuiltMFG

Member
148
5
18
Location
Denver, CO
You are farther ahead of your build then I am. (still sorting out mechanical problems). Thank you for sharing this design. I really like it. It's great to visualize how much you can pack into the space. Well I have to pay people to sort out mechanical issues so at least you can do it on your own.

When you say HiLo style camper. Do you mean a lifting roof or a 2nd bed that descends from the ceiling or something else?
Yes, it's basically a box with a long top that lifts, look up "Perkymog" on Instagram, he has a similar set-up

Regarding the sub frame. In the rear there are some large frame rails, a 2nd set of rails then the bed cross beams. Do you intend on removing that 2nd set of rails to reduce the overall box height or retaining them and adding a sub frame at that level? Will the sub frame be a 3/4 point pivot design or are you doing direct(hard) mount?
Correct, I will remove the set of rails and install a 4 point system, unless somebody convinces me otherwise.

In the sketchup it looks like everything is mounted clear of a central isle. Where do you intend on mounting the fresh water tank? It looks like it might fit under the bench seats but that would put all the weight on one side.
I'm still working on if the bed is the front or the rear of the vehicle, currently it's the rear. Fresh is under one bench and Gray is under the other.

Re: toilet. Are you doing a cartridge or black water tank? Any ideas where to mount that?
The toilet is composting, I've watched a few videos on them and i'm impressed.

One last thing. Where do you intend on putting your house battery and main electrical stuff?
The battery box will fit at least 7 batteries due to the new arangment in the battery box. So 4 still run the truck and 3 for solar.

Everything the I CREATE either via PDF or sketchup I will make available on the blog (just FYI). I am currently building a molle rack for behind both the passenger and driver seats to increase storage.
 

Aernan

Member
510
19
18
Location
San Jose/California
Regarding the hard fixed vs 3/4 point system:
This design point people seem to have strong views on both sides of the fence. From my research I have heard that the Unimog and European truck builders make a 3/4 point system because the Unimog itself has very flexible frame rails as part of the design to help with articulation of the truck. The SS truck is based on the Steyr which from my reading also had somewhat flexible frame rails. But the SS design has much stiffer frame rails and flexes a lot less(non zero flex).

I would speculate that the Mog has a flexible frame to keep the weight down and added articulation is the net benefit. I can't really imagine having a flexible chassis as something you intend on designing. Certainly custom built race vehicles of all forms are designed to have as rigid a frame as possible and all production cars are modified to have stiffer frames. In addition the torque tubes cover the drive shafts. This is unique to the unimog. I believe the torque tubes have limiters/stops in them as well. The engine/transmission in the mog is also designed to flex a great deal and is only connected in 3 points. The S&S trucks have at least 4 points so they don't support massive frame flex. Basically nothing I can find in the design supports the idea of massive frame flex.

I believe if you make the frame stiff enough you can hard mount the box with no issues. This view is supported by the fact that the 1079 has the box hard mounted.

I'm not sure which side of the debate I fall on yet. I would like to get a water tank and add the 5k of weight and then go drive the truck cross axle to measure the total frame twist with the factory bed on it to see just how much torsion there really is. Looking at videos on youtube of pickup trucks I know they demonstrate how the bed is mounted and how much torsion there is. AFAIK all pickup trucks have the bed hard mounted so this supports the view that it is safe to do.

On the other side of the argument they say that if the frame is not allowed to flex it will put stresses on other stuff and eventually break the frame or other components. I have seen some frame failure pictures but I don't know the full story on the failures. None of the photos have been on Steyr or S&S trucks so I can't make any judgements.

Lastly if you could design a 3/4 point mount that uses some form of isolator to damp vibrations from the road I would be very interested. This could be done in how the frame attaches mount or how the box attaches to the mount. Anything to reduce vibration in the box would really improve the longevity of stuff in the box.
 

BuiltMFG

Member
148
5
18
Location
Denver, CO
Thanks for the intel, and I don't know which side of the fence i fall on either. I would certainly prefer to build cross supports over the back of the frame to reinforce the frame and call it a day as opposed to spending a good deal of money/time on a 3/4 system.

If I could find a way to cushion the frame to the habitat and use the method with angle iron and springs to attach the two I would be all for it if I can verify the frame isn't eventually going to trash everything I built.
 

coachgeo

Well-known member
4,955
3,325
113
Location
North of Cincy OH
You are farther ahead of your build then I am. (still sorting out mechanical problems). ..... Regarding the sub frame. In the rear there are some large frame rails, a 2nd set of rails then the bed cross beams. Do you intend on removing that 2nd set of rails to reduce the overall box height or retaining them and adding a sub frame at that level? Will the sub frame be a 3/4 point pivot design or are you doing direct(hard) mount? ...
If reading your description of things correctly.. Bed cross beams and sub frame you speak of is all part of the bed... not part of the chassis of the truck. Least that has been the consensus in past conversations here. If you remove bed.. these go too. The camper body should then get mounted in some manner so the truck chassis can flex below it many say, but not everyone. You can add back a subframe like the bed and the bottom of M1079 box has with some sort of 3 or 4 pivot mount system or captured spring like the M1079 if you think that is best.

For example I am going to NOT use a new sub frame; cause my Ambo Body has one constructed within it already. Though will use captured springs at front like the M1079. Granted in that scenario will have to cut out a piece of the front center of floor of Ambo box and raise it over the area of the transmission since it sits above the height of the Truck's chassis. A short transmission tunnel you could call it.
 

coachgeo

Well-known member
4,955
3,325
113
Location
North of Cincy OH
...
If I could find a way to cushion the frame to the habitat and use the method with angle iron and springs to attach the two I would be all for it if I can verify the frame isn't eventually going to trash everything I built.
That is a captured spring system. Some say NOT having this will most likely trash everything you build. Captured spring system mounts can be purchased off the shelf though they are made for a water tank which would be heavier. Thus not sure if springs would be too stiff or not. Examples:

http://www.watertrucks.com/prod_details.asp?id=UTETANKMTKIT
http://www.tandbwatertrucks.com/store/p17/Water_Tank_Hold_Down_Spring_w/_Hardware.html
 
Last edited:

Masspilot

Member
163
1
18
Location
Ky
If you have any questions pls feel free to contact me or call I am in the process of my build and am having a blast. There are a few others on here that have built there's and have done some amazing work. I don't want to speak for them but the few people I have talked to have been a tremendous amount of help.KIMG0492.jpg
 

BuiltMFG

Member
148
5
18
Location
Denver, CO
Coachgeo,
I've been leaning towards the 3/4 system because I am essentially building a box without a top for the habitat. Therefore, any little torque will rack the box. If I was just building a straight box on the top I would probably do the same thing you are.

I've seen the sprigs for the water trucks, I'd def prefer to use those I'm just a little leery based on the design of the camper.
 

coachgeo

Well-known member
4,955
3,325
113
Location
North of Cincy OH
Coachgeo,
I've been leaning towards the 3/4 system because I am essentially building a box without a top for the habitat. Therefore, any little torque will rack the box......
If am recalling right; your thinking of a Hi-Lo like design? Would agree with you if that is that case...... a pivot sub structure 3/4 would be best.
 

zx9rpilot

New member
2
0
0
Location
Huntsville AL
Hi-Lo concept

I like your concept so far. Here are some concept pics I have been working on that have a Hi-Lo type setup, if you are looking for some design ideas. I am trying to get a low center of gravity and make it look less like an RV when in unsafe areas. All the camper windows are enclosed when the top is lowered for security. With some design changes I think I can get the whole truck under 9 feet with the tires deflated. 6.5 foot inside height after the roof raises 2 feet. My main design challenge now is the bathroom. I want the bathroom area ceiling to raise up separate from the roof so that when not in use the bathroom ceiling can be used as a countertop for the kitchen area. The XPcamper V1 does this very well and it provides so much more usable space. So the bathroom ceiling needs to be about 3 foot tall when not used and then raised to about 6.5 feet. I do not want flexible bathroom walls like the XPcamper though. There is room for a BMW 1200GS under the bed and a washer/dryer. The construction design is mostly foam/fiberglass with the body panels being structural. This means no subframe needed, maximizing usable height.

Perspective LMTV concept.jpg
LMTV exp 2018.jpg
LMTV rv cross section.jpg
 
Last edited:
Top
AdBlock Detected

We get it, advertisements are annoying!

Sure, ad-blocking software does a great job at blocking ads, but it also blocks useful features of our website like our supporting vendors. Their ads help keep Steel Soldiers going. Please consider disabling your ad blockers for the site. Thanks!

I've Disabled AdBlock
No Thanks