• Steel Soldiers now has a few new forums, read more about it at: New Munitions Forums!
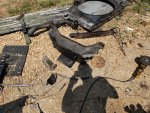
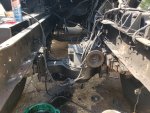
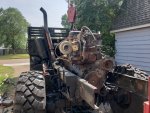
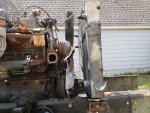
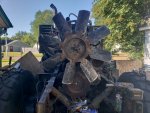
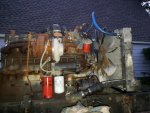
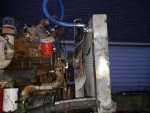
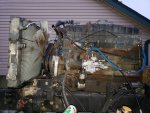
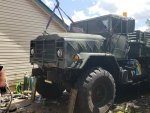
  • Microsoft MSN, Live, Hotmail, Outlook email users may not be receiving emails. We are working to resolve this issue. Please add support@steelsoldiers.com to your trusted contacts.


Simp's M923 Big Cam Repower

simp5782

Feo, Fuerte y Formal
Supporting Vendor
12,095
9,256
113
Location
Mason, TN
Front crossmember cut out. New front mount rough installed. I will have to drill the frame out and bolt it out. It has some spacing behind it but it should pull together when bolted up. The frame spread almost an inch when i cut the front cross member out.

I hate cold rivets.

Dropped the motor in a little bit ago but was too dark for pics.
 

Attachments

simp5782

Feo, Fuerte y Formal
Supporting Vendor
12,095
9,256
113
Location
Mason, TN
Well I got tired of trying to fight the motor in with a heavy transmission and that big cab cowl so I just pulled the cab. Had raised it as much as i could but with only a few hoses holding it on. Was easier and fewer cuss words to just take it off. Trying to force it in past the third member it popped a hole in the oil pan so now i get to weld that up.

but all and all with the rear mounts in place and the 920 front mount thrown in there. It is close. 2" overall probably 1.5" with the frame pulled together. So options are to raise the motor some just a little beyond level and do a channel mount to use the existing bolt holes or weld a piece onto the 920 mount that is a little bit wider than what is on there and redrill the mount holes on the cross member.

Engine can not move to the drivers side cause the oil pan will be in the way of the front driveline. it is close enough already. and the cross member can not go to the passengers side. So i will get on the drawing board. As it sits on the mount the engine is below level so raising is in the plan.

plan will be to go with a 1.5" thick piece of flatbar. drill and tap it so that the holes line up for the top mount and the bottom holes and the offset.
 

Attachments

Last edited:

74M35A2

Well-known member
4,145
312
83
Location
Livonia, MI
Isn’t it the same base engine, 855? What is causing complications? I would think you just transfer the mounts and oil pan from your NHC-250 to the turbo BC engine and you’re off to the races. Apparently not? I’m sure you’re not doing extra work because you want to.
 

simp5782

Feo, Fuerte y Formal
Supporting Vendor
12,095
9,256
113
Location
Mason, TN
Isn’t it the same base engine, 855? What is causing complications? I would think you just transfer the mounts and oil pan from your NHC-250 to the turbo BC engine and you’re off to the races. Apparently not? I’m sure you’re not doing extra work because you want to.
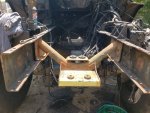
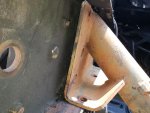
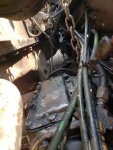
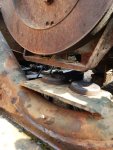
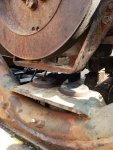
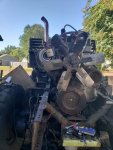
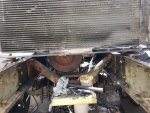
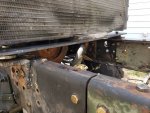
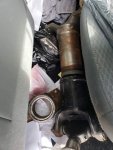
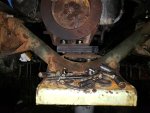
The original NHC250 front mount is a clamp around the timing cover that was bolted to the cross member. Big Cams have a L type mount that bolts to the outer bolts on the timing cover.

Oil pan from an NHC250 will fit a Big Cam I but not a Big Cam III. The big cam III uses an internal pickup tube system. The NHC250 and BC1 use exterior suction lines from the bottom of the pan. Which would also be in the way of the front driveline.
 

simp5782

Feo, Fuerte y Formal
Supporting Vendor
12,095
9,256
113
Location
Mason, TN
Oil pumps between a big cam 1 and 3 are different as well20180825_174924.jpg20180825_174843.jpg20180825_174807.jpg

Sent from my SM-G965U using Tapatalk
 

simp5782

Feo, Fuerte y Formal
Supporting Vendor
12,095
9,256
113
Location
Mason, TN
Issue solved I believe. I had some 1/2" plates i welded together so i stuck those under there. Will weld another 1/2" piece to it and drill and tap it. so 4 bolts for the 1 mount. 3/4" L9's should work for the offset.
 

Attachments

Buffalobwana

Well-known member
Steel Soldiers Supporter
1,392
170
63
Location
Frisco Texas
That’s where 74’ will be instead of swapping his engine out. Hobnobing with ... nobody.

Ill have a steak sandwich and a steak sandwich. Put it on the Underhills bill.
 

simp5782

Feo, Fuerte y Formal
Supporting Vendor
12,095
9,256
113
Location
Mason, TN
Been busy. Had to go to Jeff's yesterday for some stuff so took the day off.

Radiator mounting bracket is done today. I am going to run the cooling hoses for the aftercooler thru the top cooler on the radiator. I have used it for an transmission and oil cooler in the past. On the allison transmission it dropped the temp by over 60 degrees. So it should do well to supply the aftercooler. Plus add another 2 gallons or so to the system. The large big cam fan is bigger than the whole radiator so I am going to do a fan shroud around the outside of the radiator instead of on the inside. Should pull a good many CFMs. It is about 10 inches overall bigger in diameter than a small cam fan.

Also my morphed driveline that is 4in diameter tube, 1710 on one side and a 92 series mechanics style on the other.

I mounted the radiator on top of angle iron with a 3/8" flatbar across with a single bushing under each side to allow some movement. I am probably going to move it back towards the fan by about 3 inches tomorrow to get it a little closer.
Also added my winch frame extensions for the 25,000lb electric winch i purchased. It is an 8.9 hp motor. Dual motors are available. Supposedly the components can handle 31,000lbs. Available in steel cable or synthetic rope. 366:1 planetary, Pulls 210amps at 25,000lbs and has a 5yr warranty. and for $1075 shipped. Was hard to beat.

https://sherpa4x4.com/products/stal...bh4s6hpAQkksoDedvKEmp68UZx9JkJHRoCnLgQAvD_BwE
 

Attachments

simp5782

Feo, Fuerte y Formal
Supporting Vendor
12,095
9,256
113
Location
Mason, TN
Got a little bit done today. Most of the hard stuff is now over. Cab goes back on tomorrow. The hood is gonna be the only PITA left.

I am gonna do several mock ups on the lower radiator hose. It goes from a 2.5 on the pipe off the water pump to a 2" on the radiator. Just too many bends with that pipe trying to get up under the engine. The other alternative is use the stock long 90 degree pipe and come out under the frame rail right there in front of the leaf spring perch and run it up. OR I believe the square pattern is the same thing as a thermostat housing off a NHC250 so I might just put that on there and get it over with. Unfortunately the flexible hoses I tried just cant bend that sharp. Work with it a little bit tomorrow.

New injection pump is on with dual fuel line system. New Water pump and belt, Alternator mounted up, and that was a full blown *$$&#&#*$*#&$ as it wanted to sit too low. Should be fine now though I redrilled the bracket and raised it up a good 2 inches.

My radiator is an aluminum MRAP type I put in last year. It has pretty good capacity. It has a huge separate cooler on the top of it that i ran the allison transmission through. However with nothing needing that heavy air to air cooler I decided to run the coolant that goes to the aftercooler thru the upper unit. It is a 3/4" hose from the thermostat housing thru the cooler then to the top of the after cooler on the drivers side of the engine. Should give the system an extra 2 to 3 gallons of capacity. Using Pushlok parker hose for all the coolant hoses. I also replaced the metal coolant lines going to the air compressor. My NHC250 temp dropped a noticeable bit from those metal lines becoming 3/8" rubber hose.

Front mount is finally done. It was a full pain in the rear to. Having to line up bolt holes and shift that way and this way. I used L9 5/8" bolts on the engine side and 3/4" L9s on the crossmember side. There is a pretty big area under the radiator between the frame and I will plan to mount my Power steering cooler and the small transmission cooler for the CAT under there. Should be fine.

I ordered a AC bracket from Kenway but it will be 3 to 4 weeks before it gets here so I will have to fab up something to make my NHC250 bracket work.
 

Attachments

simp5782

Feo, Fuerte y Formal
Supporting Vendor
12,095
9,256
113
Location
Mason, TN
Cab and hood are back on. I bolted the crossmember the hood bolts to to the underside lip of the upper frame. That allowed me to delete the spacer plates I had made to raise the hood to account for the cab raise. Radiator and all that seemed to clear just fine.

Upper radiator hose assembly i made for the aluminum radiator appears to work just fine with the current setup.

will be working on the exhaust tomorrow to get that figured out.

Will be doing a custom front bumper. My stock one was bent in a few places and I am not fighting with it to get it back on. Will do a long piece of channel then heat it up after its bolted u to bend it back in on the outside.

Also going to work on a 5inch intake tube to sit just behind the inlet where the heater intake would be on a stock truck
 

Attachments

simp5782

Feo, Fuerte y Formal
Supporting Vendor
12,095
9,256
113
Location
Mason, TN
Does this now change your model designation to m925a3. Lol. Nice looking beast.


Sent from my iPhone using Tapatalk
Man of few words

M1081 LVAD


Mine is actually a M51014 or M5141020 ton truck. 5 Ton axles. 10ton transfer case (hemtt) and 14/20 ton engine and transmission

I pity whoever buys my truck in the future. They will have too many TMs to go thru.
 
Top
AdBlock Detected

We get it, advertisements are annoying!

Sure, ad-blocking software does a great job at blocking ads, but it also blocks useful features of our website like our supporting vendors. Their ads help keep Steel Soldiers going. Please consider disabling your ad blockers for the site. Thanks!

I've Disabled AdBlock
No Thanks