• Steel Soldiers now has a few new forums, read more about it at: New Munitions Forums!

  • Microsoft MSN, Live, Hotmail, Outlook email users may not be receiving emails. We are working to resolve this issue. Please add support@steelsoldiers.com to your trusted contacts.


101A2 Adventure Trailer

Buffalobwana

Well-known member
Steel Soldiers Supporter
1,392
170
63
Location
Frisco Texas
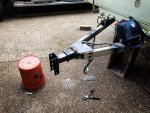
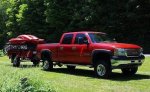
I am modifying one of my 101A2’s to be an “adventure trailer”. That is a widely used and abused term, so let me define my intentions with this build.

I’m going to take it hunting and I’m going to take it to the ranch and it’s going to get used to work, and haul stuff. I’m not going sleep in/on/under it unless something goes wrong, or really right (draw the right tag) or unless I just decide I want to.

Ok, let’s get started.
 

Buffalobwana

Well-known member
Steel Soldiers Supporter
1,392
170
63
Location
Frisco Texas
I want my trailer to sit level. It doesn’t.
8DEE00DA-54FB-419C-9BA6-0FEF3C5981F7.jpg
So, I removed the tongue and sold it to a member here.
3FC2F7C4-6A3B-4CFF-8250-AAD4DD76BF81.jpg
I welded a 2 1/2” receiver (little over 3” wide) between the pieces of tongue and welded a piece of 3/8” plate on top of the receiver.

I made a removable hitch from 2 1/2”x.250 sq tubing and welded the channel to it. Bolted the Lunett ring to the channel and I have a trailer that rides level! Shoot it with some primer because it’s time to go to work.
7604D459-950D-4E04-B01D-BF81ED537E85.jpg
BBC8963D-770B-492E-A53D-1CF7D282455C.jpg
 

Attachments

Buffalobwana

Well-known member
Steel Soldiers Supporter
1,392
170
63
Location
Frisco Texas
Literally had to go straight to Home Depot and get lumber to work on the house on the ranch. Put temporary lights on it for the trip. I had to buy a chain to make an improvised safety chain.
295EBBE0-4F09-4901-A1B8-554C981E6742.jpgBD1A8E97-BB91-424E-AE76-71DD412BED1E.jpgC10D92D8-5F0F-4FA2-9DEA-3C633151E691.jpg
 

Buffalobwana

Well-known member
Steel Soldiers Supporter
1,392
170
63
Location
Frisco Texas
Ok, let’s get through some of the more mundane points of trailers.

Fixed lights. Wires were cut in a few places. Marine Heat shrink crimps. Replaced bulbs with some German made 12/24 v LEDs I found on Amazon. Bright when hooked up to 12v. Nice bulbs.

Welded on safety chains and a drop-leg swing up jack. Shot a little paint on it and my good pants. Now they are my new painting pants. Perfect.

Inspection. Pass.

Took the inspection and receipt from 2016 to the courthouse and walked out with a license plate.

Im legal.
B03B6222-E549-4DAC-AF23-A24A7C03935B.jpg84B49114-8119-4334-9B78-5980B23F9149.jpg
 

Buffalobwana

Well-known member
Steel Soldiers Supporter
1,392
170
63
Location
Frisco Texas
Harleyhouse, I read your build. You did a great job on yours. Mine may be a bit rougher finish, and will take a different route, but you are right, great platforms to build on.

I noticed my tailgate was slightly bent bent today and it made me mad! I may swap out with one of my others. We will see.
 

Buffalobwana

Well-known member
Steel Soldiers Supporter
1,392
170
63
Location
Frisco Texas
I have a plan in my head, and some of it on paper ... but most of it is in my head, of an adventure rack! What is that? I dunno, but it really sounds cool, and it roughly resembles this concept.

784C611A-F086-43BD-9BF2-DF9E57D0B34C.jpeg

This is a truck rack, so no side tool boxes, no tire rack, no lights. But the concept is the same.

Its a roof rack mounted on 2’ legs above the trailer. This gives me ample room to store whatever I want inside the trailer, And have a roof rack for other items. Duffle bags, coolers, lighter items and possibly a rooftop tent (yeah, I know I said I wasn’t sleeping in/on/under it ... you never know) I keep putting in for Moose. One day I’ll draw. Ill need a trailer with a RTT if I draw. (Not really, just an excuse for another adventure)

Ok, let’s get to welding this thing together.

First the base is 2x2x1/8” angle iron that is bolted to the top of the bed with 3/8” grade 8 bolts. I left 1/4” between the side wall of the trailer and the angle iron because I may either spray Bedliner on the trailer or the bottom of the rack once all is welded.

I left the base a little short at the back in case I wanted to use the pockets at the end for something.
8D3A6592-99A0-4B6F-B79F-2C4FAB9DD99A.jpg0840B4CC-F77D-40F8-8AD7-D1275CD7C1D9.jpgD7F1A59A-584A-4BD2-BCDC-2CD13EDD9176.jpg0B6C6162-5B44-4388-B111-26C28C34213B.jpg
 
Last edited:

Buffalobwana

Well-known member
Steel Soldiers Supporter
1,392
170
63
Location
Frisco Texas
The rack will be built out of 1” schedule 40. I am bending it with a JD square tubing bender. The rack will be narrower than the trailer and a little shorter so the legs that support it on the sides have a 15 degree Bend in them 6” from the bottom.

The tubing bender has a Harbor Freight air over hydraulic 8 ton ram that makes bending 1” sch 40 a breeze if you have a decent compressor. Mine is just decent. It keeps up just good enough to bend as fast as I can put pipe in it. I love the set up, couldn’t be happier with it.
A3BC42FC-F297-4514-9DA6-08AEAD0268D0.jpg
 

Buffalobwana

Well-known member
Steel Soldiers Supporter
1,392
170
63
Location
Frisco Texas
I bent the ends of the rack and laid them out first. I’ll build the rack first, then weld the legs on to lift it up.
123F6262-CA15-4D6B-9F16-1463B1DA9163.jpg24BAD93E-D3A2-49AA-A47F-0BE236ED9408.jpg0C0E1B69-F7FD-4F31-B2D4-1B8C2F23BB9D.jpg

I used a JD Squared tubing “Notch Master” to notch the pipes. Makes quick precise work of notching. It uses Milwaukee hole dozer bits. You get quite a few notches per bit if you take care of it. Clamp the pipe in and hook up your own drill to it and in 30-45 seconds, you are done.
730DF37A-CD35-48B7-AC1F-B8C1B54C3F7E.jpgB2B97025-AAD8-4A1D-9697-BEDFD1791FCA.jpg
 
Last edited:

Buffalobwana

Well-known member
Steel Soldiers Supporter
1,392
170
63
Location
Frisco Texas
Since I’m using the trailer as a work surface, I leveled it by using the jack and letting air out of one tire until it was perfectly level.
3F5EF53A-4290-412A-A2A5-0CCBBB4FD7C9.jpg
I used 2x4’s as my spacers between the bars for a reason, not just convenience. I wanted the space between the bars to be exactly the same as a 2x4 or 1x4 so that I could use it as a base to build a shelter off of should I chose to. Screwing together an awning or roof out of a dozen 2x4’s doesn’t take too long and is sturdy once a tarp is pulled right over it.

Plus its also convenient.

I cut 3 1/2” pieces of 1/2” schedule 40 for the bars between the top and bottom of the rack.
7BBC6525-45E5-48CC-B97D-5E3F5D388310.jpg
I tacked the end pieces on and the 1/2” spacers as well. Everything looked good and square, so I welded all the pipe together.
20429CB1-2BA6-4ADD-9100-823383F57303.jpg
I’ll do the same for the rear and then join the front and rear with longer side pieces.
E4422571-8318-4121-96F5-F07353E2CEDB.jpg
 

Buffalobwana

Well-known member
Steel Soldiers Supporter
1,392
170
63
Location
Frisco Texas
I’m not sure how to finish out the top of my joint between my end and side pieces on my rack. I can take a file and carefully remove any burrs on the inside of the pipe and leave it open and paint the inside. I could cover it with some flat stock. Or I could do this. If I weld a 3/8 or 1/2” washer (can’t remember which one works), I can either leave it like that or install a rivnut in it for some future shenanigans. (I’m leaving the bottom open for drainage and to hook ratchet straps to)

I don’t often ask for input on my projects, but I could use some here. Open? Capped off? Washer? Or washer with the largest rivnut possible? These would be at all 4 corners of the rack and I could also install additional ones along the side of the rack.
3CB0A398-FE96-42F6-A295-2A437FA27E9A.jpg
 

Buffalobwana

Well-known member
Steel Soldiers Supporter
1,392
170
63
Location
Frisco Texas
That would finish off the bottom nicely. I could drill weep holes in the sides, on the inside, so it would be harder to see, to keep it from collecting water.

Thanks HH!
 

Buffalobwana

Well-known member
Steel Soldiers Supporter
1,392
170
63
Location
Frisco Texas
I believe I may weld a 3/8” nut to the backside of the washer, then weld the washer on, nut down, instead of using a rivnut. I’ll get a stronger bond, and can use a larger diameter bolt. I can make a plan to do the same all down the top piece of the sides.

I can mount lights, or bolt down a base for a RTT.
 

Buffalobwana

Well-known member
Steel Soldiers Supporter
1,392
170
63
Location
Frisco Texas
Finished the front end of the top of the rack. Now need to make the sides.
B055A5D7-1077-422D-8C0F-34EF54732FF3.jpg
I have cut and bent the legs. Three on each side and two in front. I bent a 15 degree angle on the side legs and 17 degree Bend on the front legs. They are notched and ready to weld to the base and rack. I may wind up doubling the number of legs and putting a 4” sheet of 14 ga diamond tread between two legs to strengthen it.
8E7096AB-61AC-4A5D-9415-A4CFE93892A7.jpg
 

Buffalobwana

Well-known member
Steel Soldiers Supporter
1,392
170
63
Location
Frisco Texas
This is kind of what I’m going for. No side tool boxes, but maybe some lights and a tire mount, but the frame and roof rack plan are similar. I have a spare 2000 lb Warn winch that I may mount on it to help assist in loading heavier items. Generators, 16.00’s, Bull Elk, you know, normal stuff that goes in your trailer.

My legs are different, but I’m really diggin this look, and the rack is forever, so I might just change the legs. Decisions ...

69B467AE-0377-4A04-8CED-948D46A1D11F.jpeg
 

j10jim

New member
28
6
3
Location
Simi Valley, So Cal
What is the name of that rack? I can't remember but I do remember seeing pictures of it.

This is kind of what I’m going for. No side tool boxes, but maybe some lights and a tire mount, but the frame and roof rack plan are similar. I have a spare 2000 lb Warn winch that I may mount on it to help assist in loading heavier items. Generators, 16.00’s, Bull Elk, you know, normal stuff that goes in your trailer.

My legs are different, but I’m really diggin this look, and the rack is forever, so I might just change the legs. Decisions ...

View attachment 726964
 

Buffalobwana

Well-known member
Steel Soldiers Supporter
1,392
170
63
Location
Frisco Texas
I don’t know. I pulled it off of Pinterest. Lots of good ideas there, this is the closest thing to what I want. The more I think about it, the more I think I may try to replicate this model.

The winch idea is great. I already have two 2/0 wires from my battery running to my hitch that have a 50 amp Anderson disconnect that I use to run my feeder trailer.
E8EA6294-7A3C-45D5-B84A-460078B06058.jpeg
It plugs into my pig trap trailer that also has a 2000 lb winch to suck the trap up against the trailer so I don’t have another incident where the angry sow pushes her way between the trap and the trailer and chases Buffalobwana. I’m too old for that crap.
 

Buffalobwana

Well-known member
Steel Soldiers Supporter
1,392
170
63
Location
Frisco Texas
Last night before I went to bed, I Ordered the electric brakes with the parking brake option. Scrapdaddy gave out the part number on eTrailer that he used over on Expo, and ironically I started a thread about it here at the same time.

I also ordered all the bearings races and seals. I don’t know that I will need them all, but I have four 101’s so, I’m sure one of these trailers will need them eventually and I’d much rather have all of them on hand when I tear into it, than have to re do the job a week later when the part arrives, or order a more expensive part on Amazon to get it done faster.

Electric Brakes with parking brake option and all bearings races and seals was just a hair under $300. $220 for brakes alone.

For the bearings and race numbers I got the info from ncdeerejeep in the sticky above about “101A2 and A3’s brakes and bearings”. Props to him for his research. I won’t repeat it here, it’s on page one of the sticky above, post #8.
 
Top
AdBlock Detected

We get it, advertisements are annoying!

Sure, ad-blocking software does a great job at blocking ads, but it also blocks useful features of our website like our supporting vendors. Their ads help keep Steel Soldiers going. Please consider disabling your ad blockers for the site. Thanks!

I've Disabled AdBlock
No Thanks