- 319
- 13
- 18
- Location
- Gardnerville, NV
3.07 GEAR SWAP With Photos, 1995 A-0
I am creating this post with the hope that my experience may be of help to the next member planning on doing this operation.
Before I begin, please do not reply asking 'where did you get your gears?'. I can tell you up front, that I have had these for a while. I also pinkie-swore I would not reveal where they came from to prevent this individual from having his e-mail box blow up.
I realize this is a hit topic currently on this very forum, and please don't think I am being a jerk. Sadly, it appears that for the time being the supply of 3.07 gears has evaporated. Going forward we can only hope that the US Powers-that-be will remove these part numbers from the 'Don't sell to Joe Citizen list'. Seriously, they are selling these to civilians. Are they not worried we'll drive them to another country and sell this advanced technology to the commies? With that said, please enjoy.
As stated, I have been sitting on these bits for a while. After returning from OE-18 (documented elsewhere), I became deeply involved in a house remodel. Another word for this is H**l. Being that there are NO contractors available in Northwestern Nevada, we were forced to do much of the work ourselves. Heaven forbid, and bite my tongue, the place catches fire. Now that we are at 95$%$ completed, its time to focus on Thor.
With Pointwife (Yes, I miss you sweetie..) out of town for a week or so, I was up at 0500 go make enough coffee necessary to jump start My engine.
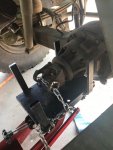
Job #1 is remove the front wheels.

The little tool laying the ground is a torque multiplier and is mostly sold to RV owners. I consider it a necessity to loosen the lug nuts on these beasts. (This is a 'hint')
Once done, you have this.

Now, the TM says 'have an assistant' to remove the brake drum. This is most likely so that you have someone to call for help when it lands on your foot. (Did I say this project is not a one man job..?)
Barring any Brake Drum incidents you get to this.

This shows the end of the driveshaft poking out of the stub axle. Got a large impact wrench? Good, you will need that and a long breaker bar. (Notice these photos are all from the left side? I tried to keep in the shade. The sun was coming up and it eventually would hit 91F today.)
Oh, before I get ahead of myself... When removing the CTIS bolt from the right side wheel, I found this..

It came out covered in GL-4, so the CTIS seal is toast. Its getting replaced anyway so no worries.
After removing the hub cover, I noticed this.. A lot of this.

The little balls of goo are bits of Red RTV left from the last repair. The were munched onto globs by the spider gears and were plentiful.
Who ever worked on this previously must have owned stock in 3-M, or whoever produced this particular product. I guess they thought if a little was good...
Now we get to what I fondly call the 'Spiders Nest'.

After getting all the bits and bobs laid out, you'll end up with this.

A close visual inspection of everything showed tons of RTV sealant everywhere. Please, don't be that guy. Jeez...
And finally for this entry, we get to this..

This is 'dangly axle' and it is a good place to get to in this operation. Slightly pull these out and Mr. Pumpkin will pop right out. Or at least that is what I was told.
I must honestly say that before beginning this, I had read all the TM's. Printed them out and made a cute little binder. Read and re-read. Although it has been helpful, I have found 'irregularities'.
Nowhere was it mentioned that you had to disconnect the CTIS hoses from the housing between the steering knuckle and the stub axle for one. Its pretty obvious once you get the brake backing plate off though.
Also the parts manual describes the half-shafts as being 'dry'? I took that to mean is was sealed and not able to be lubricated. Once visible mine obviously have zerk fittings on them.
Late this afternoon, I picked up a transmission jack from my local Ahern. Tomorrow the pumpkins get pulled, and we'll see how that goes.
Super Mega thanks to my friend from work, Mark Smith for his valuable assistance today and also for helping me kill a couple of cold beers after we were mostly done. Mark is an avid off-roader and drives a sweet round-eyed Ford Bronco rock crawler, thanks buddy!
Pointman
I am creating this post with the hope that my experience may be of help to the next member planning on doing this operation.
Before I begin, please do not reply asking 'where did you get your gears?'. I can tell you up front, that I have had these for a while. I also pinkie-swore I would not reveal where they came from to prevent this individual from having his e-mail box blow up.
I realize this is a hit topic currently on this very forum, and please don't think I am being a jerk. Sadly, it appears that for the time being the supply of 3.07 gears has evaporated. Going forward we can only hope that the US Powers-that-be will remove these part numbers from the 'Don't sell to Joe Citizen list'. Seriously, they are selling these to civilians. Are they not worried we'll drive them to another country and sell this advanced technology to the commies?
As stated, I have been sitting on these bits for a while. After returning from OE-18 (documented elsewhere), I became deeply involved in a house remodel. Another word for this is H**l. Being that there are NO contractors available in Northwestern Nevada, we were forced to do much of the work ourselves. Heaven forbid, and bite my tongue, the place catches fire. Now that we are at 95$%$ completed, its time to focus on Thor.
With Pointwife (Yes, I miss you sweetie..) out of town for a week or so, I was up at 0500 go make enough coffee necessary to jump start My engine.
Job #1 is remove the front wheels.
The little tool laying the ground is a torque multiplier and is mostly sold to RV owners. I consider it a necessity to loosen the lug nuts on these beasts. (This is a 'hint')
Once done, you have this.
Now, the TM says 'have an assistant' to remove the brake drum. This is most likely so that you have someone to call for help when it lands on your foot. (Did I say this project is not a one man job..?)
Barring any Brake Drum incidents you get to this.
This shows the end of the driveshaft poking out of the stub axle. Got a large impact wrench? Good, you will need that and a long breaker bar. (Notice these photos are all from the left side? I tried to keep in the shade. The sun was coming up and it eventually would hit 91F today.)
Oh, before I get ahead of myself... When removing the CTIS bolt from the right side wheel, I found this..
It came out covered in GL-4, so the CTIS seal is toast. Its getting replaced anyway so no worries.
After removing the hub cover, I noticed this.. A lot of this.
The little balls of goo are bits of Red RTV left from the last repair. The were munched onto globs by the spider gears and were plentiful.
Who ever worked on this previously must have owned stock in 3-M, or whoever produced this particular product. I guess they thought if a little was good...
Now we get to what I fondly call the 'Spiders Nest'.
After getting all the bits and bobs laid out, you'll end up with this.
A close visual inspection of everything showed tons of RTV sealant everywhere. Please, don't be that guy. Jeez...
And finally for this entry, we get to this..
This is 'dangly axle' and it is a good place to get to in this operation. Slightly pull these out and Mr. Pumpkin will pop right out. Or at least that is what I was told.
I must honestly say that before beginning this, I had read all the TM's. Printed them out and made a cute little binder. Read and re-read. Although it has been helpful, I have found 'irregularities'.
Nowhere was it mentioned that you had to disconnect the CTIS hoses from the housing between the steering knuckle and the stub axle for one. Its pretty obvious once you get the brake backing plate off though.
Also the parts manual describes the half-shafts as being 'dry'? I took that to mean is was sealed and not able to be lubricated. Once visible mine obviously have zerk fittings on them.
Late this afternoon, I picked up a transmission jack from my local Ahern. Tomorrow the pumpkins get pulled, and we'll see how that goes.
Super Mega thanks to my friend from work, Mark Smith for his valuable assistance today and also for helping me kill a couple of cold beers after we were mostly done. Mark is an avid off-roader and drives a sweet round-eyed Ford Bronco rock crawler, thanks buddy!
Pointman
Last edited:


")