• Steel Soldiers now has a few new forums, read more about it at: New Munitions Forums!

  • Microsoft MSN, Live, Hotmail, Outlook email users may not be receiving emails. We are working to resolve this issue. Please add support@steelsoldiers.com to your trusted contacts.


two piece 12 bolt rim assembly Hmmwv

1993

Member
173
1
16
Location
NY
here's a bunch of questions I encountered very quickly while changing the first tire.

first of all,
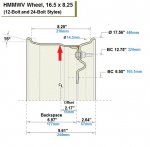
In preparing to install new tires, I found out that I have the older style 12 bolt rims.
As I understand it they have a tendency to not align well and so three centering washers(per wheel) need to be installed so that the balance is not WAY off.
the military apparently did not bother to use the washers(since they were an AM general after thought) so my truck bounces down the road at certain speeds.

The newer rims(which my spare tire has) have an "alignment hole".
How precisely does the hole need to be lined up?
It seems to me that the same problem can occur as with the older style if assembled without the centering washers.
Am I missing something?

Also, any trick to aligning the old 12 bolt rims without using the centering washers?
or should I just get a set of newer style rims?

Any benefit to getting 24 bolt(even or tandem E-rated) rims other than gaining weight capacity?
do they align more easily?

If the o-rings look ok is there any problem with reusing them?
I just changed out the tire on a rim that had what looks like red gasket making gunk on the black o-ring, is that an acceptable practice or not recommended? I've read that applying grease to the o-ring is recommended.
 
Last edited:

lowell66dart

Member
Steel Soldiers Supporter
135
6
18
Location
Paulina La.
On the 12 bolts I had the holes, which are about 1/2 inch, just line up. One hole on each half. I bought new orings and used oring lube on them. No leaks.
 

simp5782

Feo, Fuerte y Formal
Supporting Vendor
12,095
9,256
113
Location
Mason, TN
If you plan on using the old O-rings I suggest using Super 77m adhesive it will keep the old oring secure and a little extra protection on leaking when it gets together.
 

gringeltaube

Staff Member
Super Moderator
Moderator
Steel Soldiers Supporter
6,879
2,254
113
Location
Montevideo/Uruguay
The older style 12-bolt wheel has 12ea Ø 5/8" holes in its outer half. Since the studs (on all model wheels) are Ø 1/2" it means that - in theory - both wheel halves could shift as much as 1/8" relative to each other - which will make any tire wobble like crazy!
On the outer half they also have three protrusions placed at 120° which obviously were intended to center both parts when everything is bolted together. But the reality shows that they do very little, in that sense...

Yes, by adding a pair of short bushings (not washers!), slipped over two opposed studs it may help with alignment...

On the newer generation 12-bolt wheel, nine of those holes measure 15.5mm in diameter and the other three are a bit smaller (Ø 14.5mm - placed at 120°) which should serve the same purpose, to better center both parts. (*)

For some reason there is also a 13th hole (Ø 15.5mm), equidistant in between two of the 15,5mm holes and on the same bolt circle. It sure isn't an "alignment hole" since for that you would need a second one, 180° apart.

Both 12-bolt styles use the same kind of a very unique, weird wheel valve... a poor (& stupid) design IMHO, and just another reason to modify them - or get rid of them entirely and replace with either style of the newer...

24-bolt wheels, both designs- w/paired and equidistant studs: Compared to the older versions these are a real upgrade! Not only are they stronger; they also have "normal" wheel valves now, which can be found everywhere!
For both styles, all except three of the bolt holes are Ø15.5mm. The other three being Ø14.5mm, same as the 12-bolts above.
The big difference is that the studs have a longer knurled section (+3 mm) compared to the old style's studs (this post...)
The diameter there is 14mm and it protrudes almost 1/8", well into the holes of the outer wheel half. That really makes all the difference, minimizing any possible, relative movement.
_________
(*) I have yet to confirm if the late style 12-bolt wheels used those "longer neck" studs, as well.

Sadly, even that improvement doesn't guarantee that both parts will run perfectly true and centered... Tolerances seem to be way up when it comes to military use... even for these newer HMMWV wheels.

The only way I have found to solve that alignment issue is by mounting the wheel on a hub and check the run-out of the bead sections; especially the inner one. Then loosen the bolts; shift the inner wheel half to where it runs true-best, and re-tighten. Then bore-through two Ø3/8" holes at 180° from each other and press-fit a pair of 1"-long dowel pins into the inner part only. Finally enlarge the holes in the outer part to Ø10mm.
This isn't complicated at all; it just takes time and patience... two things that I know got kind of scarce, nowadays...

As for the O-rings, I have always reused them with good results (= zero leaks). Only problem - at least for the OEM rings - is that once they come out they seem to stretch quite a bit. In most cases I had to glue them in place for them to safely remain put during assembly. That might be the reason why you find some of them having been installed with RTV sealant.

Yes, for new O-rings simply use grease.
 
Last edited:

Action

Well-known member
3,581
1,551
113
Location
East Tennessee
The washers are called pilot washers, 6001844. 3 per rim. They used to be under $1 each. Prices have went up a bit over the years.


86humv

Well-known member
Steel Soldiers Supporter
1,693
489
83
Location
Texas
Early 12 bolt wheels used a thick black O-ring P.N. 12342633
Late 12 bolt wheel with 13th hole uses the same O-ring as the two different 24 bolt wheels.
24 bolt wheels evenly spaced uses same valve stem assy. as early and late 12 bolt wheels.
24 bolt wheel with paired studs uses a regular round valve stem.
O-rings for the late 12 bolt wheel and on is : 91610, or 12460338
Pilot washer for early 12 bolt wheels : 6001844
 
Last edited:

gringeltaube

Staff Member
Super Moderator
Moderator
Steel Soldiers Supporter
6,879
2,254
113
Location
Montevideo/Uruguay
Good info!

These are the two styles in question:
HMMWV wheel valve stems.jpg


I stand corrected, regarding the valve stems on the evenly spaced 24-bolt wheels... (I'm forgetting things too fast, even after having worked- and posted about it, before...!:-()
2017-07-27 10.32.45 B.jpg
 

1993

Member
173
1
16
Location
NY
The washers are called pilot washers, 6001844. 3 per rim. They used to be under $1 each. Prices have went up a bit over the years.


In your opinion are they only needed on the early 12 bolt? have you heard of them being used on 24 bolt rims?
 

1993

Member
173
1
16
Location
NY
Only the H1’s used centering washers, military did not, I’ve had hundreds and never saw them on old style 12 bolts
I'm thinking of just using a loop of copper wire around three studs to keep the outer half centered. any thoughts?

Also, in putting the spare back together(it's the newer 12 bolt with the "alignment hole").
I used a torque wrench I tightened the 12 bolts to 80lbft and then 120lbft as per the book.
at 80lbs they were all fine but at 120 one of the nuts started to pin more easily.
the stud is not spinning so I'm guessing that the threads are shot.
does this happen often?
what studs and nuts(part numbers) are best for replacing failed ones?
 

Jake59

Active member
169
97
28
Location
Kaggevinne, Flanders, belgium
Thank you to All,

Interesting and valuable read, thank you!
This will be very helpful in getting HMMWV rims set up correctly.

In view of implementing a change of offset, does anyone here know the exact inside diameter of the rim just about at the center line, on the edge where the rim is angled inward ? For clarification, see picture, red arrow points out the inside diameter measuring point.
Should be a precise measurement to assure proper centering and I unfortunately do not have the tools to do that.

Thank you,
Jake
 

Attachments

Jake59

Active member
169
97
28
Location
Kaggevinne, Flanders, belgium
Hi,

Just been measuring a little bit on the disassembled 12 bolt rims.
The bolts are indeed exactly 1/2" or 12.7mm OD and as already indicated there are 9 holes 15mm and 3 holes 14mm.
The 14mm holes are no doubt intended to support centering, but this still leaves a gap of about 1.3mm.

So I went looking for those centering washers... which are priced around $16.00 a piece...

So I went on looking again for an alternate (read: cost- effective) centering alternative...
Sure enough, standard plastic electrical cable tubing has an OD of 16mm and when given a lengthwise cut with a cut-off blade and then chopping off 1/4" lengths, the herewith created open ring will fit snugly into the 15mm hole and at the same time snugly around the 1/2" bolt!!
About 5" of electric tubing, will make 15 rings for a total of 5 rims and at a cost of ~ $0.25 I guess; and easy to replace; and will not rust; and easy to make; and...

Then I had a closer look at the 12 bolts.
On the HMMWV rim I have here, it appears that the ribbed base of the bolt protrudes through the rim nearly 5mm. Not sure if this is normal but I have no reason to suspect otherwise.
Now, this ribbed part of the 1/2" bolt has an OD of 14mm.
Thus, the 2 rim halves should be quite well centered as is in any case.

Once the rims are all nice and clean and all sealing gunk removed, we will give it a try with and without the plastic centering rings to see what is best...

But I still do need that inside dimension of the back side of the rim, so if anyone can help out with that, much appreciated!!

Thanks,
Jake
 

TOBASH

Father, Surgeon, Cantankerous Grouch
Steel Soldiers Supporter
3,248
2,966
113
Location
Brooklyn, NY
Stop torturing yourself.

Just get a five gallon bucket and flip upside down. Place the inner rim on that. Place the tire with internal runflats over that. Don’t forget to place lubricant bundles in to lubricate the runflats. Then place your gasket. Then place the outer rim over everything.

Gravity is your friend and will pull tire and runflats down and make alignment and sealing of the split rim easier. Place bolts at 180 degrees 1-6 o’clock. Then 90 degrees 3 and 4. and then 1 and 7 and then four and ten and then .....

Then gently hand tighten, then partially torque and then fully torque. Then apply air and look for leaks.
 

gringeltaube

Staff Member
Super Moderator
Moderator
Steel Soldiers Supporter
6,879
2,254
113
Location
Montevideo/Uruguay
Gravity is your friend and will pull tire and runflats down and make alignment and sealing of the split rim easier
I think you're missing the point here...(?) The question isn't just how to best get the tire mounted, but rather ensure alignment (= the least possible (radial) runout of both beat seats/flanges) once everything got assembled.
I say anything over 1/16" sure causes - or at least contributes to - excessive tire hop and/or wobble, in my experience. Tolerances of this design are indeed quite high and may be acceptable for the military, but not so much (for some of us at least) in the civilian world.
Thus, the 2 rim halves should be quite well centered as is in any case.
Should, yes.... but don't be surprised if not. Keep in mind, these things are only "good enough" for its original purpose...
Also, unlike the outer part - which is a stamped disc and round by default - the inner rim is cylinder-rolled and may be egg-shaped (which of course can be corrected with a bottle jack and some patience).

Best thing to do is mount the bare wheel on a hub & spindle and get busy with a dial indicator. It may take a few trials, clocked at different positions until you get both parts more or less aligned (within 1mm). Once there, just mark them and see if you can find two, possibly opposite bolts where you can fit a centering ring, to ensure that nothing can later shift while mounting the tire.
In many cases, especially the larger FMTV steel wheels, I have gone so far as to install a pair of dowel pins to ensure that all comes together- and stays where I want it...
 

TOBASH

Father, Surgeon, Cantankerous Grouch
Steel Soldiers Supporter
3,248
2,966
113
Location
Brooklyn, NY
I didn’t miss the point at all.

I have Centrimatics with tires that were installed this way. I then balanced the tires and they are perfect at all speeds.

The five gallon inverted bucket allows more balanced tire installation, thereby reducing rim offset and mismatched halves. It allows the rims to more completely align.

But hey, you do you.
 

Action

Well-known member
3,581
1,551
113
Location
East Tennessee
Gringe, do your 12 bolt rims have a 13th hole? There were 2 versions. The 13th hole is for alignment.
Those pilot washers used to be under $.50 each. Only 3 needed per rim, when used.
I can jack up a corner of my humvee and put in D. I can measure 1/4” of up and down on the tread, while the wheel is spinning. But on the road, if rides smooth.
 

Jake59

Active member
169
97
28
Location
Kaggevinne, Flanders, belgium
I think you're missing the point here...(?) The question isn't just how to best get the tire mounted, but rather ensure alignment (= the least possible (radial) runout of both beat seats/flanges) once everything got assembled.
I say anything over 1/16" sure causes - or at least contributes to - excessive tire hop and/or wobble, in my experience. Tolerances of this design are indeed quite high and may be acceptable for the military, but not so much (for some of us at least) in the civilian world.

Should, yes.... but don't be surprised if not. Keep in mind, these things are only "good enough" for its original purpose...
Also, unlike the outer part - which is a stamped disc and round by default - the inner rim is cylinder-rolled and may be egg-shaped (which of course can be corrected with a bottle jack and some patience).

Best thing to do is mount the bare wheel on a hub & spindle and get busy with a dial indicator. It may take a few trials, clocked at different positions until you get both parts more or less aligned (within 1mm). Once there, just mark them and see if you can find two, possibly opposite bolts where you can fit a centering ring, to ensure that nothing can later shift while mounting the tire.
In many cases, especially the larger FMTV steel wheels, I have gone so far as to install a pair of dowel pins to ensure that all comes together- and stays where I want it...

Gruss dir Gringeltaube,

Thank you for the advice!! I was planning on fabricating a static vertical wheel hub anyways to help in aligning and centering when the rim offset is being changed. WIll check for out of round as well; did not expect this to be an issue, but ounce mounted on the test hub, it should be easy enough verify.
And we will certainly follow your recommendations when trying to properly center the 2 rim halves. I like the idea of 2 or 3 dowel pins very much actually!!

Vielen Dank,
Jake
 

Jake59

Active member
169
97
28
Location
Kaggevinne, Flanders, belgium
All,

Been doing a little bit of testing this morning.

And simply stacking the rim halves on each other indeed does allow for quite some residual play. Thank you for your wise words GringelTaube. For details on free play, see attachment video.

When adding 3 short plastic rings the play is virtually entirely eliminated. Of course these rings must still be trimmed to the proper length so the nut can be bolted down properly, but I will leave the rings 1mm or maybe a little more sticking out above the rim edge, so that the nut will slightly crush the ring into place, thus centering even more. I pulled and wiggled just as hard and even harder in this case but there was no wiggling room between the two rim halves. See attachment video.

Cheers,

Jake
 

Attachments

Top
AdBlock Detected

We get it, advertisements are annoying!

Sure, ad-blocking software does a great job at blocking ads, but it also blocks useful features of our website like our supporting vendors. Their ads help keep Steel Soldiers going. Please consider disabling your ad blockers for the site. Thanks!

I've Disabled AdBlock
No Thanks