• Steel Soldiers now has a few new forums, read more about it at: New Munitions Forums!

  • Microsoft MSN, Live, Hotmail, Outlook email users may not be receiving emails. We are working to resolve this issue. Please add support@steelsoldiers.com to your trusted contacts.


M35A2 Windshield Rebuild

jake20

Well-known member
431
839
93
Location
Illinois
Hi All,

I recently reconstructed the driver's side windshield on my deuce. I wasn't able to find too many details pertaining to how the window comes together and such, so I thought I'd post my experiences as a resource to anyone in the future. I'm not sure if this is the best way to do it, but I'll put each step in a separate post describing what I did along with pictures. This is my first time ever setting glass into a frame, I think it turned out pretty well. Feel free to leave feedback!
 
Last edited:

jake20

Well-known member
431
839
93
Location
Illinois
In order to construct a windshield from scratch, you'll need a few parts. I constructed my driver's side windshield from scratch because it was beyond what I considered repairable, too much rust, frame damage, cracked glass.

1: U shaped lower frame (I ordered from Big Mike)
2: Top cross piece for the frame (Ordered from Memphis Equipment)
3: 2x L shaped brackets that press fit into the cross piece (Also ordered from Memphis Equipmen
4: Thin rubber to cut into strips (based on how I did it, I'm sure there's many different ways this can be done)
5: Laminated safety glass (I had a friend with a glass shop cut the glass to size)
6: Urethane sealant/adhesive. I used BetaSeal U-428 Plus
7: Assortment of 8-32 and 10-32 machine screws or bolts and lock nuts
8: Rubber outer seal (I ordered from Big Mike)
 
Last edited:

jake20

Well-known member
431
839
93
Location
Illinois
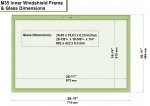
First thing you'll need is the glass, if your glass is still good, you can skip this step. I found the following image on a post a while back and gave the dimensions to my glass guy, thank you to whoever was able to provide it initially:


76fdba42-6273-43d7-a125-99c60332b05b (1).jpg
 

jake20

Well-known member
431
839
93
Location
Illinois
I then ordered the bottom U-shaped frame and top cross piece with L brackets. The parts only seemed to have a light coat of paint on them, I didn't want the parts to rust over the winter so I sprayed them with 2 coats of paint+primer rust-oleum. I will be painting the truck once summer rolls around, hence I didn't care too much about the shade of green I had lying around.

The pictures show the U shaped bottom piece and the top cross piece while test fitting the L bracket and screws. The L bracket is press fit into the top cross piece, for this specific window, I re-used my old brackets after re-painting them. Because of the nature of how this truck is built, it is inevitable that some parts will never line up, or may need to be fiddled with to fit correctly. I'll go into more detail with this in the next few steps.


KIMG1730.jpgKIMG1742.jpg
 

jake20

Well-known member
431
839
93
Location
Illinois
Test fitting the glass without any sealant yet. I wanted to make sure it fit nicely before making anything permanent. The top cross piece gets mounted with the flanged side opposite of the handle on the window. The flanged side serves as the hinge for the window to go up and down on the truck, there is a piece that slides onto it and then the whole window gets mounted to the truck.


KIMG1743.jpg
 

jake20

Well-known member
431
839
93
Location
Illinois
I then began to cut thin rubber strips to seat into the channel of the frame. This is in order for the glass not to contact the metal frame, otherwise it can crack if the truck hits a bump. It also helps raise the glass a bit to close up some clearances. The glass is slightly smaller than the frame, hence we will rely on properly sealing it to prevent any issues and shifting around.

I cut several equal strips of the rubber and placed it into the frame channel. I ensured that the corners and a good amount of surface area in general was covered.

KIMG1767.jpgKIMG1766.jpgKIMG1765.jpgKIMG1748.jpgKIMG1746.jpg
 

jake20

Well-known member
431
839
93
Location
Illinois
Time to set the glass into the bottom portion of the frame. I put a bit of the urethane on the parts where the rubber didn't cover.


KIMG1770.jpgKIMG1771.jpg


For the top cross piece, put a couple beads of urethane into the channel first, then lay the rubber strips.


KIMG1779.jpgKIMG1778.jpg


Before even making anything final on the top cross piece, ensure that the L brackets are lined up and both pieces of the frame fit together nicely. In my case, I had to widen the edges of the cross pieces, and compress the edges at the top of the U shaped frame for them to slide into each other.

KIMG1750.jpg
 

jake20

Well-known member
431
839
93
Location
Illinois
Next I slid the glass into the bottom part of the frame, with the rubber strips on the bottom and sides, it lined up well with very little wiggle room.

KIMG1776.jpgKIMG1777.jpg

After sliding the glass into the frame, very very carefully add the cross piece to the top of the frame. If it doesn't want to go on nicely, carefully tap it in with a rubber mallet. Many parts on these trucks don't like to line up and have to be coaxed into place or modified. I had to drill the topmost screw hole slightly bigger for the screw to go fully through. The L bracket inside didn't completely line up, although this isn't too big of a deal.

KIMG1807.jpg

This picture was taken after I already sealed the top outer edge. Notice the screws. The bottom ones are 8-32, the top one is a 10-32 with a nylon lock nut. Ensure that you double check your bracket threading and screw size before buying the screws I mentioned. Many parts on this truck tend to differ over the years.
 

jake20

Well-known member
431
839
93
Location
Illinois
This is the difficult part. Grab an assistant and begin to seal all 8 outer edges with the urethane sealant/adhesive. Do not worry if your glass wiggles a bit in the frame, the urethane will completely solve that.

This stuff is super thick and difficult to squeeze from a caulk gun. I attached square tubing to make it easier.

KIMG1785.jpgKIMG1716.jpg

Lay the windshield against a wall in a way that the glass is seating against the bottom part of the frame. Mask off the frame edge very accurately, then mask off the glass. I used 2 pieces of scotch tape per side, it was easy to see through and left no residue. Then proceed to squeeze (preferably have an assistant squeeze while you aim the end of the bottle) the urethane in a line across what you masked off. Pictured below is one of the sides, but just pretend the frame is against a wall right side up. You'll have to remove the hinge/handle piece on the bottom for this part.

After you squeeze the urethane in a line, put on a latex or nitrile glove, then run your finger across the entire side along the tape. This will pack the urethane into the thin channel between glass and frame. If you have extra on your finger after sweeping across, feel free to pack more into the channel. Then run your finger across again in a single motion without stopping. If you stop, you'll have a noticeable mark that you stopped there. I say to use a glove because this stuff is super messy, avoid getting it on anything you care about, including parts of the frame you don't want it on.

KIMG1786.jpg

After this, slowly peel either side of the tape to reveal the cleanly sealed edge. Then repeat for the remaining sides.

KIMG1814.jpgKIMG1818.jpgKIMG1795.jpgKIMG1793.jpg

My corners had a bit of slightly messy overlap, but it's not too big of a deal, the more sealant the merrier in the long run.

The urethane sealant I used takes a few days to fully cure/seal. Try not to install the window immediately after doing this.
 
Last edited:

jake20

Well-known member
431
839
93
Location
Illinois
After waiting a few days for the urethane to cure, you'll have to install the outer seal for the window. These can be ordered from most of the surplus dealers, I ordered mine from Big Mike.

These can be a bit of a bear to install and seat into the outer edge. It may sound stupid but I found that using the round edge of the blade of a pair of children's safety scissors works well for this. A putty knife is too narrow and can cut through the rubber too easily, a butter knife is also a bit narrow and unwieldy. There are plenty of posts that suggest using soapy water, or just straight dish soap to help lubricate the rubber to go in. I find that this causes premature rusting if done on an unpainted frame. I installed a seal into another frame I had that only had the factory coat of paint. I used the dish soap method and it worked ok for the most part, the frame never left my garage, I removed the seal a few weeks later and found a decent amount of rusting already present where the dish soap was used.

The method I used below required no lubrication to go in and took about ~8 minutes per side.

I started with the bottom right, I seated the right side and the right bottom to perfectly square the rubber against the frame. Start by sliding the bottom part of the rubber into the frame, then roll/push the top edge with safety scissors or whatever you choose. The curved edge of the scissors I used was square and could not cut the rubber, it does take a bit of force to slide the top edge in.

I did the entire bottom of the U shaped frame first, then the sides. The sides will have a bit of excess on the top, you can cut the excess off as needed afterwards.

KIMG1822.jpgKIMG1821.jpgKIMG1820.jpgKIMG1823.jpg
 

jake20

Well-known member
431
839
93
Location
Illinois
Finally you can install the windshield, the screws used to install the windshield to the top part of the window frame are 10-32.

KIMG1841.jpgKIMG1838.jpg

Let me know if you have any questions or would like more pictures! Anyone with more glass experience is welcome to chime in, this was my first time doing such a procedure.

I rebuilt the windshield from scratch because it will be much cheaper for me to do all 4 windows this way. I believe that my method of sealing will probably last longer than however the NOS windshields were assembled, but time will be the true test of that.
 

gimpyrobb

dumpsterlandingfromorbit!
27,785
747
113
Location
Cincy Ohio
It isnt any fun for sure. When I put mine in the outer windshield, I added a section of square foam and it helps keep some of the rain out.
 

3rdmdqm

Active member
429
101
43
Location
Woodbine Maryland
Wow, that's a lot of work. Nice job! I was looking at potentially replacing the glass on my windows as the frames are still in pretty decent shape. However I could not find anyone that carried or would make a flat glass windshield panel. How much did the glass cost to have made? Thanks for the write up, very informative.
 

jake20

Well-known member
431
839
93
Location
Illinois
Thank you 3rdmdqm. A friend of a friend was able to cut the glass for me. At first, he said it would cost ~ $50 per pane, after he saw what it was for he wanted to contribute to my restoration effort and just gave me the glass haha.

It's fairly common glass and should be available at a standard custom window shop. The place where I got mine specializes in glass for buildings, I just made sure to ask for laminated safety glass, that way if it does crack it doesn't all fall on your lap while driving. You might want to try calling or emailing some local shops with the dimensions I posted, luckily it's square and flat, making it easy to cut.

It's 2 pieces of glass with a piece of laminated plastic sandwiched in between:

KIMG1764.jpg
 

cattlerepairman

Well-known member
Steel Soldiers Supporter
3,173
3,095
113
Location
NORTH (Canada)
Literally any auto glass place will cut flat safety glass to your measurements. It's a routine process.

Sent from my SM-G950W using Tapatalk
 

3rdmdqm

Active member
429
101
43
Location
Woodbine Maryland
Apparently not around where I live. I went to two, they don't cut glass anymore, they only order glass for specific cars they are replacing it for and installing it.
 

rustystud

Well-known member
9,071
2,388
113
Location
Woodinville, Washington
Apparently not around where I live. I went to two, they don't cut glass anymore, they only order glass for specific cars they are replacing it for and installing it.
Same goes for around here too. They just use "off the shelf" glass now. Cheaper and easier. I still haven't found anyone to replace the rear window glass in the deuce. The cab came off a 1954 REO so the glass is smaller then the larger M35A2 glass. I might just use Plastic and be done with it.
 

Jbulach

Well-known member
Steel Soldiers Supporter
2,587
2,041
113
Location
Sunman Indiana
Nice write up Jake20!

Apparently not around where I live. I went to two, they don't cut glass anymore, they only order glass for specific cars they are replacing it for and installing it.
Try a regular glass shop, almost all auto glass shops only deal with modern manufactured automotive windows and don’t mess with flat glass, usually two totally different businesses. As Jake said be sure they understand it’s for a windshield and needs to be safety glass, but they should stock it due to requirements in modern building codes.
 
Top
AdBlock Detected

We get it, advertisements are annoying!

Sure, ad-blocking software does a great job at blocking ads, but it also blocks useful features of our website like our supporting vendors. Their ads help keep Steel Soldiers going. Please consider disabling your ad blockers for the site. Thanks!

I've Disabled AdBlock
No Thanks