• Steel Soldiers now has a few new forums, read more about it at: New Munitions Forums!

  • Microsoft MSN, Live, Hotmail, Outlook email users may not be receiving emails. We are working to resolve this issue. Please add support@steelsoldiers.com to your trusted contacts.


MEP 802a/803a starter switch operation? Is this normal?

leedawg

Member
270
10
18
Location
Napa / CA
So four years later I have finally got time to get around to getting my MEP-803a up and running. She purrs like a kitten now and makes power just fine and runs at full load no problem. I noticed however when I start the set the starter stays running until I let go of the start position and the switch returns to the run position. I did not think much of it but my 003a and 005a do not do this the starter automatically cuts out once the motor is up and running and you then can put the switch into the start position to flash the field but the starter motor does not engage.

On my 803a however, if I were to move the starter switch back to the start position it will grind the starter in even though the diesel engine is up and running. Is this normal do all these sets do this? Its making power once I start it so I have no reason to move the switch to the start position after the motor is up and running but found it a bit different than the other sets and have no other experience to compare it to. If this is not supposed to occur is this a problem with the S14 switch (which happens to be brand new on my unit) or possibly the sensor lead to know the motor is running?

Thoughts welcome look forward to hearing others thoughts on this. I can post a video if anyone is unclear.

Thanks in advance

Lee
 

Light in the Dark

Well-known member
Steel Soldiers Supporter
3,559
5,060
113
Location
MA
From TM 9-6115-642-10:
1-11.The Engine Starting System (FIGURE 1-3), consists of two 12-volt batteries connected in series, a starter, a 24 volt battery charging alternator, a magnetic pickup (for sensing engine speed) and the related switches and relays required for control of the starting system. For engine cranking, battery power is supplied to the starter motor through the starter solenoid which in turn is controlled by the cranking relay. The starter then engages the engine flywheel causing the engine to turn over. For engine starting, the DEAD CRANK switch must be in the NORMAL position, the DC Control power circuit breaker must be pushed in, the EMERGENCY STOP SWITCH must be in the OUT position, and the MASTER SWITCH is moved to the START position. The cranking relay is then controlled by a circuit consisting of the crank disconnect relay and crank disconnect switch. As the engine accelerates to the preset speed (sensed by the magnetic pickup), the crank disconnect switch opens and de-energizes the cranking relay to stop and disengage the starter. The starting sequence may also be stopped by moving the MASTER SWITCH to OFF. The engine may be cranked without starting by use of the DEAD CRANK switch. With the DEAD CRANK switch in the CRANK position, the cranking day, starter solenoid and starter motor are energized without activating any other starting or control function.

I'd start looking at the crank disconnect switch and relay... or the magnetic pickup.
 

Guyfang

Moderator
Staff member
Moderator
15,816
21,957
113
Location
Burgkunstadt, Germany
It's the mag pickup. When ever a gen set, MEP8XX grinds the starter, go to the mag pickup. You might as well do the whole enchilada now.
1. Pull the mag pickup.
2. Inspect it.
3. Clean the end off. Metal and oil/trash will give a false reading.
4. If the end is ground off, get another one.
5. If the end looks good, and it's clean, screw it in until it bottoms out. Turn it 3/4 back out. Hand tighten the locking nut. Get someone to help. The someone turns the engine over with the S10 dead crank switch. You mesure at the same time the output of the mag pickup with a multimeter. You want to read 2.5-3.0 volts AC. The closer to 3 volts, the better. If it's low, screw it in a HAIR. No more. Retest. If it's over, screw it out a HAIR, no more. Remember, if you screw it in too far, you will be buying another one. Always test when you have done an adjustment.
6. When you have 3 volts on the meter, lock it down. Test again, to be sure.
7. Hook up the wires. Start the set, and see if it grinds. I personally never had that happen, but you never know.

In the TM is the ohm reading to mesure if the thing is good. By the time you look it up, you can perform the above procedure.
 
Last edited:

leedawg

Member
270
10
18
Location
Napa / CA
From TM 9-6115-642-10:
I'd start looking at the crank disconnect switch and relay... or the magnetic pickup.
Thank you that confirmed just what I was thinking was digging through the maint TM guess I should have just read the operators manual.
It's the mag pickup. When ever a gen set, MEP8XX grinds the starter, go to the mag pickup. You might as well do the whole enchilada now.
Guyfang you are an incredible resource!

The procedure outlined here makes a ton of sense. I almost went out there at 5 this morning to go test it but was 32 degrees and had to get ready for work. Going to dig into this tomorrow and report back the findings. Makes sense its most likely the hall effect sensor. I literally just put in a brand new s14 switch it was missing in my unit when I bought it.

Thanks again for the incredible feedback!

Lee
 

leedawg

Member
270
10
18
Location
Napa / CA
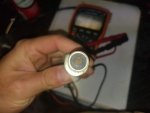
So I got into this project this morning. Pulled the sensor off the unit it did indeed have some metal shaving stuck to it as well as a good solid coating of rust on the sensor. I cleaned it up a bit and hit it with some 100 grit sandpaper clean up the rust layer that was on the end of the core. Put a light layer of grease on it. THen measured the depth of the hole with caliper then put it in just as Guyfang outlined placed a witness mark on the threads as I just barely felt the sensor tightening. Then backed it off from this mark 3/4 of a turn and hooked up the multimeter and cranked it over. Noted about 1.8 ac volts upon cranking. Turned it in another quarter turn rechecked and got about 2.4 so turned it in another quarter turn and you can do that without fear because of your witness mark present on the threads you placed. Rechecked the meter again and noted 3.1volts felt this was close enough to 3 volts. Locked down the lock nut and hooked the sensor back up to the leads. Started it up and starter now disengages when the motor is up and running and does not allow you to engage it. So problem solved thank you again for the great test procedure you were spot on with all the numbers. Here is a quick picture of the sensor unfortunately i had already wiped it off with my thumb before I took this but you can still see all the rust on it etc. Just wanted to report back problem solved hope this helps others out.

20181117_081424.jpg
 
Top
AdBlock Detected

We get it, advertisements are annoying!

Sure, ad-blocking software does a great job at blocking ads, but it also blocks useful features of our website like our supporting vendors. Their ads help keep Steel Soldiers going. Please consider disabling your ad blockers for the site. Thanks!

I've Disabled AdBlock
No Thanks