• Steel Soldiers now has a few new forums, read more about it at: New Munitions Forums!

  • Microsoft MSN, Live, Hotmail, Outlook email users may not be receiving emails. We are working to resolve this issue. Please add support@steelsoldiers.com to your trusted contacts.


Extreme Potato LMTV build

adcomp

New member
13
12
3
Location
Georgia
Hi Everyone,
I finally have started the build of my m1079 expedition / SHTF vehicle and am so exited! I have spent a few months planning, CAD work, reading lots of info on this forum and thinking through the build, and it has begun:)

I suppose first I need to explain the history of the truck name. Well in short my wife and I somehow end up naming all our vehicles as vegetables (not really sure how that started), but a while back she had a BMW 328 she called potato. We then took a trip to Iceland and rented a 4x4 lifted diesel ford camping van from the 80's, and named it Grand Potato. Since that van a few years ago was our initial
inspiration for building an overland camper, we decided to call this truck Extreme Potato, or EP for short!

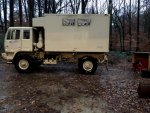
Here are the first pics of the bone stock truck. I will be updating this frequently as we are already starting to get deep into the rebuild of the cab.
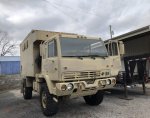
IMG_5448.jpgIMG_0926.jpg
 
Last edited:

doghead

4 Star General /Moderator
Staff member
Super Moderator
Steel Soldiers Supporter
26,247
1,168
113
Location
NY
Please attach photos, not link them.
 

adcomp

New member
13
12
3
Location
Georgia
Hi Everyone, thanks for the warm welcome! I am really excited for my first foray into MVs with this M1079.

@mkcoen - Yes! they have a super cool build, and I have already taken some inspiration from them as well as a few others like the blissordie build. I just hope one day I can have a build that is inspiring!

@Awesomeness - I use Solidworks for my CAD. Im a ME by training so I can use it through my work, otherwise I probably would not since it is super pricy for just occasional home use. By the way, the Google Doc links in your signature are true awesomness - I have already started reading through some of it, really great info! I put some pics below of the CAD

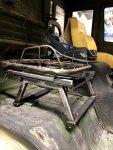
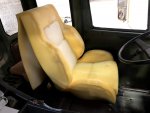
Yesterday we got the seat brackets welded up and test fit. The Driver's seat is not covered yet but is going to have both heating and cooling integrated, so hopefully that will keep us comfy on long drives! We are also building custom lockable steel storage drawers underneath the seats for valuables.
Passengerseat_frame_only.jpgSeat-no-cover.jpg

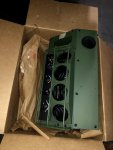
Also got in the AC unit, condenser, compressor, cabling and hoses from Scotty at advancedautomotion.com, new unit ready to go in sometime this next week.
AC_evaporator.jpg

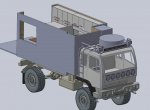
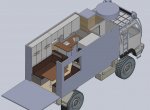
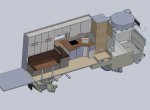
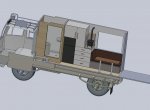
Finally here are a few CAD images of the design. I did not CAD the truck itself, downloaded that online, but I added the rack and the complete box in the rear. I will be extending the box forward by about 2' after removing the spare tire and air cleaner. In the CAD I still show the air cleaner, will be adjusting that in the next few weeks after I complete the Cab rebuild and repaint.
Front_Right_Iso.jpgISO_Box_RR.jpgLeft_Box_section.jpgRight_Box_section.jpg
 

Third From Texas

Well-known member
2,704
6,325
113
Location
Corpus Christi Texas
Nice layout.

One thought about the seats before your go to covering. You may want to re-think the high lips on the lower seat sides. Climbing up and into the cab, I found seats with a more flat lower section FAR easier to slide into (while already extending to step into the cab).

ymmv
 

adcomp

New member
13
12
3
Location
Georgia
@Third From Texas - Good point. I thought about this when talking with the vendors on the seats, but ultimately decided I wanted to try the larger bolsters in the hopes it will be just more supportive and comfortable while in the seats and I would accept the more challenge of getting in an out. I guess if it is we can always cut down the outer bolster and recover just that side piece. Luckily the covers are not all one piece, so we actually could just make a single bolster cover if we want to shave that down.

@lino - that is where one of the spares will be. I already have a Harbor freight truck crane and 2500lb atv winch that is going on the roof rack and will be foldable. That way I can not only have a 1000lb crane on the roof for just general use, but be able to take the tire up and down as well as any otehr gear I have up there.
 

coachgeo

Well-known member
4,964
3,332
113
Location
North of Cincy OH
...One thought about the seats before your go to covering. You may want to re-think the high lips on the lower seat sides. Climbing up and into the cab, I found seats with a more flat lower section FAR easier to slide into (while already extending to step into the cab). ..
or if you like the high lips like I do...... carve the outer one out of strong styrofoam or?? then cover with only one inch of foam so it won't get so badly compressed... or even use headrest slides from base of an old headrest... and make that outside lip of seat slide up then swing out for easy entry.

Myself going the first route above. Old seats from a Mitsubushi spyder was already worn exactly as 3rd from TX predicted one would. Cut a hole in the cover and stuffed it with rags for a sold base.... then am going with thick memory foam tied down to form similar shape to oem and contured. This will then be covered by a generic mid range cost waterproof seat cover.
 
Last edited:

adcomp

New member
13
12
3
Location
Georgia
Third From Texas and coachgeo - I definitely thought about that issue, but decided to give the bolsters a try since I really wanted the comfyness of the bolsters during normal driving. Luckily since the bolster is a separate piece of cover and not stitched to the rest of the seat I could always pull that one off and shave down the bolster or adjust the foam as coachgeo suggests. There is a pretty solid steel support for the bolster, so hopefully that will help it from collapsing, but on the flip side will make it so it does not compress much for ingress/egress. I want to give it a try for now with the bolster and see how I like it and then can modify as needed. Coachgeo, very interested to hear how your bolster comes out.

Lino - Yes one of the two spares will live on the roof. I am adding a harbor-freight truck crane with a wireless 2500lb ATV winch onto the roof rack for lifting and lowering the tire as other items on the roof (probably the roof storage boxes), so hopefully that will make it feasible to have one of the spares on the roof.

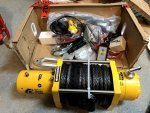
My Sherpa 25,000 lb winch arrived yesterday from Australia, it is actually surprisingly light with the synthetic rope. I like steel cable usually for its overall durability but also figure I won't be using the winch much and wanted to save the weight of the 125' of steel cable. Fab of the winch plate and roof rack will start this next week, I'll get some photos up as that comes along.

Sherpa_25k_Winch.jpg[SUB][SUP]
[/SUP][/SUB]
 
Top
AdBlock Detected

We get it, advertisements are annoying!

Sure, ad-blocking software does a great job at blocking ads, but it also blocks useful features of our website like our supporting vendors. Their ads help keep Steel Soldiers going. Please consider disabling your ad blockers for the site. Thanks!

I've Disabled AdBlock
No Thanks