• Steel Soldiers now has a few new forums, read more about it at: New Munitions Forums!

  • Microsoft MSN, Live, Hotmail, Outlook email users may not be receiving emails. We are working to resolve this issue. Please add support@steelsoldiers.com to your trusted contacts.


MEP 831A Fix-up Thread

DieselAddict

Well-known member
Steel Soldiers Supporter
2,481
1,878
113
Location
Efland, NC
With the wiring you are describing its most likely the motors on the compressors.

Edit:

When I'm running in 115v mode on the 831 I also jumper L1 and L2 at the generator.
 

CallMeColt

Well-known member
Supporting Vendor
901
1,256
93
Location
Wilson County, Texas
With the wiring you are describing its most likely the motors on the compressors.

Edit:

When I'm running in 115v mode on the 831 I also jumper L1 and L2 at the generator.
I didn't know you could jumper them... interesting idea. Maybe that's what I'd have to do. I kind of forgot that it's a dual inverter setup... maybe the surge is above what one half can handle but it's not enough to trigger an overload.

I still thought this would run them no problem as it's setup. My small Honda EU2000I I had started the smaller A/C with more wiring at a smaller gauge. Oh well, it is what it is!
 

CallMeColt

Well-known member
Supporting Vendor
901
1,256
93
Location
Wilson County, Texas
So, I got an e-mail today from Summit Racing saying that the order for the ATX-E1074 pumps was canceled due to not being available anymore.

DieselAddict on another post found that it was replaced by Carter, since they purchased the other company, by part number P74016 & it's also available at Summit Racing for $2 less. Changed my order & they'll be shipping tomorrow.

My filters that I ordered with the pumps came already & there was a $20 off coupon in the box... had them apply it to the order while I was chatting with them.

Here is a link;
https://www.summitracing.com/parts/crt-p74016[h=1][/h]
 

DieselAddict

Well-known member
Steel Soldiers Supporter
2,481
1,878
113
Location
Efland, NC
Everyone needs to know that the replacement pump is functionally identical but not mechanically identical. The fittings are 3/8" instead of 1/8". Adapters will have to be applied to make it work.
 

CallMeColt

Well-known member
Supporting Vendor
901
1,256
93
Location
Wilson County, Texas
Everyone needs to know that the replacement pump is functionally identical but not mechanically identical. The fittings are 3/8" instead of 1/8". Adapters will have to be applied to make it work.
I figured by the pictures it was different. Once it's in hand, I figured I would find the required adapters & share those part numbers as well.
 

CallMeColt

Well-known member
Supporting Vendor
901
1,256
93
Location
Wilson County, Texas
Well, pumps came in today. Seems quality. I don't have time to work on an install it right now as I have my Kubota tractor ripped apart doing a new fuel system. Once I can get to it, I will post results.
 

CallMeColt

Well-known member
Supporting Vendor
901
1,256
93
Location
Wilson County, Texas
Strange, one month ago I got the pumps & went to install them today.

Anyways, before I even got to start, I ran into a problem. Moved it out of the garage & went to start it. No pump noise. Batteries had 18 volts. Not sure what killed them. The solar panel charge thing was installed but I didn't think the one blinking LED would kill it.

Pull started it & when I bumped the switch & cleared the faults, nothing. Showed voltage but it was all dead still. After a bit, the fuel in the lines ran out & it died.

Hooked it to my MEP-802A. Will start fine. As soon as I take the jumpers off, it will surge a bit, then do the same as it did with pull start... electric fuel pump isn't on due to low battery voltage.

I thought as soon as the motor was running that power was supplied to the controls & stuff, not the battery? I spent a while thinking about it & can't seem to figure it out.

Any ideas?
 

kloppk

Well-known member
Steel Soldiers Supporter
1,952
3,028
113
Location
Pepperell, Massachusetts
Could be the batteries are bad and the 831s charger can't put out enough current to bring the voltage up and run the pump. Another possibility is the charger may not be working. Check the fuse in the control cube. It is in the power feed from the PMA to the charger.
 

CallMeColt

Well-known member
Supporting Vendor
901
1,256
93
Location
Wilson County, Texas
Thanks guys.

I let the MEP-802A charge the batteries up for about an hour. Then it started & I ran it under load for an hour. Ran out of time after that.

I am going to get to putting the final parts in at the latest this weekend & will give everything suggested a try. I'm going to look up the charger testing in the TM & do that as well.

My best guess is since the battery was so drained, it was causing to much resistance in the circuit. If I would have disconnected the battery, the pump may have ran.

Will report back with what happens & with final repairs.

Side note...
The guy I got this one from originally have 3 more for sale right now. One is half ripped apart but the other two look complete. If the price comes down low enough, I may pick them up & have a generator to run each 240v appliance! Haha
 

DieselAddict

Well-known member
Steel Soldiers Supporter
2,481
1,878
113
Location
Efland, NC
Yep, battery too drained. That is why I suggested disconnecting the battery and starting it. That will tell you right away if your charger is working. I don't even have batteries in my 831 right now. I just pull start it.
 

CallMeColt

Well-known member
Supporting Vendor
901
1,256
93
Location
Wilson County, Texas
Alright, I finally got to doing some work this weekend.

I disconnected the battery & pull started. Everything seemed to work as it should. Also, I opened up the front panel & found the fuse holder fell out... strange. Put it back in as well. Could have been either one of these I guess. Thank you DieselAddict & kloppk for the suggestions, as always!1

Made a small bracket with a switch to isolate to solar charger when stored inside. Left some extra wire to put an inline fuse in when I get one. The one on there kept breaking the fuses.
76714051_525614044737243_6784248740677943296_n.jpg

Put the new fuel transfer pump in referenced in post 63. It fits but with the 1/4NPT to 1/8NPT bushing, the right angle hits the top of the enclosure slightly unless it's a little crooked. Had to drill one of the existing pump mounting holes to 5/16in to use the supplied bolt for the holder. I added a small layer of gasket for the holder to clamp a bit tighter onto the pump as it still wiggled a bit without it. I cut the connector off the old pump & used it to connect as the old one was. Turns on when it's supposed to now. The existing fuel line is slightly to small for the supplied hose barb so I used the small fuel like piece supplied & put a double barb fitting with 4 hose clamps between. This gives it a little extra length for the bend since this pump sticks down a bit farther. I didn't use the inline screen. Gotta run the fuel down & actually test it out to be sure it moves fuel but I don't see why it wouldn't.
73475294_580313342744997_8541314351028502528_n.jpg76675342_472020983427644_7478585720823611392_n.jpg

I started to remove the fuel sender. After I started, since it's a huge pain in the ass to get to, I figured I would test it again. It was hard to get my multi-meter leads in there but with some help from my wife moving the sender when I had the leads giving me a reading, I could see the resistance changing. Didn't get this when I tried just taking a reading across M5 S to 1 points. I also tried to put my new sender wire leads across M5 S to 1 with the existing wires disconnected & got no reading on the M5. So, I guess M5 is bad. This makes sense since the hour meter & DC breaker were bad when I got it. Some sort of short or over-voltage happened in there at some point. Was hoping to have this all fixed up this weekend but I need to wait for another part! I found one on the auction site for $55 new. The back has some rubber covers on it but it looks like they can be removed.

Thank you all, as always, for the help!
 

CallMeColt

Well-known member
Supporting Vendor
901
1,256
93
Location
Wilson County, Texas
With the wiring you are describing its most likely the motors on the compressors.

Edit:

When I'm running in 115v mode on the 831 I also jumper L1 and L2 at the generator.
When you jump them, do you do it at the inverter or the lugs?

I wanted to put something together so this could be done quickly. My thought was to put a switch between L1 & L2 1 right at the inverter in a protected gang box. What do you think of this idea? Run a very short set of wires out & to the lugs.

Picture showing where I would mount the switch so you see it & are reminded to turn it OFF when used in 240v mode.
74909780_469416173703592_8295438056131919872_n.jpg
Goes without saying that you need to be very aware to NOT have this connection when operating in 240v mode!
 

CallMeColt

Well-known member
Supporting Vendor
901
1,256
93
Location
Wilson County, Texas
I know that probably makes more sense to do it at the output lugs... but does it provide any protection? It would just be much less work to put the switch as I was thinking. Run 6 inches of wire & it's good. I'm just not sure how I would be able to put a switch inside to make the connection easy but run the wires to the main lugs outside. I will look harder at it & come up with an idea. Maybe to the back side of the main lugs?
 

CallMeColt

Well-known member
Supporting Vendor
901
1,256
93
Location
Wilson County, Texas
So, I got a few more parts in today.

Got my batch of in line fuse holders & put one on the positive side of the solar charger since the one on it had broken glass in it.
78626317_948534202186961_9065020681460121600_n.jpg
I don't know what ampere rating glass fuse was in there. Does anyone have one that can tell me?

Installed the new fuel gauge (M5).
78364458_1287137141470727_4362148349810311168_n.jpg
Worked, but was shaky & when the level got below 2/3, it spiked back up to full. Sender did give me some readings but it kept going to 0 when I tested it last week. I ASS-umed that it was from me not getting a good contact on the screws of the sender. Nope, it's shot.

I went & hooked my new sender up to the wires to test it. It goes from 3/4 to way past full.

Came on here to to some searching along with Google at the same time. Found the NSN (6680-01-476-9362) for the sender & part number LS4082. Seems the part isn't easy to find. Found a thread on here about it & found that the fuel gauge is for 0-30 ohms. The one that I got is a 240-33 ohms (WEMA 151324). I didn't know that there were different ranges. I got the same model but longer for my MEP-802A & it worked.

So, I ordered an adjustable one that should work that is 0-30ohms. It's an unbranded cheap one. Will need to trim the float length but that will be easy.

If I knew better, I could have gotten a cheapo 24v fuel gauge that was 240-33 ohms to use with the fuel sender that I have previously purchased but oh well. I know for the future & am sharing here so someone else may read it & benefit from my not knowing!

I like the WEMA fuel sender because it's similar to the float switches that are used in MEP generators for the auxiliary fuel pumps, low fuel shut off, etc. Figured over time, they will last longer being stainless steel & plastic. They aren't a who lot more than a regular one either.

Was really hoping to put the new M5 in & everything would finally be as it should... & I would only have a few minor modifications of my own to customize. Oh well!
 

CallMeColt

Well-known member
Supporting Vendor
901
1,256
93
Location
Wilson County, Texas
I know that probably makes more sense to do it at the output lugs... but does it provide any protection? It would just be much less work to put the switch as I was thinking. Run 6 inches of wire & it's good. I'm just not sure how I would be able to put a switch inside to make the connection easy but run the wires to the main lugs outside. I will look harder at it & come up with an idea. Maybe to the back side of the main lugs?
I decided I'm going to mount it to the left side of the output lug compartment, similar to the outlets. Going to put something to secure the box so you have to make a bit of effort to turn it on. Also, will make something to be a reminder about it at the voltage selection switch.
 

CallMeColt

Well-known member
Supporting Vendor
901
1,256
93
Location
Wilson County, Texas
Alright so I used it this weekend & it's just shy of 30 hours now.

Got the 0-30 ohm fuel level sender in earlier in the week. Modified it so that that size/length was close to the existing one. Got it in & it worked great.

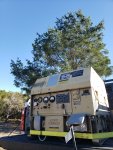
Installed the jumpers for 120v mode at the lugs & installed the switch to the left of the box.
20191214_145408.jpg

Hooked up to the auxiliary pump & my truck's auxiliary tank & fired it up.

After a bit, it started to surge. Figured out it was the angle I was parked with it in my truck was causing the fuel pickup to be in the air pocket. Moved my truck to tilt the other way & all was fine.

I tried to start my window A/C units again with the same results even with the jumper in place. After thinking a bit, I left the big unit on "Fan" mode for a little while then tried it again... it started. From it being without a power source I guess the internal capacitor was drained. Did it with the small unit & it started as well. But, they both can't run at the same time still, jumper or not. I even tried each one on each 120v leg. At least the big 10,000 BTU will start with it. Maybe since the 8,000 BTU is older, the capacitor is bad? When each run on their own, the pull 600-800 watts after the surge. I can run a microwave & two cooktops with the large A/C running. Anyways...

It will start my 3,000 watt 240v heater no problem that I have mounted in the cabin. This is what we needed for the evening.

Calculated that the auxiliary pump would kick in around 0100 so I got up at 0130 & checked on it. Sure enough it did. At 2130 when I last checked, it was at 1/2 tank. at 0130, it was at 3/4 tank. No leaks anywhere in the connections I made. Was happy!

Thought it was cool that the red LED's from kloppk's controller acts as a backlight for the fuel level gauge.
20191214_213012.jpg

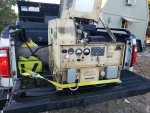
At 0700 I looked out the window at it after listening to it purr the rest of the night. It was billowing white smoke out of every vent!

Thought at first that fuel kept siphoning from my trucks auxiliary tank. After opening it up & letting the pump run, I found that the return fuel like sprung a leak right at the metal tee fitting that's before the injection pump. Sent fuel up & the fans caused it to go all over. Then with the auxiliary pump on, it kept pulling fuel from the truck's tank. Needless to say I had a nice mess on my hands.
20191215_081008.jpg

I kick myself in the butt because this same exact thing happened with my MEP-802A about a year ago. I talked myself out of just replacing the return fuel lines earlier last week because of this possibly happening. Well, I will never NOT replace these fuel lines again!

Cleaned everything up the best I could. Neighbor a few miles away had some fuel line & hose clamps. Replaced the small length of line & fired it back up for another hour to help burn off what I could of the diesel mess inside of the generator. Also, wanted the power to cook chow for the family.

On the good side, all my repairs worked & it ran well!
On the bad side, I didn't listen to myself & replace those return lines so I have a huge mess. At least it's an easy fix.

With the inverter inside, hosing it down with de-greaser to attempt getting it clean is probably out of the picture right? Air dry won't do a whole lot this time of the year. Plus, it's diesel & it never seems to dry.

Thanks for reading my long post!
 
Top
AdBlock Detected

We get it, advertisements are annoying!

Sure, ad-blocking software does a great job at blocking ads, but it also blocks useful features of our website like our supporting vendors. Their ads help keep Steel Soldiers going. Please consider disabling your ad blockers for the site. Thanks!

I've Disabled AdBlock
No Thanks