• Steel Soldiers now has a few new forums, read more about it at: New Munitions Forums!

  • Microsoft MSN, Live, Hotmail, Outlook email users may not be receiving emails. We are working to resolve this issue. Please add support@steelsoldiers.com to your trusted contacts.


Accessory drive seal leaking bad on cummins engine in M818

ida34

Well-known member
4,117
29
48
Location
Dexter, MI
RE: Re: RE: Accessory drive seal leaking bad on cummins engi

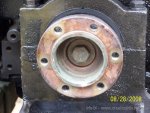
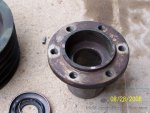
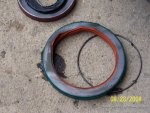
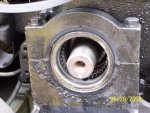
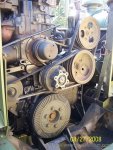
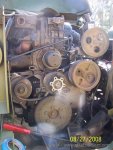
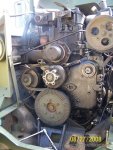
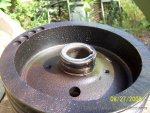
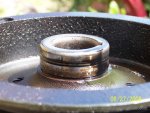
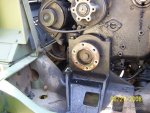
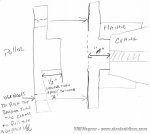
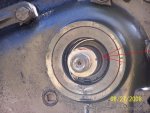
I forgot. Thanks for the pics. It really helps to know exactly what I am looking at. Line drawings can be deceptive. I used to be a certified mechanic but have never worked on a lot of diesel engines.
 

WillWagner

The Person You Were Warned About As A Child
Super Moderator
Steel Soldiers Supporter
8,386
2,391
113
Location
Monrovia, Ca.
RE: Re: RE: Accessory drive seal leaking bad on cummins engi

Chuck, before you go doing the crank seal, please answer a few Q's for me. There are two different cranks in these engines. A square nosed and a tapered nose. When you look at the damper, is there a big bolt in the center with 6 bolts in about a 6 inch diameter circle, or a round pilot in the center with 6 bolts in a small diameter circle?
 

ida34

Well-known member
4,117
29
48
Location
Dexter, MI
RE: Re: RE: Accessory drive seal leaking bad on cummins engi

The manual shows a small bolt pattern but I thought about it again and I am going to wait for a week or so to do the job. I will check it out and get back to you.
 

ida34

Well-known member
4,117
29
48
Location
Dexter, MI
RE: Re: RE: Accessory drive seal leaking bad on cummins engi

I finally got around to the job. Everything came off pretty well. The bushing on the accessory drive pulley was toast. The seal was pretty bad off too. It also became very apparent that the crankshaft seal also was leaking and probably worse than the accessory drive pulley seal. I had to stop when I could not get the crank flange bolt off with my impact. I may have to get a bigger impact. Mine is pretty stout and I thought it was good to about 600 ft lbs in reverse. The manual says torque the bolt to around 200 ft lbs so I am not sure why this one does not want to move. Anyone have any ideas?

Will,
What does the crank flange look like? Is it the fragile one or the OK one?

Thanks
Chuck
 

Attachments

WillWagner

The Person You Were Warned About As A Child
Super Moderator
Steel Soldiers Supporter
8,386
2,391
113
Location
Monrovia, Ca.
RE: Re: RE: Accessory drive seal leaking bad on cummins engi

Chuck, sometimes the adapters are a biatch to get off as are the bolts. Spray the pee pee out of it and use a drift to smack the head of the bolt. Sometimes an impact won't do it. You might have to use a big ratchet and a cheater bar, last thing would be to put a bar on the bolt, remove the FSOV wire and brace the bar on the frame. Then bump the starter. Now that the bolt is out, you need to get the flange off. The crank nose is tapered. It might come off easy...I remember only having a few like this...You will need to make a puller out of 1/2 flat stock MINIMUM...I might have one...it has been a while. When you put it on, follow the directions and lap it onto the crank. I can scan the book if you like. Good luck, take pics. Forgot the image!
 

Attachments

ida34

Well-known member
4,117
29
48
Location
Dexter, MI
RE: Re: RE: Accessory drive seal leaking bad on cummins engi

Good idea with the starter. I will get stock to make the puller. I saw some special pullers on the web but they wanted $250 or so. They bolted in with all the bolts and the middle had a bolt that was turned like a harmonic ballancer puller on a four wheeler engine. Yours would be better. I have a puller used for pulling axle shafte. It would work the same but I fear I might break it. I will post the results tomorrow. I don't think I need copies of the manual. It is nice but this stuff seems pretty straight forward. The waterpump belt adjustment method was different and the accessory drive running everything is a little different to me too. I have rebuilt a lot of engines in my time but this one is a real learning experience. Thanks for the help.

Chuck
 

WillWagner

The Person You Were Warned About As A Child
Super Moderator
Steel Soldiers Supporter
8,386
2,391
113
Location
Monrovia, Ca.
RE: Re: RE: Accessory drive seal leaking bad on cummins engi

Make sure you put a new slinger on the accessory drive shaft. It is very important to make sure the adapter is centered and straight on the crank. It can and will break the crank in front of the #1 rod journal. You must dial indicator it.
 

ida34

Well-known member
4,117
29
48
Location
Dexter, MI
Accessory drive seal leaking bad on cummins engi

Is slinger the one with the arrow pointed to it? Like a washer with teeth on the outside edge? I figure I will see taking it apart, but will the crank flange have a wear sleeve to replace also? Do you happen to have the part numbers for the crank flange seal and the wear sleeve (if it has one)?

Thanks
Chuck
 

Attachments

WillWagner

The Person You Were Warned About As A Child
Super Moderator
Steel Soldiers Supporter
8,386
2,391
113
Location
Monrovia, Ca.
RE: Accessory drive seal leaking bad on cummins engi

I'll get some p/n's tomorrow. As for the wear sleeve, depends on weather or not it's been apart before. Only way to tell, disassemble it.
 

ida34

Well-known member
4,117
29
48
Location
Dexter, MI
RE: Accessory drive seal leaking bad on cummins engi

Bumping the starter did the trick and broke it loose. Thanks for the tip. The bolt is out. Now I need to go find some stock to make the tool. Again, thanks for the help.
 

ida34

Well-known member
4,117
29
48
Location
Dexter, MI
Are you waiting for disaster Ted? Update. I will post pics again later. The 1/2 x1 inch hot rolled stock from tractor supply only bent. I then made another and sandwiched the two 1/2 pieces into one big 1 inch bar. I was going to weld them together if they still did not work. Just when I was ready to call it quits and weld them the crank flanged popped out hitting my hand. I had expected it to give way with some violence and it did. No injury so that is good. I got the seal out and am now going to the cummins parts place. No wear sleeve on the crank flange and no grooves at all. I think I can go without one and just replace the seal. More to follow.
 

ida34

Well-known member
4,117
29
48
Location
Dexter, MI
The dealer did not have the crank flange seal or the slinger seal. They had to be ordered. I did get the accessory drive seal and the wear sleeve for the drive pulley. I will work on it more tomorrow and the other parts should arrive tomorrow. I also got the water pump copper seal to replace it while I am at it.
 

Attachments

TedG

Well-known member
1,133
38
48
Location
MI USA
Absolutely not Chuck! I'm learning & this is a great thread! It seems to be going quite well & when your done with it will be a great running truck. Keep up the good work!
 

WillWagner

The Person You Were Warned About As A Child
Super Moderator
Steel Soldiers Supporter
8,386
2,391
113
Location
Monrovia, Ca.
Hey Chuck, I looked at your post like 3 times today and still forgot to get the p/n's you needed, good to see you got the stuff comming. These engines like to leak at the front cover gasket too. It would be a shame to put it all together and have oil oozing out the cover bolts. You are just a few dozen capscrews from re sealing the front completely. A pan gasket and the cover gasket are all that are needed now. Maybe something to think about. It would be better to do it with the radiator and stuff out than to have to take it all back apart. Just an opinion. Glad you didn't get smacked with the adapter.
 

ida34

Well-known member
4,117
29
48
Location
Dexter, MI
I was thinking about it but it may be more work than I want to do right now. I would have to rig up something to hold the engine up and I don't think I have anything right now. My tractor is only running on three cylinders. I could raise the engine with a jack but then could not get the pan off. If I could take the front off without the lifting engine up I probably would but with the engine in the truck it seems like it would be pretty hard.

Ted,
I am doing the pics so the next dude that needs to do it has some real pics to get an idea of what they are in for. Glad you are getting something out of it.
 

WillWagner

The Person You Were Warned About As A Child
Super Moderator
Steel Soldiers Supporter
8,386
2,391
113
Location
Monrovia, Ca.
Use a bottle jack on the pan rail to hold it up. Seriously, maybe 2 extra hours, depending on how hard...what degree of tree the gasket has turned back into.. the gasket is. Like I said, you're there.
 

ida34

Well-known member
4,117
29
48
Location
Dexter, MI
I will look into it tomorrow. I could take the oil pan off then lift on the rail like you said. I could then take off the front engine mount and the front cover.
 

ida34

Well-known member
4,117
29
48
Location
Dexter, MI
I was going back and fourth about the pan and cover gaskets. This operation has been going smooth and I did not want to tempt fate. In the end the decision was made based on parts availability. I would not be able to get the parts until Tuesday. I wanted to get the this wrapped up by the end of Sunday so I could move on to other projects. If the parts had been in stock I could have picked them up today and then it would have only been a few more hours on Sunday. Now it would have been next weekend before I could have finished it. With the exception of the front seals it not leaking to bad. When I get the pulley and crank flange back on I am going to degrease the engine before I put the rest of the engine back together. This will give me a true picture of any non sealing situation I may have. I did go ahead and replace the copper water pump gasket as a precaution. It was in stock and only about $10. No pics of this. I also got the wear sleeve changed out last night. Now I have to wait for the slinger and crank seal to arrive.
 

ida34

Well-known member
4,117
29
48
Location
Dexter, MI
I got the seals in the mail on Friday. I put it in Saturday before having to go work the U of M game. I got it all done except putting the rad back in along with the fan. I also had to put in the grill. I was waiting for the other shoe to drop because it was going way to easy and it did. While tightening the lower rad mount the stud pushed through the rad tank. I had to pull it back out and pull the tank off. there were two cracks. The mount threads on the rad also stripped out a little. I welded up the crack the best I could. I then went out and got JB weld and a helicoil to fix the threads. I also got gasket material and hollow punches to make the tank to core gasket. Tonight I put on the JB and made the gasket. I could not find the correct studs so I got bolts that I will have to cut the head off and cut new threads on the end. When I do get them in at the right depth I am going to tack them in. I also got to use my new Lincoln 220 mig welder. It works great. No pics yet of the rad repair but I will try to get some tomorrow.
 
Top
AdBlock Detected

We get it, advertisements are annoying!

Sure, ad-blocking software does a great job at blocking ads, but it also blocks useful features of our website like our supporting vendors. Their ads help keep Steel Soldiers going. Please consider disabling your ad blockers for the site. Thanks!

I've Disabled AdBlock
No Thanks