• Steel Soldiers now has a few new forums, read more about it at: New Munitions Forums!

  • Microsoft MSN, Live, Hotmail, Outlook email users may not be receiving emails. We are working to resolve this issue. Please add support@steelsoldiers.com to your trusted contacts.


My New toy

91W350

Well-known member
4,414
57
48
Location
Salina, Kansas
I went back and looked at the photos of the other side and realized you have both shafts there. Sorry.... I still bet you are in good shape. They sure have an interesting drive joint in that steering knuckle. I had not seen one before, thanks for the photos. Glen
 

pwrwagonfire

New member
652
5
0
Location
Central Massachusetts
That axle actually looks like a big mess, but the grease is pretty good. What you have there is somebody pumped the steering knuckle full of grease to protect and lube that joint. I used to do it too when the felt seal on the steering knuckles was in need of replacement and I could not find the parts. That was a Chevrolet application and not a Dodge, but the same basic design. It looks like the axle shaft going to the pumpkin is nice and clean, that is where your axle seal will be. You have a mess to clean up there, but I am betting you have a well preserved joint inside that ball of grease. Was that steering knuckle packed solid? I am betting it was.

I am not familiar with that axle joint, but where is the stub axle that goes out to the hub? I take it we are looking at the long axle between steering knuckle and differential.

The nut is pretty common damage. A lot of shade tree guys will use a chisel or large screwdriver to tap those flats because they did not have the right socket. Glen

Glen, thanks for the info! I got all the grease off, the u-joint is almost perfect underneath it all.

So I take it you don't NEED to pack the whole thing full? This deffinately was. On the other side I greased the **** out of the u-joint, and put a thin coating on the inside of the flange, but didn't pack it, am worried I didn't do it correctly...
 

91W350

Well-known member
4,414
57
48
Location
Salina, Kansas
I suppose it is like fuel additives, everyone has their own plan. That knuckle runs all the time if you do not have locking hubs. Whenever we went and played in really fine sand or deep enough water, we came home and cleaned out the steering knuckles. Our trucks were the 1957 to 1959 Napco converted GM after market 4x4s and the ball felts were very hard to find. We initially would just pump that knuckle full of grease, until it oozed out by the felts. It was always such a mess to clean up after a weekend in the off road park that we started lubing the parts and using lithium grease on the seal surface and the splines.

I am sure one of the guys that is more familiar with the M37 will jump in, but I would think you are in great shape for regular road duty and normal 4x4 activities. I can tell you that a knuckle full of water polluted grease is a nasty mess to clean up. If you are like I am and do not mind tearing in and checking once in a while, you can get the feel of your machine and what the elements do to it pretty quickly.

There were no spare axles to be had for our trucks and they had that unusual ball and socket drive, where a set of five large balls actually transfers the drive from the inner and outer axles. Mine was worn bad enough from lots of abuse that those balls would clunk in and out of the groove worn from normal driving if you turned sharp in four wheel drive. I often wished it had a normal U-joint knuckle or that I had decided upon a toy that I could get parts for.

Unlike my V8 Jeep conversions though, the old Chevrolet never broke a front axle.
 

rosco

Active member
Steel Soldiers Supporter
2,102
27
38
Location
Delta Junction, Alaska
Its always good to change that inner seal, when your doing brakes. I tend to keep the knukle full of grease.

The way the hard top mounts is just indicative of the early tops. I finally found a later style that has the more conventional window channels for the door window. They will seal better. When the wood fails, they are problematic. The later tops also have a very nice sliding rear window.

Somebody already mentioned that the front axles are hard to get... Right. The Rears are not too common either, & they tend to break - they are not real strong! The best way to break them is to forget to turn in the hubs and put the T-case in low (even for just a minute). They had the control levers fixed so that you ALWAYS had to engage the front axle to prevent that - the hubs, therefore can get you in trouble. I never found they made a measurable difference in milage.

An Old Timer told me when I bought my M-37, about 40 years ago, that its the "finest 4x4 ever built". He wasn't far off. Its best to remember that it is an off road vehicle and that it just has SOME highway capacity.

Lee in Alaska
 

pwrwagonfire

New member
652
5
0
Location
Central Massachusetts
So I had a 4 day weekend here...did a bit of work on the old truck.

I got all new brake lines and hoses installed in the front axle (vintage power wagons pre-bent brake line kit), lucky for me all of the brass fittings and union nuts cleaned up great...just had about an inch of grime ontop of them! Cleaned them all up in mineral spirits, and now they look brand new.

The pre-bent line kit worked out well so far, didn't have to do much doctoring to make it fit, and all the fittings have lined up correctly.


I also painted the outside of the drums, and the hub (like the other side), and am ready to install new seals and assemble after I pressure wash the brake drum support tomorrow afternoon.

I've decided to remove the bed of the truck before I work on the rear axle, figuired it would be easier to work on the lines, etc. Plus, I am going to need to remove my fuel tank and want to install new fuel lines as well...never hurts to have a bit more space!


I'm really liking this grease I have...picked up valvoline (sp?) high temp stuff, very easy to work with and appears to stick well.

Ok, so here is my one stupid question of the week, I promise. If there a 'plug' to remove on the back of the flange so I can pump the knuckle full of grease? I've heard this referenced a few times, and in all the manuals and my searching, including a mechanic friend, we couldn't find one. Is it just the right angle grease fitting ontop of the flange?

Thanks again everyone for all the help, positive comments, and pointers!

I'm gonna get the new seals in tomorrow after work, and I will post more pictures then.
 

pwrwagonfire

New member
652
5
0
Location
Central Massachusetts
Ok guys, got my new inner seal for the left front axle coming in tomorrow, as is my slide hammer/seal puller. I've been kind of stalled waiting for these two things.

Today, I finally packed the right front u-joint with grease...two tubes is a LOT of pumping with a grease gun!

I guess I should have looked harder for that plug, I feel pretty stupid. Simply took out the plug, put a zerk fitting into the hole, and voila. In honor of my blindness, I took a couple of pictures of its location, just in case anybody else has the same question.

Here it is first with the zerk installed, and second with the little plug back in.
I also took a couple (the best I could) of the new brakes hoses/cylinder connections/lines that I installed last week. I'm pretty happy with the process so far, should have the front axle done by this weekend!
 

Attachments

pwrwagonfire

New member
652
5
0
Location
Central Massachusetts
Alright so today I set out to finish the front axle re-build once and for all.

I actually wanted to mention, that I did NOT HAVE A SEAL on the driver's side front axle...strange, but true. The brass cup and cone were there, and popped right out when I removed the shaft, but no seal. Well, I guess that tells me why I had so much gear oil in my u-joints!:???:

So, I installed the new one I got from memphis equipment first...turned out to be a NOS part, still all sealed up, with an august '69 date on the packaging!

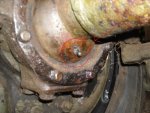
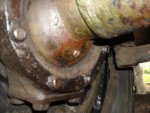
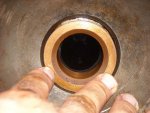
Let me just say, if I never have to replace another inner seal all my life, that would be too soon...what a PITA that was! Turns out the cup for the seal had moved forward about a centimeter, making the axle/u-joint not sit correctly. Used a punch and wooden mallet and straightened that out.

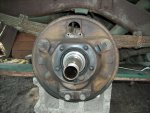
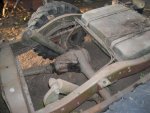
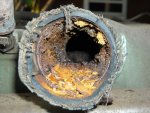
Here is a picture of the seal after it was seated correctly, and the axle shaft after it was put in place.

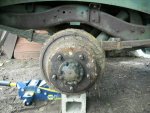
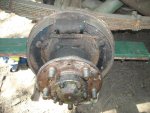
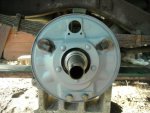
Greased up all the bearings and joints, put in the new wheel cylinder, roughed up the brake shoes, lubed everything up, and put the drum back on...whew! Tomorrow I will put the wheel on, and adjust the bearings, and add the warn hub to this side. I also got enough grease to pack the u-joint full, and gear oil to add to the diff. I got SAE 80w-90...wasn't sure what else to use. What do you guys run? The valveoline stuff I got says it's high temp, AND Military spec, so I figured it would do just fine.

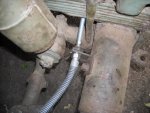
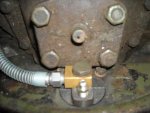
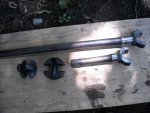
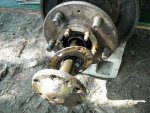
I gotta say, I am REALLY happy with how the axle turned out. Because there was some discussion on axle shafts earlier, I took a photo of mine with the joint, all cleaned up before I installed them.

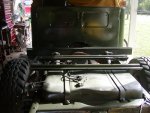
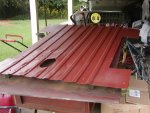
Next project- taking the bed off to get some more room to re-build the rear axle! Thanks for all the positive comments so far, I will make sure to keep the pictures coming as I progress.
 

Attachments

pwrwagonfire

New member
652
5
0
Location
Central Massachusetts
So I had to take the last couple of weeks off due to a severe finger laceration I got at work...but now Im 90% healed, and couldn't wait to jump into the rear end of the truck!

Got it jacked up, got the drum off easily. From the pictures you can see how disgusting this part of the truck was. Before I took the axle shafts out I went to drain the diff....surprise surpirse, it was EMPTY! :| I'm sure the problems [/B]that[/B] caused will rear its ugly head at some point!
Got the axle shaft out no problem, and inspected it for stress cracks...all good!

The seals were leaking just like the front, so I cleaned up all the bearings and other parts in mineral spirits and let them air dry. New timkin bearings! The cleaned up very nicely.

Removed the old wheel cylinder, took quite a bit of work to get all the old brake dust and crap off the brake drum support, but it turned out looking pretty good I think! Masked everything off, and sprayed it with several coats of high temp primer. The last picture shows how I left the old girl for the night.

I heard about lightly washing the old oil retainers for the brake shoes in dish detergent on g741.org....so I tried that and left them to dry, will let you know how it works out!


Tomorrow I will be reassembling everything because THIS TIME I had the forsight to order all the right parts before dissassembling the truck :roll:
 

Attachments

pwrwagonfire

New member
652
5
0
Location
Central Massachusetts
Gentlemen:

Since my last update, I've finished rebuilding the rear axle with cleaned and re-packed bearings, all new seals, new wheel cylinders, etc.

The whole thing came out EXCELLANT...however I left my camera at work, so no real pictures to show unfortunately.

Today, I hacked away at trying to get the bed off to make finishing replacing the brake lines a little easier, and to sand and POR 15 the frame. The bolts holding the front of the bed on have got me so pissed off (such a tiny area/weird angle to work at) that I've given up for the day...also in part to a pending rainstorm.

This week, get the bed off and sit it on blocks, and finish running all my brake lines!

Will make sure to take pictures this time...

On a cool note, my girlfriend actually helped me re-build the rear axle :shock: She at least pretended to enjoy it as well! :D
 

pwrwagonfire

New member
652
5
0
Location
Central Massachusetts
The last 2 weeks I've been working on cutting bolts/taking off parts...I traded another member on here my non-winch bumper for some parts he didn't need, I'm happy I get to be a part of his restoration!

I also finally got all the bolts holding the bed on cut and/or unbolted. Tomorrow's project will hopefully be getting multiple strong friends over to attempt to lift it off onto blocks; or just enough to drive out from underneath it!

I ask you fella: is this doable? Or should I try and acquire a chain hoist?
I figured 6 dudes should be able to muscle it off; I moved an 800 lb hot tub for a buddy with 5 people, it wasn't fun but we got it done!
 

pwrwagonfire

New member
652
5
0
Location
Central Massachusetts
So I got together 4 friends last night, and was easily able to lift the bed off and put it on blocks for now...heres a couple pics of the truck as it is now; minus the front bumper (traded to another member on SS) before I put on the winch mount bumper, and minus the bed.

As you can see, the frame is in great shape...the inside of the fuel tank....isn't that yummy?

Almost done putting in the rear brake lines, hopefully I can finish that today without the rain putting an end to that!
 

Attachments

pwrwagonfire

New member
652
5
0
Location
Central Massachusetts
Guys:

Its been over a month since my last post; I've made only a little progress since then unfortunately!

Been all tied up at school an hour away from home, but I did make it home last week to do some work to the ol' girl.

Got the front brake lines all installed all the way to the master cylinder, but not connected yet due to the union nut that goes through the frame being totally destroyed/rusted so bad I can't even get a wrench to fit over it.

Luckily for me I was able to track a NOS one down after quite a bit of leg work...FYI Memphis Equipment does NOT carry them and claim they never have, and Charles Talbert told me he had absolutely no idea where to find one other than a parts truck! :|


I didn't have high hopes...but I got the LAST one Vintage Power Wagons in Indiana had! Funny to think that a tiny brass block is the one thing keeping me from completing the brakes eh? Guess its the little things!!

I will make sure to take pictures Sunday of the progress, I wish I would have time to bleed and adjust the brakes, but unfortunately I won't as its my birthday and I have to see the grandparents!
 
Top
AdBlock Detected

We get it, advertisements are annoying!

Sure, ad-blocking software does a great job at blocking ads, but it also blocks useful features of our website like our supporting vendors. Their ads help keep Steel Soldiers going. Please consider disabling your ad blockers for the site. Thanks!

I've Disabled AdBlock
No Thanks