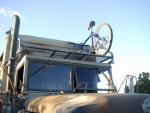
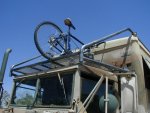
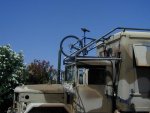
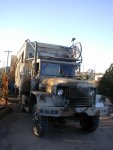
• Steel Soldiers now has a few new forums, read more about it at: New Munitions Forums!

  • Microsoft MSN, Live, Hotmail, Outlook email users may not be receiving emails. We are working to resolve this issue. Please add support@steelsoldiers.com to your trusted contacts.


Camper M109 - Spacial Transformations style

LowTech

Member
Steel Soldiers Supporter
886
12
18
Location
Arizona
Bike Rack

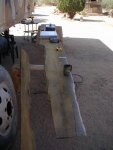
This is our new profile,
had to make some kind of "Bike Rack". Didn't want to increase our already tall clearance needs, and didn't want to figure someway to put our dirtied rides inside . . . so . . . a rack along the same lines as Mr J. Gato's. The main needs were to have a place for the bikes, and to keep branches and such off the box front.
Have to have our "rides" w/ us. Sometime (often) we are far enough "out" that leaving a major brakedown and walking to some source of help is more like a survival trek. A good mtn. bike can get me 100 miles in two days . . . and carry all the stuff I'd want w/ me, they're our "REAL" bug-out rigs :twisted:

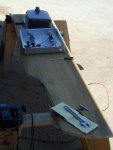
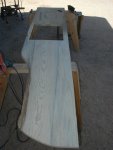
Up the mountain again to visit our Mech Master friend, the one that helped us w/ "Going Single" and swapping out the tranny. Once there I became the helper :) Two days later we've got this. Now remember we are having a heat wave this last week . . . just into the triple digets at the base camp, a bit cooler up the mountain. Still it was hot enough that the welder shutdown on us. At that point we just started holding the metal together in the sun . . . think it's called "solar welding". Seems to have come out ok.

Will prob start out by temp mounting the Batts for the box up there . . . I'll find a real place for them after the trip.

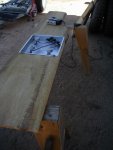
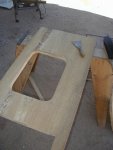
Still need to do all the clean up and painting . . . just thought you might want to see.:)
 

Attachments

LowTech

Member
Steel Soldiers Supporter
886
12
18
Location
Arizona
Nice work on that cabover rack! How far along with this project are you guys?
Now that's a question, . . . no way to tell how far we have to travel on this path. Can tell you some of the things we've done, or have in process.
Our target date for starting this trip is the 1st of Aug. For that we were wanting to have certain things done, a bed/lounge, stove w/ propane tank and plumbing, potable water tanks w/ pump and sink draining through the floor into a 5 Gal bucket underneath (we will prob add a greywater tank later), and a portable toilet temporarily built in (just till we can pass the demands of re-reg'ing as an RV). the main vehicle mods are duel alts (that I'm still waiting on install instructions), wheels from Donkdonk (which we have been waiting on since the end of June, seems the "waterjet man" is not getting the wheels to him to finish out),and the overcab rack (at least we didn't have to wait on that being shipped). Add on to that, . . . make the trailer work as a fuel processing station.

The futon is in and working (well I have it out to deal w/ water tanks and plumbing), tanks and pump are just waiting for parts (shipping :roll:), LP tank is in and most of the plumbing is there for that, just missing the flex lines and to cut through the floor for my outside to inside passage. Two 15 gal tanks are mounted under the futon w/ a sureflo, that we picked up at the swapmeet, for water. Have a solid slab of pine, from up by Idylewild, 8' 1/2 x 20" it will be a kitchen counter already have it shaped and cut-out for the stove and sink install. Been sanding it down from rough cut. About to test fit it soon, will keep working on it outside after the test fitting till the dusty part is done. The toilet is on order:sad:, I'll make a temp stall for it. Some storage for food and clothes and we're off.:driver:
 

Attachments

LowTech

Member
Steel Soldiers Supporter
886
12
18
Location
Arizona
Update

OK, it's been a year since I wrote that . . . feel like I should update :)

We've/ She's put 3000 miles on the "She Beast", in two long trips. Starting not long after that last post.
A trip up the Eastern Sierras and back down through Death Valley (the DV part mostly on dirt), and a winter trip to SE `Zona & back. That one was about half on dirt. Last winters trip also included my truck, the "little Draggin' " pulling the fuel trailer.
For anyone that wants to jump the line, and know all the answers, they can go to the links in the Sig Line. For everyone else I'll post some photos & words up here.

I'll start w/ some of the mods that weren't finished last posting.
We did get the dual alt set-up in,
and I've now replaced the "whistler" w/ a D turbo. We didn't have the "D" for the first trip and that convinced us that we needed to do the swap.
11-07-11 (0).jpg 11-07-11 (1).jpg

I've also changed the clamp for the intake mushroom from a bolt, to a mnt bike quick release seat clamp. It sure makes opening the side panel much easier. :D
11-07-11 (3).jpg
 
Last edited:

Dave Kay

Active member
Steel Soldiers Supporter
499
29
28
Location
Kingman AZ
Enjoying the thread, like the propane mounting too. Have you considered a few coats of urethane finish on the wood floor? You know, like boat spar finish? Couple of coats, sanding in between and a final, and the stuff lasts for years. Easy to clean, (water hose) and if it gets gnarly--- just sand and coat again!

Anyway, good luck!:p
 

1redgmc

Member
150
9
18
Location
West Virginia
I've also changed the clamp for the intake mushroom from a bolt, to a mnt bike quick release seat clamp. It sure makes opening the side panel much easier. :D
View attachment 260311
Having just dealt with this exact issue yesterday - and the fact that I have several of these seat clamps laying around - you sir are a genius! Thank you! I will be going out NOW to replace my bolt and make life easier.

[thumbzup]
 

LowTech

Member
Steel Soldiers Supporter
886
12
18
Location
Arizona
As for the inside, this is what became of that.
The kitchen area
10-08-14_ (5).jpg

Futon lounge/ bed w/ 30gal of potable water in two tanks & a surflo pump under neath
10-08-15_ (3).jpg

Headboard storage (w/o the top and side door under the desk)
11-06-28 (3).jpg

Desk space, next to a short closet.
11-06-25 (2).jpg


Now that the major pieces have been placed, and tested, I'll start to build specific storage areas. This project is years from finish . . . we can't stop using it long enough to bust out the whole thing . . . and I'm glad about that [thumbzup]:driver:
 

scottjhl

New member
136
1
0
Location
Loxahatchee, FL
I saw the location for fill up of the water tanks. How do you add water to the tanks. I believe it looks like it needs a pressureized garden hose to fill it up. (not a water jug).

I do like the way that you made the sink, with the custom piping.
 

LowTech

Member
Steel Soldiers Supporter
886
12
18
Location
Arizona
Our water supply from the under futon tanks is delivered through some copper piping.
This was the first set-up,
10-08-12_ (8).jpg 10-08-12_ (5).jpg 10-08-12_ (2).jpg 10-08-12_ (6).jpg

After freezing it apart at the start of winter, we re-did it this way. Now the lines will drain. We also like the control of the spayer over just a hose bib.
P7110001.jpg P7110002.jpg

We use the pipes for hanging towels, and utensils when we're parked.
 

LowTech

Member
Steel Soldiers Supporter
886
12
18
Location
Arizona
I saw the location for fill up of the water tanks. How do you add water to the tanks. I believe it looks like it needs a pressureized garden hose to fill it up. (not a water jug).

I do like the way that you made the sink, with the custom piping.
You're right, the only way to fill it (at this time) is to use a hose under pressure. I'm about to add a second fill for the other tank. Had some probs w/ trying to have them both fill off the same line. I'll now have a "Y" outside the box w/ a cut-off to each tank and separate vents. Then I'll work on being able to fill from a jug :D
We do carry loads of water in many diff containers, not being able to fill the tanks doesn't really shut us down. He// this is the first time I've had pumped water in any of my personal rigs :D
 

ODDBALL007

New member
569
5
0
Location
GENEVA FLORIDA
dude very nice camo color. i tried to get that effect, didnt work. Im building the ODDBALLS M109 w trailer and the ODDBALL EXPRESS II. both are threads on here. Anyways . Looks great
 

Attachments

Karl kostman

Well-known member
Steel Soldiers Supporter
2,283
836
113
Location
Fargo ND
I am in process of converting a s-280 into a camper so trust I will also be watching your progress closely! Thanks for posting the pics you have a good start on it!
KK
 

JDToumanian

Active member
1,655
14
38
Location
Phelan, CA
Your floor gives me hope for my M146.... It's got beat up linoleum tiles on it, I imagine it looks like yours did under there. I have a belt sander so I think I'm going to clean it up, stain and seal it. What did you use in the joints between boards?

Jon
 
Last edited:

LowTech

Member
Steel Soldiers Supporter
886
12
18
Location
Arizona
dude very nice camo color. i tried to get that effect, didnt work. Im building the ODDBALLS M109 w trailer and the ODDBALL EXPRESS II. both are threads on here. Anyways . Looks great
Thanks, The camo paint job, jobs really as most of our compound has that 4 color desert MERDC, is from the Military. Do have this paint by number sheet, it might help.
I've been watching your builds as well . . . but your EYE kind of creeps me out ;)
m35a2-01.jpg m35a2-02.jpg

Your floor gives me hope for my M146.... It's got beat up linoleum tiles on it, I imagine it looks like your did under there. I have a belt sander so I think I'm going to clean it up, stain and seal it. What did you use in the joints between boards?

Jon
The M146 has the same floor (oak) w/o the steel plate under it, not as likely to be rotted. We started w/ a belt sander . . . then changed to a floor sander . . . much better! For the gaps she used a regular oak wood filler. It's not standing up to the movement and flexing very well, already has cracks and bits falling out :( Have thought of using sawdust and glue . . . may try that on one. We have not sealed the floor, just lots of oil. I'm not that crazy about varnish.

The build looks great! I would like to convert a m109 in the future.

I see a m146 in your compound! is that next?
:grd:
There are three M146's here, and the will all be re-done as studio spaces. First we will seal the roofs, then sand & oil the floors, replace any walls/ ceilings that need it and paint. The rest is a secret ;)
 
Top
AdBlock Detected

We get it, advertisements are annoying!

Sure, ad-blocking software does a great job at blocking ads, but it also blocks useful features of our website like our supporting vendors. Their ads help keep Steel Soldiers going. Please consider disabling your ad blockers for the site. Thanks!

I've Disabled AdBlock
No Thanks