• Steel Soldiers now has a few new forums, read more about it at: New Munitions Forums!

  • Microsoft MSN, Live, Hotmail, Outlook email users may not be receiving emails. We are working to resolve this issue. Please add support@steelsoldiers.com to your trusted contacts.


Project Off-Grid M109A3 w/w log

jesusgatos

Active member
2,689
28
38
Location
on the road - in CA right now
I don't remember where I saw it (it was before I started collecting links related to the M109/M185), but I have seen photos of a deck built on the roof of a shop van, with a ladder and hatch. Some sort of observation platform. Throw an 8'x8' quick shade up there and you're all set.
That's exactly what I'm doing. Already built the perimeter frame (out of 2" x .120-wall HREW tubing) and tied it into the corner lift-points. The 'deck' is going to be made up mostly of solar panels, which I've been told are plenty strong enough to walk on, but I haven't verified that.
 

Attachments

jesusgatos

Active member
2,689
28
38
Location
on the road - in CA right now
Cool pics. I dunno about the solar panels. Haven't really given it much/any thought yet, because I've been too busy working on other aspects of the project. Think the big thing is going to be incorporating some type of easy-up-type sunshade into the design though. Otherwise the solar panels are just going to be blistering hot, and I want to have shade up there anyway. Best resource I've found for building these type of observation platforms was actually some random nascar camping / tailgating forum. Those guys are nuts!
 

Beerslayer

Well-known member
Steel Soldiers Supporter
1,054
53
48
Location
Tualatin, Oregon
ive been looking into roof racks for my 109 MRV. ive found alot of interesting ones, but dont know, how hard is it to make one?
Pretty easy to make one if you can weld or even if you just take a community college adult ed welding class and make one as a class project while you learn.

If you bought the tools you would need: [for example]

Used 120vac Lincoln wire welder used off Craigslist $150 to $200

Some way to cut steel tubing. Recommend used abrasive chop saw off of CL for $75

Small grinder, used off of CL $50

Basic hand tools like a framing square, some clamps, and some saw horses.

You can frame the roof rack and a ladder going down off of the back out of .072 wall thickness 1" square tubing.

Very easy.

I started out welding making farm gates out of steel tubing with my Dad. We figured out that anything more complicated than that, such as a horse trailer, was just a combination of gates welded together, essentially you are making rectangles. Very easy.
 

wsucougarx

Well-known member
6,951
65
48
Location
Washington State
Today, I had some time to tackle something that has been bugging me. I know these vans tend to leak. Albeit my truck doesn't appear to have too bad of a leak. I have a few dry rotted boards that I pulled...uh, rather I scooped up. I found that due to the inherit angle of the truck, the leak seems to be coming from the back passenger corner of the box. The stream of water is going under the "L" shaped bracket ,joins the wall and floor, on up to the front of the box. At first I thought I had multiple leaks but narrowed it down to one. I removed the wall panel and had a gush of water coming out. No joke, at least 1/2 gallon of water let loose. Seems the caulking they used worked all too well. Wonder why they never put drain holes in the walls. I pulled out the insulation and found it was not water logged. I followed the "wet" up towards the roof of the truck. One thing I am glad is, AM General coated the inside of the walls with tar. I was surprised to find hardly any rust in the walls where the water has been puddling. I don't have any pics yet but I'll get some posted later on. This week I plan on re caulking the roof joints with some stuff I picked up from Home Depot made espicially for this application. Oh darn, looks like I'll need to re CARC her this summer.

Projects Completed:
Found the ONE water in the van
Pulled the wall panel & found leak is from the roof (not surprising)
Removed insulation
 
Last edited:

LowTech

Member
Steel Soldiers Supporter
886
12
18
Location
Arizona
Wonder why they never put drain holes in the walls.
That is exactly what I did, drilled two holes through the floor in each wall section. I did have to soak my drill bits in gasoline afterward to clean them. I would say that there are no drain holes because of deep water fording. I think these boxes were water tight to the bottom of the windows when new.

What are you going to use for the caulking?
 

wsucougarx

Well-known member
6,951
65
48
Location
Washington State
I am going to go with Loctite Polyurethane Roof and Flashing Sealant. I had planned on getting the joints done today. However, it appears God is blessing us with some white stuff at the moment. Hmm, where did this come from? Not surprisingly the forecasters were incorrect;-).
 

Attachments

wsucougarx

Well-known member
6,951
65
48
Location
Washington State
Project put on hold until this white fluffy stuff goes bye bye. Oh, this was the first wave of snow that hit us. If you go ahead and add another 6 inches that'll be the current state of affairs. Right now it is a mere 16 degrees outstide. Today I paid a visit to Heavymetal (thanks Rick) and picked up a medium towbar and spare tire for G&C. Not sure what it is, for some reason I've got to have a towbar & safety chain for each truck:-?. I'm pretty sure it's the fact I don't like transferring those heavy lugs from one truck to another.
 

Attachments

Last edited:

Darwin T

Active member
1,185
10
38
Location
Port Arthur, Texas
I love the idea of the second fuel tank. I have an extra spare in my M105 trailer. I usually travel alone so I bought and truck bed hand crane from harbor freight to lift the tire into the trailer, i use gravity to lower it. if you mount it just inside the box door on the passenger side you can lift the tire(s) into the box and either stack them or put a bolt through the wall and bolt them upright. i have plans to set the box of my m109a3 up for a hurricane evac (Bug Out Vehical), that is why i bought him.

i have a question on the mounts you have for the intercom, the small ones you have the boxes mounted to, what are they called and where can i get some. i have a 4 station intercom system sitting on the floor in my living/parts room.
 

Attachments

wsucougarx

Well-known member
6,951
65
48
Location
Washington State
I used a piece of 1 1/4 inch stock to make the brackets for the C-10456 control boxes you see mounted in the corner of the hardtop. The brackets bolt directly to the hardtop supports. The C-10456 control box on the tranny hump is mounted to a VDR-2 RADIAC mounting bracket. I used the same bracket to house the overhead console as well.
 

Attachments

Darwin T

Active member
1,185
10
38
Location
Port Arthur, Texas
Grassy A$$ (i think that's german for "Ya'll been a big help") - Thanks though i ordered one of the mounts you used next to the gear shift so i can start my intercom project. then the radio project. along with the winch project. oh, and the 11.00x20 tire change. and the locking hub project. and the inverter power supply project, with a 12 volt altenator and another battery box. oh yea, and the receiver hitch project. then there is the m-66 project. :cookoo:
 

wsucougarx

Well-known member
6,951
65
48
Location
Washington State
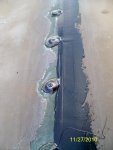
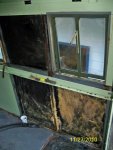
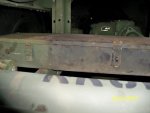
Snow is pretty much all melted, rain clouds passing overhead. Today I made a dash outside to at least accomplish one roof joint. As most of us M109A3/M185A3 owners know, the white caulking AM General used for sealing panel joints probably wasn't made to last it's 22+ years. Almost every joint, where the caulking was used, is all cracked and shows some water infiltration. Here in the PNW, it's also a nice home for moss to grow out of. Though there is only 1 major leak evident in the van, I am going to redo all the roof panel joints within the next couple weeks...weather permitting of course. I've got a tarp covering the roof at the moment to keep the areas semi dry. I tacked the easiest seam to get to, the rearmost one. I just used a flathead screwdriver with a 3/8" end and scrapped out the caulk, used a wire brush to clean the area, then scrubbed the area down with rubbing alcohol. In the process of stripping the paint back I noticed I had a total of 4 coats of paint that's been applied to the truck(1st coat:eek:riginal forest green from AM General, 2nd coat: Tan CARC, 3rd/4th coat: 3 color camo CARC). I used some polyurethane based roof/flashing sealant for the joints (discussed in a previous post). I decided to seal the rivets as well using Geocel Pro Flex Multi-purpose Brushable Primer. Both sealants I used are paintable and permanently flexible (we'll see). There really is no reason why I used the two sealants. I suppose I could have just used the Pro Flex for everthing but it's pretty runny stuff and I'm not sure I would have gotten the nice fill type of application on the seams. I do plan on CARCing her this summer if I can afford it and be able to still buy it. I'm not too happy with the Gillespie paint I used on the hardtop....TOO GLOSSY!!
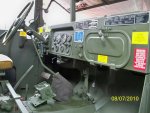
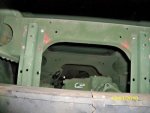
On the inside of the van, I used some phosphoric acid to kill the rust. I won't really tackle the inside until all the roof joints are sealed up. I plan on pulling all the side panels to see what's in there. I'm going to put some drains at the bottom of each wall. The plan is to extend a 4-6" clear tube down with a petcock on the end. A clear tube will let me know if I have another water issue and the petcock will keep critters from crawling up into the walls. I originally planned on just drilling a couple 1/2 inch holes on the bottom of the walls. However, when I got into the van I noticed I had a hibernating yellow jacket there all cuddled up in the corner of the door. Then I thought shoot those walls would be a great place for a yellow jacket nest. Anyways, I'm rambling on too much now.
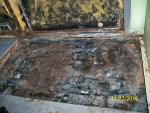
The floor actually looks worse than what it is. The entire floor and the inside of the walls are coated with a thin layer of tacky tar. The rust color you see on the floor is a result of the leak I had in the wall that rusted out the floor panel carriage bolts. The rust "powder" got on the tar and is nearly impossible to remove. I treated the bolt holes with the phosphoric acid sol'n. I have decided this is where my two 9.00x20 spare tires will reside. I'm going to construct somekind of a mount that'll keep the tires upright and secure.
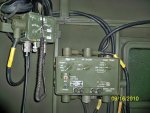
Hmm, probably should maybe run some wiring in the walls for future use (great something else to add to the already long list of projects:) )
Projects completed:
Caulked rearmost roof panel joint
 

Attachments

Last edited:

wsucougarx

Well-known member
6,951
65
48
Location
Washington State
That is looking really good WSU - :jumpin:
Coming from you Zout and knowing what you can do with an M109A3, I take that as the highest compliment sir. I only hope this truck will at least turn out half as good as what you have built with you and your friend's truck.
 

wsucougarx

Well-known member
6,951
65
48
Location
Washington State
Tonight I was able to finish up the tow bar bracket and tow safety chain storage box. I requisitioned myself a set of "L" brackets from a 900 series battery relocation kit. I bolted them to the chassis cross-member using grade 8 bolts. The storage box for the tow safety chain is off a 3/4 ton generator trailer. It went together quite nicely. I do have a couple concerns. Not sure if that's too much weight for those brackets but looking at the fuel tank bracket I think I'm OK. Considering the fuel tank brackets are smaller and have to hold 450 lbs. I estimated the towbar is around 170 lbs, chain is probably 70 lbs, box is 10 lbs, tow bar brackets are about 20 lbs. I should be OK with 270 lbs. I do plan on adding a brace for those extra bumpy roads. Also, the decrease angle of clearance for off-roading came up as well. If anything, I can put a heavy duty hinge on the "L" to articulate up if needed. So for now, I'll keep it this way. I did comtemplate mounting the tow bar to the front bumper, but figured the extra weight probably wouldn't be a good idea. Plus the tow bar is completely out of the way mounted in the rear. Unfortunately, it doesn't stick out far enough to use as a step for van entry.
I sealed the towbar openings with grease to keep water out as much as I could. It is a pretty tight squeeze to get the chain out. I don't ever plan on using the safety tow chain (LORD helping). But it's there in case I do for some reason.
This project didn't cost too much:
NOS Safety Tow chain....$20
Tow bar w/adapters.......$200
Tool box..........................$5
L-shaped brackets..........$10/pr
Towbar brackets.............$20/pr
Grade 8 bolts/nuts..........Free, scavenged them off the ground:)
 

Attachments

Last edited:

LowTech

Member
Steel Soldiers Supporter
886
12
18
Location
Arizona
Dang . . . you guys that have access to all these MV parts and pieces are sure lucky.:jumpin: Out here I have to make due w/ bits of old wood and rusty metal. Being that I don't have any metal fabbing tools sure doesn't help either.

Your rig is looking sweeter every day [thumbzup]
 

wsucougarx

Well-known member
6,951
65
48
Location
Washington State
Hey LowTech, we are lucky to have a local scrap metal dealer who's primary client was DoD. He lost his contract with DoD and now his parts are dwindling down to almost nothing. Luckily I've had the ability to run out there and fill my pickup up several times. I've got more jerry can holders than I know what to do with.
Thanks for the compliment. I post these pics to help someone else along with ideas for their trucks:)
 
Top
AdBlock Detected

We get it, advertisements are annoying!

Sure, ad-blocking software does a great job at blocking ads, but it also blocks useful features of our website like our supporting vendors. Their ads help keep Steel Soldiers going. Please consider disabling your ad blockers for the site. Thanks!

I've Disabled AdBlock
No Thanks