• Steel Soldiers now has a few new forums, read more about it at: New Munitions Forums!

  • Microsoft MSN, Live, Hotmail, Outlook email users may not be receiving emails. We are working to resolve this issue. Please add support@steelsoldiers.com to your trusted contacts.


All the stuff I did to my deuce, right here

sewerzuk

Member
524
9
18
Location
Seaside, OR
I’ve been working on my deuce on and off now for several months. I thought it was time I posted some details and pics of my build. Rather than have a dozen different posts for each project on my deuce, I thought I would consolidate it all into this one build thread.

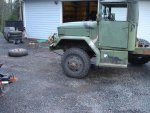
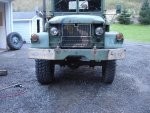
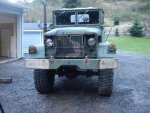
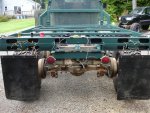
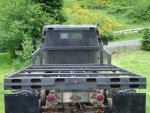
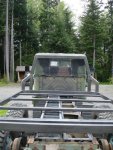
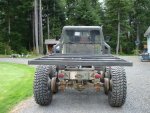
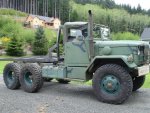
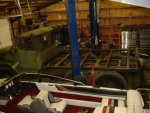
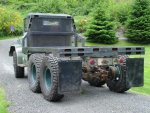
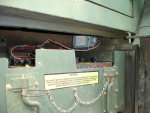
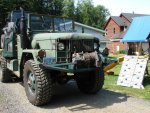
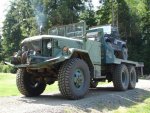
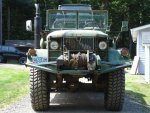
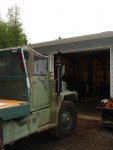
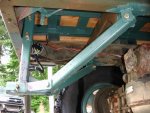
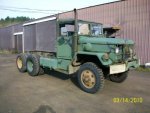
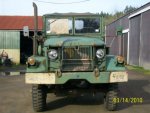
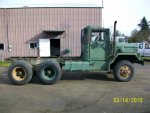
I picked up this 1971 A2 from a seller on craigslist; he had removed the bed intending to put a wrecker body on it, but ran out of time, money, or maybe both...
The bed was full of firewood and a little bit beat up, and he wanted an extra $500 for it so I decided to let him keep it.
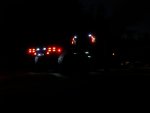
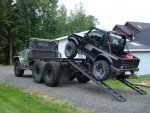
I talked him down to $1700; he helped me out a bit by supplying some plywood for covering the rear axles and some floormats (redneck mudflaps). I wired in the factory lights (the factory wiring harness was cut), and drove it a couple of hours back home.
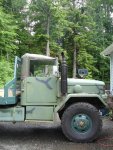
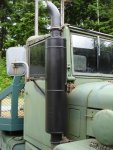
The truck ran and drove perfect, but even with hearing protection, the truck was deafening at 55.
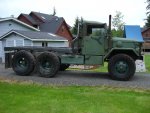
Now that it is here, I have a loosely laid plan for a resto-mod.
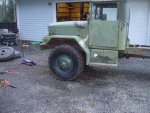
First I needed to obtain title and registration; I was a little concerned because the previous owner only had the SF97 and transfer forms from GL. He wrote me a bill of sale, so I had paperwork showing the "ownership trail." I insured the truck through Progressive for $16/month, then I took all of the paperwork into the DMV office. There was no problem with obtaining plates and a title...the person behind the counter was familiar with the SF97 and the only delay was in finding the manufacturer code for AM General.
 

Attachments

sewerzuk

Member
524
9
18
Location
Seaside, OR
I planned on building a flatbed, but before I got started on that I wanted to put a set of 395's on the truck and then measure for clearance (so the tires don't hit the bed on full bump). So, I did a little research, made some calls, and ended up buying a set of goodyear MVT's from 100dollarman. I went back and forth quite a bit between the MVT's and XML's, but finally ended up with the MVT's because of less road noise, better rubber compound, longer tread life, and smoother ride.
I ordered a set of 1100-20 tubes (also from 100dollarman) and a set of lug nuts from Erik's military surplus (re-using the rear budd-style studs was an option, but they are difficult to remove/install and it looked kind of half-assed to leave them on there).
I dismounted 7 tires from the factory split rims; 2 of them almost fell off once they were deflated, but the other 7 were a real pain. I ended up using the pallet forks on my kubota tractor to break the beads on each tire; some went as fast as 5 minutes, one of them took me over an hour. I cleaned up the wheels, and paid particular attention to the lock ring and seating surface. I shot on a coat of OD green in a satin sheen (satin in MUCH easier to clean up than flat, but still prevents the shiny look), and started mounting the MVT's. The mounting process was actually pretty easy; I added a liberal amount of baby powder to the tubes and flaps, and they went right in. I used the kubota again to press the tires on the rims, and simply stomped on the lock ring until it popped into place. Then I took the wheel out of my shop, passed a big chain through a few of the holes in the wheel to hold the lock ring in place in case of a blowout, locked the air chuck into place, set my air regulator at 50 psi, and then turned on the air. All 7 tires aired up with no problems.
 

Attachments

sewerzuk

Member
524
9
18
Location
Seaside, OR
I put my flatbed together; it is designed for hauling my wheeling rigs. It has integrated ramps for loading my rigs and multiple tie down rings. The ramps are about 10ft long and make it easy to load up a short wheelbase jeep or other off road rig. I won’t be getting any cars up there though because of the breakover angle. I used LED lighting for the stop/turn/tail lights. They are all 12v lights, but I wired the ones on the headache rack in series, and added the appropriate size resistors for the lights in the deck. I also added rock lights to the underside of the bed for those night wheeling trips, and LED clearance lights (also wired in series to work with the stock 24V system).
 

Attachments

sewerzuk

Member
524
9
18
Location
Seaside, OR
Electrical system...this seems to be a common issue with most deuce owners. I spent a few hours thinking about my options. Here is what I came up with:

1. Convert the entire deuce to 12v. This wasn't practical due to expense and difficulty. I would have had to change all of the electrical gauges, lights, starter, alternator, etc. And, in my opinion, a 24v electrical system is superior to a 12v system in many ways...I didn't want to give it up. I have actually built a 24v auxiliary system into my wheeling rigs in the past to be able to run my ready welder, so it didn’t make sense to get rid of this with the deuce.

2. Add a stand-alone separate 12v electrical system (alternator and battery). I seriously considered this option and, while I'm all for redundancy and fail-safes, adding another alternator and battery system seems like too much work and expense for little or no benefit over options 4 and 5.

3. Add a 12v converter. This is a good option, but if you want to run anything big (like a winch or other heavy 12v load) you need a HUGE converter. The expense of a large converter eliminated this option.

4. Add a small 24v-12v converter, and use it to charge a separate 12v battery. This seems like one of the best options to me; a 20 amp converter can be purchased relatively cheap from ebay, and the total cost of adding another 12v battery (battery, cables, box, etc.) probably doesn't amount to more than $200.

5. Tap 12v off of one of the deuce's factory batteries. I see lots of people doing this...for every person who says that it killed their batteries, there's another person who says it works just fine for them.
The problem with this method is that the alternator passes the same amount of current through both batteries. When you pull current from one battery and not the other, the alternator effectively recharges the batteries unequally (the battery you are pulling your 12v from requires more current to recharge than the other battery does, but the alternator isn't capable of determining that so it charges both batteries at the same rate causing the upstream battery to overcharge and the downstream battery to undercharge). This damages BOTH batteries. The bottom line is, whether or not it works for 6 months or 4 years, you are shortening the life of the deuce's batteries, and possibly supplying low voltage to your 12v accessories.
There is a solution for this; it is a product called a battery equalizer. The one I purchased is the EQ 12/24-20.
75 DC to DC Voltage Converters & Dimmers by Solar Converters
http://www.solarconverters.com/product_frame.html
This device senses an imbalance in the battery bank and directs more current to the battery with the lower charge. This means that you can tap off of one of the batteries without damaging anything. And, you can pull large transient loads from the battery (such as a winch or other large motor). The equalizer will supply "balance" current at up to 20 amps. This means that the battery recharges at the charging rate that the alternator is providing, and an additional 20 amps is being redirected from the upstream battery. This will make the batteries last longer than they would even in a completely stock system, allows me to use large 12v loads, and doesn't require any large, bulky, or heavy equipment to be added. I’ve been running this setup now for several months and the batteries stay perfectly balanced, within .05v
I installed a fuse block for my 12v accessories. From that block I supplied power to a 12v power socket, and switches for my rock lights, backup lights, and driving lights. And it leaves me room for adding a few more circuits in the future.
 

Attachments

sewerzuk

Member
524
9
18
Location
Seaside, OR
My deuce came without a winch, so I made another call to 100Dollarman and had him send a complete winch setup my way; the winch bolted right up without any fitment issue, but I discovered that the final position of the bumper was just absurd. It was nearly a foot farther forward than it needed to be, drastically reducing approach angles and reducing the clearance on the front corners of the truck. So, I tossed it in the scrap pile and broke out the plasma cutter. I cut about 6” off of the factory frame rails, welded plates on the end of them for a clean finished look, and then made up a brush guard that bolts onto the factory frame. I usually make my brush guards out of round tubing, but in this case I decided that rectangle tube did a better job of following the truck’s styling. Overall the guard turned out awesome; it sits more than a foot further back than the factory bumper, does a better job of protecting the sheet metal, and looks better too. And, it is easily removable with just 8 bolts.
 

Attachments

sewerzuk

Member
524
9
18
Location
Seaside, OR
The noise…I’m sure that all of you who own a deuce understand this. The whole truck is noisy…EVERYTHING makes noise on this truck. But the biggest annoyance to me was the exhaust noise at highway speeds. After a little searching here on SS, I ordered a Walker Dynomax muffler from Amazon, part number 21470 (thanks to the people who figured this out before me). The muffler is a good fit; I simply cut the old pipe off just above the fender, clamped the muffler into place, and then welded the factory exhaust pipe joint onto the top of the muffler (assuming I’ll be hitting a tree at some point and bending the factory pipe). I shortened the factory pipe by the length of the muffler and bolted it on, and then I welded a support tab onto the side of the muffler that bolts onto the factory bracket. The difference in sound is AMAZING! The turbo whistle seems to be almost exactly the same, but the exhaust noise is reduced to probably 50% of its original level. The exhaust note is very deep and throaty now; still sounds mean, but without all of the annoying midrange sounds. The difference at highway speeds is VERY noticeable. I would recommend this mod to anybody.
 

Attachments

sewerzuk

Member
524
9
18
Location
Seaside, OR
I decided that I should add a 2” receiver hitch to this rig as well; this way I can pull my dump trailers up in the woods for firewood without worrying about getting stuck (A common occurrence with my pickup truck). I wanted it at a height that didn’t require some stupid 24” drop hitch, so I put it at about 20” off of the ground. I didn’t want this to get hung up off road, so I made it completely removable. 6 bolts, and the hitch breaks down into 3 small pieces that stow away easily. I tested its stoutness by chaining it to a tree, putting the deuce in 6 wheel drive in low range, and pouring on the coal. I dug 6 good sized holes in my driveway and got the top of a 100ft high spruce tree to swing like crazy, but the hitch didn’t move at all. I guess that’s stout enough for me :)
 

Attachments

Last edited:

runk

Active member
542
65
28
Location
Houston, TX
Very nice set of mods. Its neat to see a real plan to meet a specific application.
If you did any fab sketches of the receiver hitch, more details would be great.
 

sewerzuk

Member
524
9
18
Location
Seaside, OR
You made a good choice on the tires. Job well done on the whole project.
runk said:
If you did any fab sketches of the receiver hitch, more details would be great.
Thanks :)

The updates that I just posted bring the project to its current state...I have more planned over the winter months, so I'll post more pics as the projects progresses.

I didn't do any drawings for any of the projects on this rig...Since this is a cheap, just-for-fun project I'm building stuff as I go. I'll pull the hitch off and take some detailed pics when I get a chance. It's a pretty simple design, and it's pretty stout.
If you're REALLY interested, I might be able to find some time to sketch it up in autocad...
 

srodocker

Well-known member
6,549
68
48
Location
Lacey, Washington
thats sweet! you should come up for our winter run this winter!!!

how much you pay for the mvts? and how much for the 11x00 tubes? i also need to get some
 

rwoods

Member
258
4
18
Location
Greeneville/TN
Looks great and very clever. I wish I had your fabrication skills. If you haven't, give a little thought to adding a little protection to your aluminum winch as you may want to push something sometime -or if you drive like me, you might need it for those pesty trees that jump out in front of you. I'm sure you will get a lot of use and fun out of your truck. Thanks for sharing it. Ron :)
 

asgtoolman

New member
289
3
0
Location
Florence SC
Thank you for the solarconverters link; can't say that I understand how it works, but sure intend to do some more research and will probably try out a system like this to get some 12v power.
 

dc3coyote

New member
1,393
19
0
Location
Chattanooga TN
Very nice work, I am not sure about the bumper, but i think it would grow on me. I like your bed, how did you mount it? The normal beds are mounted with springs to allow the frame to flex.
 

frodobaggins

Active member
2,861
16
38
Location
Ruston, La
Thanks :)

The updates that I just posted bring the project to its current state...I have more planned over the winter months, so I'll post more pics as the projects progresses.

I didn't do any drawings for any of the projects on this rig...Since this is a cheap, just-for-fun project I'm building stuff as I go. I'll pull the hitch off and take some detailed pics when I get a chance. It's a pretty simple design, and it's pretty stout.
If you're REALLY interested, I might be able to find some time to sketch it up in autocad...

How about just some more pics of all the mounting points. :smile:
 
Top
AdBlock Detected

We get it, advertisements are annoying!

Sure, ad-blocking software does a great job at blocking ads, but it also blocks useful features of our website like our supporting vendors. Their ads help keep Steel Soldiers going. Please consider disabling your ad blockers for the site. Thanks!

I've Disabled AdBlock
No Thanks