• Steel Soldiers now has a few new forums, read more about it at: New Munitions Forums!

  • Microsoft MSN, Live, Hotmail, Outlook email users may not be receiving emails. We are working to resolve this issue. Please add support@steelsoldiers.com to your trusted contacts.


No help needed with M109 Restore..

goldneagle

Well-known member
4,425
853
113
Location
Slidell, LA
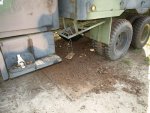
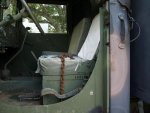
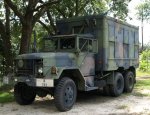
I picked up my M109A2 from Camp Shelby in early September. She had a bad case of SITTINGS disease. Horn didn't work, parking brake cable was frozen, kill switch was unusable, broken driver's side mirror, frozen hinges on cab doors as well as the box. Driver's seat was worn to the springs and no back pad! The usual dead batteries!

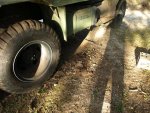
We checked all the fluids and they were clean and full. She started up with no issue after a jump from the GL driver. We aired up the tires and checked the brakes. All else were fine. Drove the 1-1/2 hour trip home with no problems.

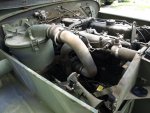
Best news is she has a BRAND new engine with only 88 hours on it!

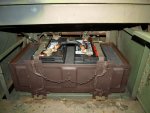
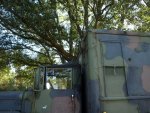
Since bringing it home I managed to replace the broken Kill Lever assembly, repair the horn wire ( was ripped at bottom of column), replaced both mirrors, new batteries and custom battery box, freed up the parking brake cable, lubricated all hinges, installed door locks, re-padded the drivers seat and recovers the bottom cushion using canvas from a half shelter. Now the truck is at least more drivable!

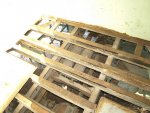
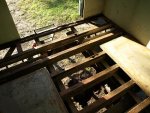
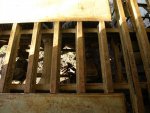
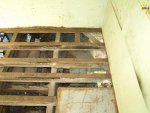
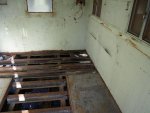
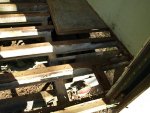
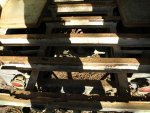
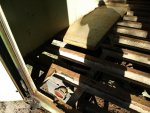
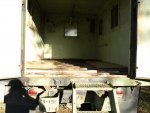
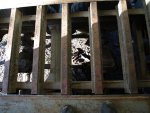
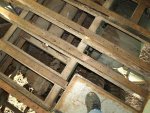
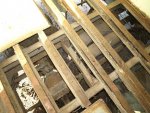
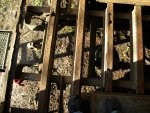
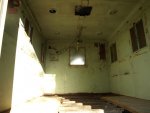
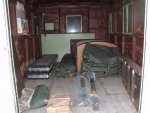
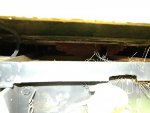
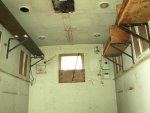
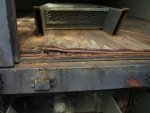
I removed all the shelving and junk from the shelter area. The floor is warped and rotting. Ripped out all the floor boards exposing a rusted mess underneath! Yesterday i started to remove the rust from the frame and was disappointed to find that there is some rust through in spots on top of the floor frame members. They will need to be repaired.

I was hoping I can get someone near me to help me repair the shelter floor. Mostly i can use a bit of help tearing out the remainder of the rust from the floor and repair the framing. I can do the rest once the framing is repaired.

I have read many threads on here where members have volunteered to help fellow members repair their MV's. I am hoping someone can step up and help here. I can provide food and plenty of refreshment. Thank you in advance!
 

Attachments

Last edited by a moderator:

Chevytruck

Active member
1,579
2
38
Location
Western Maine
I wish I could help GE, I could use the experience... But too far away (from pretty much everything lol) aua


So all I can offer is moral support :)
 

SCSG-G4

PSVB 3003
Steel Soldiers Supporter
5,307
3,190
113
Location
Lexington, South Carolina
First thing to do is go up top and seal all the joints with the aluminum roofing compound (assuming there are no holes up there) - in fact, do the whole top and down the sides wherever any joints are not solid. That will stop the rain from getting in on the top side. Then take out the wall and ceiling panels and remove the old fiberglass insulation. It was/is holding in the moisture that rotted the floor out. If you just replace the floor you will have the same problem again soon! Check the M109 conversion threads by m109guy, zout, mdmorgan and others to see what you are in for!
 

6x6guy

Member
476
20
18
Location
McHenry, Il.
Thats what you get when you buy a 40+ year old truck, most of not all civilian trucks have been junked over 20 years ago. It's a project you do it because you want to, not because you have to LOL. :roll:
 

goldneagle

Well-known member
4,425
853
113
Location
Slidell, LA
After waiting a week or two for volunteers that never surfaced I started to tear out the rusted metal sheeting from the bottom of the box. A lot of it just fell below the truck. Other spots required some elbow grease to remove using a hammer and chisel. There were some rusted stove bolts that I had to break in order to remove. Pounding the top of the support members with the hammer helped loosen up the rust pieces and clean off the metal.

The angles against the side walls was mostly rusted. I used the angle grinder with cut off wheels to remove the remainder of the angles. I had to use an air chisel to remove the sheet metal that was tac welded to the wheel wells. I have 2 rust through spots to repair on the wheel wells.

The threshold for the back doors has some rust damage. i cut the loose metal out and plan to overlay it with heavy gauge sheet metal. It will need some creative metal fabrication to restore the strength and weather resistance of the original design.

Tomorrow I plan to clean off the angle on the front wall from some bolts that are still hanging on by rust and undercoating. I will shop for the sheet metal and supplies for restoring the floor support members. I am buying some Chassis Paint. It is supposed to neutralize the rust and protect the metal. it is paint and neutralizer in one. Last time I bought some it was $18 per 1/2 pint. it is really good stuff!

I also picked up one of those vibrating multi-tools with some chisels for scraping some of the undercoating from the sides of the floor support members. I plan to bend some 16 gauge metal into a U shape to go over the rusted areas of the support members. I need to remove the undercoating so it will make a snug fit.

I will use 1/4" monobolts to secure the sheet metal repair pieces to the support members. (This will be done after the members are already coated with 2 coats of Chassis paint. Once I secure the patches into place they will also be painted with the chassis paint to protect them.

On top of all the support metal I plan to install some self sticking weatherstripping tape like they use around windows before installing the siding. I am using this tape to protect the metal surfaces from the chemicals that are in the Pressure Treated plywood I plan on using for the subfloor. I will use 3/4" P.T. plywood first layer and then add a 1/4" sanded exterior plywood on top of that. I will use adhesive between the plywood layers as well as screws. That should make a SOLID floor for the box!

I will add some pictures and more detail once i get some of the supplies on site so I know I can continue as planned.
 

badga the badger

New member
229
1
0
Location
bell county, texas
with most of your problems i cant solve, but if you need batterys, ive got a great batch of about 600 AGM batterys. i use 2 in my m109 and starts up every time with no problems. PM me if you need any.
 

goldneagle

Well-known member
4,425
853
113
Location
Slidell, LA
with most of your problems i cant solve, but if you need batterys, ive got a great batch of about 600 AGM batterys. i use 2 in my m109 and starts up every time with no problems. PM me if you need any.
Thank you for your offer. I already installed new batteries in the truck. There is another thread that shows my conversion of a 81mm ammo box into a battery tray for the Deuce.
 

Attachments

goldneagle

Well-known member
4,425
853
113
Location
Slidell, LA
ok well looks good. im gonna tell you right now and you propably already know this. m109s are alot of work, but its worth it.
I am aware of the work ahead of me. I am not doing a CAMPER mod to it yet. I am just making it solid and road worthy. i will be doing some small mods to it as time goes by. I am woking on a electric wiper motor mod for my Deuce. Details later.


I am looking for a J-pipe exhaust pipe for my truck. Anyone have one in very good shape and a cheap price?
 

goldneagle

Well-known member
4,425
853
113
Location
Slidell, LA
Well I managed to fabricate the metal track that I will use to patch the cross members for the box floor. I also fabricated some replacement trim that will repair the rusted area by the back doors. I hd to do it in1 foot lengths since that was the only way to do it with the brake I had. It would not bend 16 gauge sheets 24" long!

Today I managed to scrape the undercoating from the areas of the cross members where I will install the patches! I also wire brushed all the rusty metal and then blew all the rust debris from the truck frame and components below it.

I feel bad for the trash man. I ended up dumping all the rust from under the truck into 2 trash cans. They are fairly heavy! I was surprised how much rust was under the truck. i had already trashed a lot of the larger pieces!

I am attaching a lot of pictures of the work done to the truck box.
 

Attachments

zout

Well-known member
7,744
154
63
Location
Columbus Georgia
GE - that is a nice job you have going there and very well cleaned up to prepare for the rebuild.

Have you thought about pressure washing the interior while you have the floor out - so the water can disperce easily ??

After speaking with you on the calls we have touched base on with your build - your crossmembers are much cleaner than what I had thrown at me - but I see the couple area's you were speaking of that had rotted through - and you now have the machine to help repair those.

Keep the pics coming - as you continue on.
 

Katahdin

Active member
1,303
23
38
Location
Scarborough, ME
Nice work! I didn't realize there were that many crossmembers....:shock:

I plan on tearing up my floor in the near future too, I wish I had your Louisiana temperatures to work in. Summers done up here, too little done too late!
 

zout

Well-known member
7,744
154
63
Location
Columbus Georgia
Take and tarp up around the exterior of the 109 and have really good hold downs attached so it does not blow loose - place your heater on the bottom side - at least take the chill out while you work. That is if you want to work on it during the cold.
 

goldneagle

Well-known member
4,425
853
113
Location
Slidell, LA
Nice work! I didn't realize there were that many crossmembers....:shock:

I plan on tearing up my floor in the near future too, I wish I had your Louisiana temperatures to work in. Summers done up here, too little done too late!
Be careful what you wish for! Our temperatures and humidity are unbearable for 8 months out of the year. When I lived in NJ we had a lot more comfortable working days in the year than we got in Louisiana!
 

Katahdin

Active member
1,303
23
38
Location
Scarborough, ME
Thanks for the suggestion Zout, yeah I'll get 'er done this winter. Just whining because I can't work outside in 60-70 degree days anymore this year. I must be getting old.

Golden Eagle, an FYI, one thing I found about mine is the metal was only primed on under the box runners thus leading to rust. The runners are heavy duty enough metal not to rust through for awhile, but I did have one small hole and heavy pitting on the sheetmetal under the runners. On mine I clipped all the rivets off the runners from the inside of the walls to remove them and am working on cleaning those up and giving them a proper coat of paint.

Not sure if you Southerners have ever seen the Red-Green show, but here's a quote: "Remember, I'm pulling for you. We're all in this together." :)
 

Attachments

zout

Well-known member
7,744
154
63
Location
Columbus Georgia
K - those runners are a rust haven wating to happen. When I pulled ours I wire brushed them - used rust inhibitor on them - expoxy primered them and shot them. Then I used (Sikaflex - 221) on the lips before riviting them back on which sealed them from water running down the sides and into them - which led to rotting and rusting and running down the lower sides of them with rust trails.

If you use the tarp thing - be sure to keep enough ventilation so you do not wind up laying inside the closed area permenantly. Keep your pics coming.
 

goldneagle

Well-known member
4,425
853
113
Location
Slidell, LA
Thanks for the suggestion Zout, yeah I'll get 'er done this winter. Just whining because I can't work outside in 60-70 degree days anymore this year. I must be getting old.

Golden Eagle, an FYI, one thing I found about mine is the metal was only primed on under the box runners thus leading to rust. The runners are heavy duty enough metal not to rust through for awhile, but I did have one small hole and heavy pitting on the sheetmetal under the runners. On mine I clipped all the rivets off the runners from the inside of the walls to remove them and am working on cleaning those up and giving them a proper coat of paint.

Not sure if you Southerners have ever seen the Red-Green show, but here's a quote: "Remember, I'm pulling for you. We're all in this together." :)
I wasn't planning on doing any other box work at this time. I was just trying to repair the floor so I can use the truck. The camper mod is years away unless I end up with another truck to use for intermittent personal hauling. (Picking up lumber or large items at Home Depot)

Now I have to reconsider removing those runners and restoring them properly. I wonder if I can do it from the outside without removing the inside panels. I can always drill 1/4" holes through the inside sheet metal and use a long phillips screwdriver to hold the outside skin tight against the runners when I reinstall them.

Please let me know if that will work. If I do the camper conversion later all the interior wall will be covered over -so the small holes will be covered over anyway. I just hate taking out all those slotted screws by hand! If they were phillips I would be more likely to just remove the inside sheet metal.

Maybe the newer boxes already have phillips screws holding the sheet metal panels in place.
 

phil2968

Active member
2,591
17
38
Location
Lakeland, Florida
I just hate taking out all those slotted screws by hand! If they were phillips I would be more likely to just remove the inside sheet metal.
Its is real easy to remove the screws with a cordless drill and a straight bit. There is fiberglass insulation walls if you decide to drill holes.
This is mine without it's inside walls. It was loaded with stuff for the ga rally at the time. I will not be reinstalling the panels. Going to use wood.
 

Attachments

goldneagle

Well-known member
4,425
853
113
Location
Slidell, LA
Its is real easy to remove the screws with a cordless drill and a straight bit. There is fiberglass insulation walls if you decide to drill holes.
This is mine without it's inside walls. It was loaded with stuff for the ga rally at the time. I will not be reinstalling the panels. Going to use wood.
Thank you for the picture. It will help if I need to know what is inside the walls without opening them.

ZOUT and I figured out a way to reattach the outside rails without drilling the holes in the interior walls. I am gonna get a dental tool that has a 90 degree hook on the end and use it to pull the sheet metal tight against the rails and rivet the track on both sides of that hole. Once the two are secure I can rivet the hole between them.

I am going to use 1/4" MONO-BOLTS. They are almost as strong as regular bolts!

I will take pictures when i get to that stage.
 
Top
AdBlock Detected

We get it, advertisements are annoying!

Sure, ad-blocking software does a great job at blocking ads, but it also blocks useful features of our website like our supporting vendors. Their ads help keep Steel Soldiers going. Please consider disabling your ad blockers for the site. Thanks!

I've Disabled AdBlock
No Thanks