• Steel Soldiers now has a few new forums, read more about it at: New Munitions Forums!

  • Microsoft MSN, Live, Hotmail, Outlook email users may not be receiving emails. We are working to resolve this issue. Please add support@steelsoldiers.com to your trusted contacts.


No help needed with M109 Restore..

goldneagle

Well-known member
4,425
852
113
Location
Slidell, LA
Nice job with the patches. It's giving me inspiration to rip up my floor.

Here's the results of my efforts this weekend. The wife assisted me with riveting the runners back on the box, she pushed against the sheet metal from inside the box to get it flush with the runners. (credit to Zout for suggesting that in his M109 thread). She also placed rivet washers where it looked like it needed it.

After the runners got put on, everything got a couple coats of 24087, including the M101A2 and the new Donaldson M070028 muffler. Also sprayed the entire box with a second coat of paint, including the roof. It feels good to be making progress!
Looks really good. I like the paint color. I will probably use the same color for my truck since it is a 1958 model.
 

goldneagle

Well-known member
4,425
852
113
Location
Slidell, LA
Well I took her out for a drive to Home Depot today to pick up the plywood and supplies I needed to finish installing my flooring in the box. Picked up 3 sheets of 3/4" pressure treated plywood, 3 sheets of 1/4" exterior grade plywood some screws and a roll of window tape.

I installed the aluminum angles on the bottoms of the side walls on both sides of the wheel wells. I then measured out and cut 3" wide stripes of the window tape to cover the tops of all the floor support in the box. I am using the tape to protect the metal from the chemicals in the pressure treated plywood. i installed enough tape to cover the cross members that would be covered by the first sheet of plywood.

I had a friend come over and assist me in handling the heavy sheets of plywood. We measured and cut the first sheet to fit. We placed the first sheet down all the way back in the box. (it had started to rain) Once we secured it with a couple of screws so we could measure out for the next sheet. We continued to cover the metal surfaces with the window tape. Got the next sheet cut and installed as well. Once we secured the 2nd sheet we measured and cut the 3rd sheet of plywood to fit. We installed the remainder of the tape and then placed the 3rd sheet of plywood on top. After that we secured all the perimeter of the plywood with self tapping screws.

Because of the rain I did not take any pictures today. I will take pictures tomorrow before and after I cover over the bottom sheets.
 

Katahdin

Active member
1,303
23
38
Location
Scarborough, ME
Looks really good. I like the paint color. I will probably use the same color for my truck since it is a 1958 model.
Thanks, I wasn't sure if I'd like it at first but it matches the interior of the cab and the frame and it's really growing on me now that I see it in person. My wife likes it too which is a bonus.

FYI, the recipe I'm using is:

Rustoleum rusty metal (red) primer. I hear primer colors make a difference with Gillespie 24087. Reduced 2:1 with Mineral Spirits.

Said paint reduced 2:1 with Xylene.

Then mix in the recommended amount of Valspar Tractor/Implement Restoration Hardener (found at Tractor Supply).

I'm spraying it with a Harbor Freight Industrial paint gun at about 35-40 PSI. Still learning how to use the thing, but sofar so good.
 

jasonjc

Well-known member
5,325
283
83
Location
Gravette Ar.
I just found this on Rustoleums web sites FAQ about the rusty metal primer.

:Can I use Rusty Metal Primer on clean metal?
A:No. The fish oil that is in the primer needs to penetrate into rust to seal out air and moisture. If there is no rust, the oil will rise to the surface making adhesion of the finish coat difficult.

It says to use the clean metal primer over paint and light rust.

What do the rest of you think??
 

goldneagle

Well-known member
4,425
852
113
Location
Slidell, LA
I have used it before and with good results. It seems to cover over rust really well because it goes on thick. You should see how much solids it has when you buy it in gallon cans! However it works well for me on all metal surfaces.
 

Katahdin

Active member
1,303
23
38
Location
Scarborough, ME
I've had problems using Duplicolor Autopaint and RRMP from a spray can without letting it thoroughly dry out between priming and topcoating. My understanding is the problem may have more to do with the propellents in the spray can then the primer.

So far my experience reducing it with mineral spirits and shooting from an air gun has all been positve.
 

jasonjc

Well-known member
5,325
283
83
Location
Gravette Ar.
So you are saying that you can use it as a do all primer?? Over the old paint , bare steel and rust both light & heavy?

I just want to paint stuff once and have it LAST. I have toooo many projects to do, to have to do them twice. I do not like rust!! And do not want to see it again, any time soon.
 
Last edited:

goldneagle

Well-known member
4,425
852
113
Location
Slidell, LA
So you are saying that you can use it as a do all primer?? Over the old paint , bare steel and rust both light & heavy?

I just want to paint stuff once and have it LAST. I have toooo many projects to do, to have to do them twice. I do not like rust!! And do not want to see it again, any time soon.
For rust I recommend Chassis Saver paint. It is a rust neutralizer and surface protector. All you do is scrape or brush off the lose rust and paint the Chassis Saver over the rust. This stuff is amazing! It has a tough surface when dry. You can also paint over it! (It is so adherent that when dry will not come off your skin-so wear gloves when painting)

The president of the company said the OD color will be one of the first new colors to come out. Right now it comes in Silver-Aluminum, Satin Black, and Gloss Black. They can be left as the final finish!

This company will also be coming out with a OD colored Truck Bed Liner Paint.
 
Last edited:

Katahdin

Active member
1,303
23
38
Location
Scarborough, ME
My experience is coating rust will only get you so far. Attached are pictures of the rear crossmember to my 93' GMC Yukon. (Picture was taken in the 109 and I did the repair before picking up my M105 so it's slightly MV related.)

The bottom crossmember is original and was coated with POR-15 several years before it crumbled at the touch of my state vehicle inspector. POR-15 is supposed to be one of the best rust coatings out there, superior to any rustoleum product anyway.

The top crossmember came from a parts vehicle and was blasted down to clean metal and coated with rustoleum primers and paint.

Guess which one I'm using now?
 

Attachments

Green_gator

New member
760
1
0
Location
Tampa, Fl
GE, with all of the work that you are doing on the floor it may be worth your while to pull out the interior panels and replace the insulation. When I pulled mine out I also found that the wiring had dry rotted in a number of places and needed replacement. Pulling out and putting in the roof panels is not a fun job. You can do it on your own but if you can grab another person it will help. I put mine back in on my own and do not want to have to do that again. I am glad to offer any advice that I can on the panels and windows but sadly am way to far away to offer any help. I put in a mix of fiberglass insulation along the sides and the silver foil/bubble wrap in the ceiling. You have 25 inches between the ribs except for the front most so a full length and a bit extra down the sides works fine. I found some that was the right width but it was 9 inches thick and you only have abut 2 1/2 inches of depth. Down along the bottom there is plenty of some kind of tar material used for water proofing. If I had it to do over I would pull out the entire metal floor like you instead of repairing the holes.
 

goldneagle

Well-known member
4,425
852
113
Location
Slidell, LA
GE, with all of the work that you are doing on the floor it may be worth your while to pull out the interior panels and replace the insulation. When I pulled mine out I also found that the wiring had dry rotted in a number of places and needed replacement. Pulling out and putting in the roof panels is not a fun job. You can do it on your own but if you can grab another person it will help. I put mine back in on my own and do not want to have to do that again. I am glad to offer any advice that I can on the panels and windows but sadly am way to far away to offer any help. I put in a mix of fiberglass insulation along the sides and the silver foil/bubble wrap in the ceiling. You have 25 inches between the ribs except for the front most so a full length and a bit extra down the sides works fine. I found some that was the right width but it was 9 inches thick and you only have abut 2 1/2 inches of depth. Down along the bottom there is plenty of some kind of tar material used for water proofing. If I had it to do over I would pull out the entire metal floor like you instead of repairing the holes.
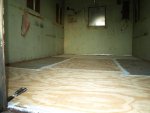
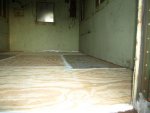
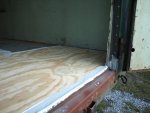
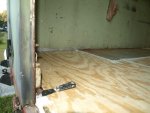
You have a good point if I were making a camper out of her. Since I am not converting it to a camper yet I don't see any reason to reinsulate the box yet. The floor was a necessity so I decided to tackle it ASAP. I decided to repair it the proper way instead of taking short cuts and having to redo it later!

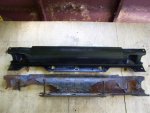
The truck needs other work ($$$) done that is more important for me. i just bought 2 used air ride seats for the cab. I intend to reinstall the outside rails since they are coming off. They already had some screws used to replace the lose rivets. I will remove them, clean them and repaint. They will be installed with MONOBOLTS to make sure they never come off again!

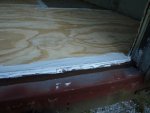
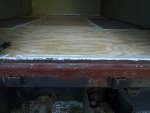
There are also some devices that are mounted on the outside of the box that need to be removed and the walls patched. Since I have plenty of galvanized 24 gauge sheet metal left I will do the patching as soon as I have time after the floor is done.

I am still deciding if I will build a custom hardtop for the truck. I bought some TEREX electric wiper kits from a member. In his ad he stated that they can be easily modified to fit a M35. Based on the parts I received and the size of the hole required through the windshield I could not figure out how to use them! If I build a custom hardtop I can install the wipers through the front of the hardtop.

There are other mods I will be doing as time and money allow.

Thanks guys for all the support!
 

goldneagle

Well-known member
4,425
852
113
Location
Slidell, LA
Well I had a little setback today in finishing the floor in the box. It had been raining on and off all day. There is a bad leak in the patched-over opening in the roof above the center of the box. There must have been a vent there at one time that was removed and covered over with sheet metal. Well whoever installed the patch did not do a very good job. The silicone calk used to seal the patch was too narrow and the screws were spaced too far apart! It leaked badly.

Since it was still wet out there, I had to do a temporary repair. i removed the patch, cleaned off the old caulking from the patch and the roof, and dried off the area with a rag. I used some 3/4" wide closed cell weatherstripping around the perimeter of the patch metal. I screwed the patch back down with 2x as many screws - to make sure the metal stayed as flat as possible. I will reinforce the area later and install a new vent.

I did manage to finish screwing down the 3/4" pressure treated plywood today. Now I will wait a few days for the plywood to dry before installing the top 1/4" plywood layer. I will take pictures of the floor as soon as I move the 1/4" plywood and work horses into the shop temporarily.
 

goldneagle

Well-known member
4,425
852
113
Location
Slidell, LA
Thanks Tim.

Well the weather was windy but dry today so I decided to finish the floor late in the afternoon. I brushed the floor clean. Next I caulked around the entire perimeter of the plywood floor to seal everything up. I installed the window tape along the 2 plywood seams. I used exterior construction adhesive to glue the 1/4" sheets down. I used an air stapler with 1" long narrow crown staples to nail down the plywood in 6" spacing. So the plywood is both chemically and mechanically attached to the first plywood layer.

Tomorrow I will do a final caulking to the newly installed plywood. I also plan to remove the bottom screws from the wall panels and install a 1" aluminum angle along the bottoms of the box walls.


BEFORE anyone asks..it was too dark for pictures when I got done. I will take some tomorrow.
 

goldneagle

Well-known member
4,425
852
113
Location
Slidell, LA
OK I have the pictures! I managed to take the truck out today to the local Stated Police Station to get the VIN # Verified. I took the documents and went to DMV and got the Title and Registration work done. I got the Registration so now I can drive the truck around legal!

I managed to do some caulking on the final layer of plywood just to seal things up more! I will probably paint the entire floor with some Polyurethane Paint. It's flexible! I took pictures of the floor in the box for your entertainment.
 

Attachments

Top
AdBlock Detected

We get it, advertisements are annoying!

Sure, ad-blocking software does a great job at blocking ads, but it also blocks useful features of our website like our supporting vendors. Their ads help keep Steel Soldiers going. Please consider disabling your ad blockers for the site. Thanks!

I've Disabled AdBlock
No Thanks