• Steel Soldiers now has a few new forums, read more about it at: New Munitions Forums!

  • Microsoft MSN, Live, Hotmail, Outlook email users may not be receiving emails. We are working to resolve this issue. Please add support@steelsoldiers.com to your trusted contacts.


Fuel Tank Question - Status Report on my MEP-002A

joesco

Member
442
1
18
Location
Hampstead, NH
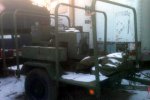
OK folks, after some down time, I started work today again on refurbishing my recently acquired MEP-002A. Today's tasks were to install one of the two Wix Spin-On Fuel Filter units and remove the fuel tank, to clean it.

Took about 15 minutes to install one of the two new Wix Filter units. The second unit hasn't arrived yet. Then I removed the fuel tank and could not believe what I found inside of it. I would swear it was filled a 1/3 of the way with moldy alien urine, but just wasn't able to id exactly.

As suggested by a couple of the experts on this forum (thank you), I emptied the tank found that the entire bottom of the tank had a very thick amount of sludge and possibly mold. I sprayed an entire can of carb cleaner inside of it, added about about a gallon of gas and dropped a length of light chain link in the tank and swished and swished and swished. I emptied it, but it was still a mess. So I put some acetone, along with another gallon of gas, swished and swished and I am now letting it sit overnight. I am not to encourage that I will be able to clean it.

My research on the forum tells me that the Aux pump feeds this tank. I was hoping I could just bypass the main fuel tank, but don't think so????? If I can't get the tank clean, any suggestions on what else I can do to clean it or find a replacement?

Thanks!
 

Attachments

jbk

Member
404
5
16
Location
livingston la.
i preasure wash the inside of all mine, with all the brass removed then hose it out, leaf blower it out then set it out in the sun. the only other thing ive had is some soldering of small holes.
 

glcaines

Well-known member
Steel Soldiers Supporter
3,834
2,393
113
Location
Hiawassee, Georgia
The tank on my MEP-003A was in a similar condition. I also tried MEK, which didn't do anything. I found that very hot soapy water worked the best. After removing all fittings, I reached inside with a brillo pad and tried to clean as much as I could. After 4 or 5 brillo pads, I half filled the tank witj hot soapy water after plugging the holes with plugs. I also poured in about a quart of stainless steel ball bearing grimding media - 3/16 inch diameter. I sloshed the tank around over and over. It was very exhausting. I emptied the tank and refilled it with more hot soapy water. I used Ivory liquid the first time and then Dawn the next 4 times. The tank was spotlessly clean with some minor white colored deposits after I finished. The MEP-003A tank had a divider down the middle and I have no idea how clean the other side of the tank was since I couldn't see inside it. I also have no idea if the MEP-002A tank has a similar divider, but it probably does.

After the washing, I took my wife's hair dryer and placed the spout down the fill hole and turned it on high. I left it running like that for about an hour with the tank in the sun. It appeared to be completely dry. I then rinsed it out with gasoline. I have not had any problems since.

I should also say that I removed all fuel lines and filters and cleaned them, replacing the filters with new FRAM fuel filters. I didn't replace the fuel filters on the pumps due to the high cost, but I thoroughly cleaned them. Carb cleaner was used to clean the fuel lines and pump filters.
 

PeterD

New member
622
6
0
Location
Jaffrey, NH
One thought, there is a guy in Raymond who does a lot of these units (he had four or five when I was at his place last year). He might have pointers, and perhaps some spare parts. PM me and I'll give you contact info--I think he's on here, if so perhaps he'll jump in? :jumpin:
 

joesco

Member
442
1
18
Location
Hampstead, NH
Yes, I was over to see Scott (Battle Grade Electric) in Raymond last year, nice guy and he has some real nice gensets. But we just could not come to terms on price. Thanks, I might touch base with him anyway. Appreciate the suggestion!
 

LuckyDog

Member
393
10
18
Location
Freedom, NH
What I just did recently.

I mostly followed RickF's advise here: http://www.steelsoldiers.com/trailers/61157-m101a1-mep002a-recovery-nj-pa.html

If your stuff looks like my stuff, here is what I did. I used mineral spirits to start. Put a gallon in and shake, shake, shake. Drained it out into a one gallon clear glass jar. Let it sit over night. In the morning, drain off the clear stuff from the top and do it again.

Repeated as necessary. Sometimes I would reach in with a parts cleaning brush and rub some stubborn spots.

Read that PD-680 is no longer available in the military. They recomend using mineral spirits. I can't remember which type though. I or II?

I then put a quart of xylene in the tank. (I would have used more but that was what I had on hand) MAN! did that bring out more stuff. Again, I would swish and drain, let drainings sit overnight and then repeat.

I ended up with about 1.5 inches of "stuff" at the bottom of the glass jar. The xylene really works well.

I didn't get it perfectly clean. but I am comfortable to run it now with the clean pump screens and new fuel filters. (Bought extra fuel filters)

OH, and there is no baffle (divider) inside the tank.
 

PeterD

New member
622
6
0
Location
Jaffrey, NH
One has to wonder just what they (the military) was/is putting in the fuel tanks to do this, or whether this 'gunk' is the result of normal breakdown/evaporation of diesel fuel? I have an old day tank from a 60's vintage generator set, and the black stuff in it was incredible--hardened to almost paint like consistency. I never bothered to clean that tank as I never needed it, but I can imagine a fuel tank would be a major undertaking. :roll:
 

glcaines

Well-known member
Steel Soldiers Supporter
3,834
2,393
113
Location
Hiawassee, Georgia
OH, and there is no baffle (divider) inside the tank.
Not having a baffle inside the tank would make cleaning the tank much easier! Mine had the baffle and it was a bear. Good idea using the xylene. I'll remember that for next time, although I hope there isn't a next time.
 

joesco

Member
442
1
18
Location
Hampstead, NH
Just finished the tank clean out. Thanks to all for your suggestions. I had baffles in my tank. A combination of a long length of chain, several rinses and shakes, $3.05 per gallon gas, a pint of acetone, two large lobster pots of boiling water with dish washing soap. Then blew the tank out with air and then applied the heat gun to the inside for about half hour. Looks like new! Reinstalled and will test the GP's tomorrow and then will try start him tomorrow. Thanks again for all the help!
PS not looking forward to replacing the left GP!!!
 

Keith_J

Well-known member
3,657
1,313
113
Location
Schertz TX
Mine was possibly the worst. Evidence of leaks upon delivery. 1" of crud in the bottom. Heavy rust on the bottom and up to the seam on the back.

I first pressure washed, then boiled with TSP and then removed the filler strainer support bracket, desoldering and drilling out the six copper rivets. By doing so, I was able to scrub the inside and soak in phosphoric acid until rust bubbles were removed. Then I stripped the outside and spotted a dozen or so leaks. These I fixed with careful TIG welding, burning through a few cubic feet of argon to purge the tank of oxygen. By doing so, quality of welds is assured. I drilled out the rust holes to sound metal so i wouldn't be chasing rust bubbles, using a mix of ER70-S2 and S6 filler wire.

After replacing fittings with rivets and soft soldering, I pressure tested with air and soap on the outside, then sealed the inside of the tank with POR tank sealer. I sealed the pipe thread fittings with hot melt glue, pouring the sealant through the filler without strainer, coating the strainer support bracket as much as possible.

I could have replaced the bottom and back up to the seam weld but that would have required a lot of tedious grinding of the seam welds plus two delicate butt welds. At my snail's pace fitting rate, that is easily two weeks of work.

The problem with these tanks is two-fold. First, they were stored with nearly empty tanks. And because the bottom of the tank is dead flat, there is often a bit of water that cannot be drained.

Annual PM of removing the tank and complete draining, cleaning and inspection will save a lot of grief. Keep them filled to 1" from the top and keep the vent valve closed unless running.
 

Buttweet

Member
Steel Soldiers Supporter
78
1
8
Location
Fort Valley Ga
Have 3 MEP003a gensets. Tanks were bad rusty. All 3 have baffles. Used a 5 inch dia hole cutter to gain top access on the opposite end of tank from filler hole. Also drilled out rivets to remove filler flange but found out the filler flange is also soft soldered to the tank making it difficult to remove. After cleaning, covered access hole with a SS cover with gasket. Doesn`t look half bad. Thanks, Buttweet
 
Top
AdBlock Detected

We get it, advertisements are annoying!

Sure, ad-blocking software does a great job at blocking ads, but it also blocks useful features of our website like our supporting vendors. Their ads help keep Steel Soldiers going. Please consider disabling your ad blockers for the site. Thanks!

I've Disabled AdBlock
No Thanks