Bought 1/4" diamond plate (new) from a local metal recycler (call around, prices can vary widely even in the same town). They sheared the 2 pieces to my exact size (24" x 25") for an extra charge (~$150 for metal and cuts). At the same yard I found a rusting piece of channel iron which I got for about $10. Cleaned the rust off by soaking in vinegar (recipes can be found on youtube/google).
I made a cardboard template of the space where I wanted to put the platform. Traced the outline of the template on the pieces of diamond plate and made the cuts with a oxy/propane torch. I also cut up the channel iron into the brackets I would use for supports. You can see the cut is a little rough, but what the ****. Borrowed use of a torch.
Braced the diamond plate using a bottle jack and piece of wood, lined up the brackets on the truck to where I approximately wanted them to go, used a sharpie to mark the location. Drilled holes (3/8") in the brackets using a vise and cordless drill (drill press would've been better, but didn't have one). Lined up the brackets to the diamond plate, using the predrilled bracket holes, and drilled holes in the plate. Painted everything with a primer+paint rattle can - I'll repaint it later, just wanted to cover all the exposed metal with something to protect it.
On the truck below the turn signal is a piece of channel iron whose sole goal as far as I can tell is to protect the wire that goes to the turn signal. This is what I put the biggest bracket against. I clamped the bracket to this piece on the truck and using the predrilled holes, drilled 4 into the channel iron, going through both sides. I bought 3.5" bolts to go through this channel and used plastic tubes cut to size for the bolts so they wouldn't rub against the wire that runs in the channel. I bolted everything using washers and nyloks (I've read studies that conclude lock washers actually contribute to loosen nuts in a vibration setting). For the diamond plate side I used nylon washers covered with steel washers. All the rest of the nuts I used were 1".
Once I had the biggest bracket and plate secured (on the right in pic), I propped the plate up using a bottle jack and piece of wood. If I leveled the diamond plate it wouldn't match the bumper because the bumper isn't level so I just kinda found a point I liked. Placed one of the other brackets against the bumper and using the predrilled holes drilled through the bumper. Once I got one hole done I put a bolt/nut on and that held it tight enough to do the other hole (it was getting crowded under the truck with the jack holding the plate up).
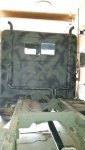
As for the ladder, it's a boat ladder that swivels and slides in it's own channel to stow. Found it on Amazon.
View attachment 731241
It's got 2 steps and covers about 2/3 of the distance to the ground. Before I installed the diamond plate I lined the disassembled the ladder bracket and lined it up on the plate, marked and drilled the holes (another great place for a drill press I don't have). I later counter sunk the holes on the diamond side as the screws would never sit right with the ridges.
Spent about $250 in materials. Haven't done the passenger side yet, will get to that later this summer (the diamond plate and brackets for that side are included in the material costs). I've done a dry fit on the passenger side already, I just have to drill all the holes and assemble. Spent a lot of time running around. A pro's job would've looked much better but also would've cost lots more.


 but i had to bend new transmission lines on a friends Mustang... 5/16" tube. And the problem even with a bender are kinks.

")