nudewheeler
New member
- 41
- 1
- 0
- Location
- Tucson, AZ
Howdy Folks -
Condensed story: Radiator had a small leak from previous owner, leak got worse, took radiator into radiator shop to evaluate it's condition. Report was most tubes where soldered to the header plate were leaking, both header plates required a rebuild, re-soldering most passages. Service was ~ $200, a new vista-pro copper/brass radiator $320. I chose the new radiator.
Picked up the special order murray 432098 radiator (which from my understanding is a re-badged vista-pro 432098) from Checker today, replaced all other components of cooling system, and fixing to place radiator in. Haha, this was obviously a 'returned' radiator. Most fins were smashed or bend, and filler neck was smashed unusable. Luckily caught another radiator shop before they closed and picked up a never been opened 'new' radiator and continued procedure.
Radiator shop sold me a 'ready-rad' 432098 radiator, that indeed had a vista-pro sticker on the box. This radiator was identical to the murray radiator from checker, less the damage. Anyways, radiator instructions indicated there was a 'hardware adapter kit' to help fit the radiator. The second radiator included a 4 part kit.
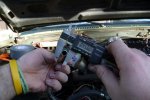
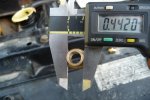
Anyways, put the radiator in, fastening everything up, and the last lines to connect were the engine oil cooler lines. Bonk, cooler lines don't fit inside of radiator. The just don't fit, the orifice in the radiator for the lines is too small. Took some measurements, here's what I found:
Engine oil cooler lines OD: .4580
new radiator cooler line orifice ID: .4510
original radiator cooler line orifice ID: ~.46
This is the recommended replacement radiator for blazers, suburbans, and the pickups with the 6.2. I am hoping to get some advice from other folks on the forum who may have encountered this same problem. Anyone successfully replaced original radiator with the 432098 copper/brass radiator? Any clever solutions to solve the cooler line problem?
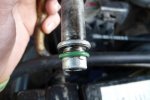
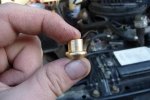
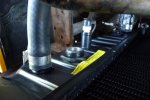
The 'hardware kit' contained 2 brass mushroom shaped adapters, and 2 o-rings.
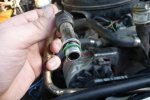
I'll toss some pictures up of the components. Yes, the o-ring is not seated for the purpose of photographing. No, this displaced o-ring is not the culprit preventing engine oil cooler line from fitting. Brass mushroom was part of 'adapter kit'.
Called the auto parts stores and found some oil cooler line adapters, but they don't seem to fit the bill. Oriley part number 251550 and 251660
Solutions:
Has anyone solved this predicament?
Thanks in advance,
Steve
Condensed story: Radiator had a small leak from previous owner, leak got worse, took radiator into radiator shop to evaluate it's condition. Report was most tubes where soldered to the header plate were leaking, both header plates required a rebuild, re-soldering most passages. Service was ~ $200, a new vista-pro copper/brass radiator $320. I chose the new radiator.
Picked up the special order murray 432098 radiator (which from my understanding is a re-badged vista-pro 432098) from Checker today, replaced all other components of cooling system, and fixing to place radiator in. Haha, this was obviously a 'returned' radiator. Most fins were smashed or bend, and filler neck was smashed unusable. Luckily caught another radiator shop before they closed and picked up a never been opened 'new' radiator and continued procedure.
Radiator shop sold me a 'ready-rad' 432098 radiator, that indeed had a vista-pro sticker on the box. This radiator was identical to the murray radiator from checker, less the damage. Anyways, radiator instructions indicated there was a 'hardware adapter kit' to help fit the radiator. The second radiator included a 4 part kit.
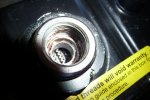
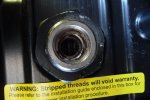
Anyways, put the radiator in, fastening everything up, and the last lines to connect were the engine oil cooler lines. Bonk, cooler lines don't fit inside of radiator. The just don't fit, the orifice in the radiator for the lines is too small. Took some measurements, here's what I found:
Engine oil cooler lines OD: .4580
new radiator cooler line orifice ID: .4510
original radiator cooler line orifice ID: ~.46
This is the recommended replacement radiator for blazers, suburbans, and the pickups with the 6.2. I am hoping to get some advice from other folks on the forum who may have encountered this same problem. Anyone successfully replaced original radiator with the 432098 copper/brass radiator? Any clever solutions to solve the cooler line problem?
The 'hardware kit' contained 2 brass mushroom shaped adapters, and 2 o-rings.
I'll toss some pictures up of the components. Yes, the o-ring is not seated for the purpose of photographing. No, this displaced o-ring is not the culprit preventing engine oil cooler line from fitting. Brass mushroom was part of 'adapter kit'.
Called the auto parts stores and found some oil cooler line adapters, but they don't seem to fit the bill. Oriley part number 251550 and 251660
Solutions:
- One solution would be rebuild old radiator, but I'd really like to use the new radiator.
- I'll have to call the radiator shop on monday, but possibly they could take the oil cooler fittings from original radiator or that entire heat exchanger and put that in new radiator.
- Or, (preferred solution) some sort of cooler line adapter for the radiator or new cooler lines to properly fit into new radiator. Planning to contact vista-pro to inquire if included 'adapter kit' was complete
Has anyone solved this predicament?
Thanks in advance,
Steve
Attachments
-
 48.8 KB Views: 229
 -
 38.2 KB Views: 217
 -
 55.3 KB Views: 209
 -
 48.4 KB Views: 214
 -
 49.9 KB Views: 206
 -
 59.1 KB Views: 208
 -
 66.4 KB Views: 204
 -
 53.6 KB Views: 217
")