• Steel Soldiers now has a few new forums, read more about it at: New Munitions Forums!

  • Microsoft MSN, Live, Hotmail, Outlook email users may not be receiving emails. We are working to resolve this issue. Please add support@steelsoldiers.com to your trusted contacts.


M109A3 - Combat Camper Build

Bad_Carp

Active member
Steel Soldiers Supporter
695
53
28
Location
Palm Springs, Ca
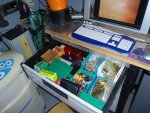
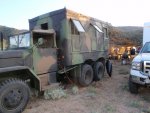
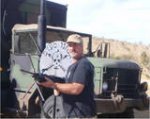
I've had a few requests for more pictures or asked if I had done a build thread on the Combat Camper. Unfortunately I didn't take alot of pictures as I was building, but thought I would use a few that I have and take some new ones to create an after the fact build thread.

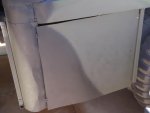
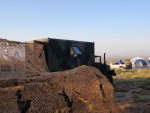
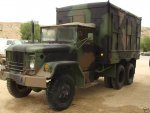
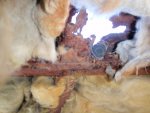
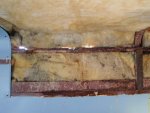
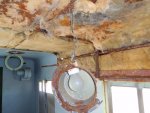
The box was in pretty bad shape when I got it, rust all the way around the top and a basketball sized hole in the roof. As this is not intended to be a show truck and funds were limited, I decided to simply cut out and treat rusted areas and patch them up with sheet metal and roof patch. Then seal the entire roof with truck bed liner to seal any small cracks, leaks.

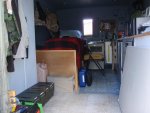
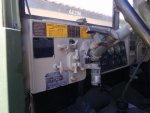
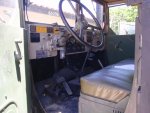
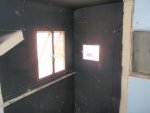
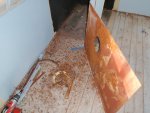
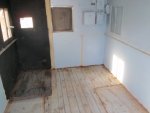
Here's what the box looked like originally, the black area was where someone made a small darkroom in it. This was used as a movie truck after serving our country.
 

Attachments

Last edited:

Bad_Carp

Active member
Steel Soldiers Supporter
695
53
28
Location
Palm Springs, Ca
Once the holes were patched, one of the first projects was the water system, I want to have enough water for basic camping plus a shower or two now and then. I haven't added the shower setup yet as I'm planning on an outside system that will be floor height and attach right outside the door.

The water tanks are under the bed with a 12V on demand pump. The water heater I got cheap as the electronic ignition doesn't work, a camp lighter solves that and there is plenty of hot water available.

No black/grey water tank installed yet, currently the system drains under the truck into a bucket that can be emptied as needed.

The sink/stove combo was a must and works great without taking up alot of space.

The water tanks are filled by opening the black flap and attack=hing a water hose.
 

Attachments

Bad_Carp

Active member
Steel Soldiers Supporter
695
53
28
Location
Palm Springs, Ca
Next up was power, got to have power! So I installed 4 deep cycle batteries in the truck. I have a small 2000 watt inverter that is always connected and on which powers the fridge. A larger 6000 watt inverter that can run everything else if needed when the generator or shore power is not available.

To charge the deep cycle batteries I have a Vanner battery equalizer so the batteries are charged off the alternator when the truck is running, plus 2 solar panels that supply most of the power and keep the fridge running day to day.

Also installed a solargizer to keep the truck batteries in shape.
 

Attachments

Bad_Carp

Active member
Steel Soldiers Supporter
695
53
28
Location
Palm Springs, Ca
Next was to build a place to sleep, while most go for bunk beds, my wife doesn't camp, so I figure I'm sleeping alone most of the time and I'm 6'4" so bunk beds are usually a bit cramped. So I built a frame over the water tanks and included room for storage bins as well as a large open area next to the water pump where I can store my camo netting. I built the frame a bit longer than a standard full size bed, so my feet aren't hanging off all night. There is some space at the end of the bed, between the bed and the cabinet/closet to store an extra cot if needed and the water can I use to refresh the portable water cooler.
 

Attachments

Bad_Carp

Active member
Steel Soldiers Supporter
695
53
28
Location
Palm Springs, Ca
The kitchen is basically the sink/stove, a microwave, toaster over, fridge and the cabinet under the microwave which stores food, dishes, pots and pans and enough MRE's to survive for at least 2 weeks should the zombies strike without warning.

That green thing on top of the microwave is a 24V MRE heater that is hardwired into the 24V system of the truck.
 

Attachments

Bad_Carp

Active member
Steel Soldiers Supporter
695
53
28
Location
Palm Springs, Ca
It gets hot out here, so while I eventually plan to install a roof air conditioner, for now I'm getting by with a portable water cooler and letting the heat escape out the top with a roof vent. Seems to do the trick, but I still want it colder, so the a/c will be coming soon.
 

Attachments

Bad_Carp

Active member
Steel Soldiers Supporter
695
53
28
Location
Palm Springs, Ca
Generator placement was a concern, I have a really quiet gen (honda knockoff) so having it be close to or part of the truck wasn't a concern as far as noise. I was simply hauling it around and then setting it outside to plug into the truck, but then there is always some mess from oil and gas. So I decided to remove the pioneer rack and spare tire mount (plan to get larger tires eventually, so a spare wouldn't fit there anyway) and create a space for the gen and supplies.
 

Attachments

Bad_Carp

Active member
Steel Soldiers Supporter
695
53
28
Location
Palm Springs, Ca
The storage cabinet/closet helps me keep all my gear sorted out. I do alot of mil-sim games which means I could be dressed in just about any uniform depending on what side I'm playing on. So I have everything from multicam to traditional arab attire available.

The poles for the camo netting and a portable toilet are also stashed there.
 

Attachments

Bad_Carp

Active member
Steel Soldiers Supporter
695
53
28
Location
Palm Springs, Ca
So, some of you are probably saying, ok you did a cheap camper build...where's the combat part of it?

You probably saw bits of it in other pictures, but the work area of the truck has a reloader for making my own ammo, a tumbler for cleaning brass, the computer/TV for storing reloading data and of course watching TV/movies and other goodies.
 

Attachments

zout

Well-known member
7,744
154
63
Location
Columbus Georgia
BC = nice pics and great work to make yourself a camper from the 109 - you did a great job [thumbzup]

Now for a few pics of excurions in use of he unit :jumpin::jumpin:
Time to go out and have some fun in it.

Thanks for posting pics of the work in good detail.
 

Bad_Carp

Active member
Steel Soldiers Supporter
695
53
28
Location
Palm Springs, Ca
The cab was pretty trashed when I got it, none of the gauges worked, so I cleaned that up a bit, replaced all plates and gauges to make everything functional again.

Just finished installing a new wiring harness and 70A alternator in the truck as the old generator fried along with the voltage regulator on the firewall. The wiring on the truck was pretty crispy, so the new harness really makes a difference.
 

Attachments

Bad_Carp

Active member
Steel Soldiers Supporter
695
53
28
Location
Palm Springs, Ca
BC = nice pics and great work to make yourself a camper from the 109 - you did a great job [thumbzup]

Now for a few pics of excurions in use of he unit :jumpin::jumpin:
Time to go out and have some fun in it.

Thanks for posting pics of the work in good detail.
Thanks, and it does get used quite often. I actually spend time in it even when it's in the driveway...nice to turn on a movie and do some reloading, but it's been in the field as well. I'll be out at what used to be George AFB on Memorial weekend for a Mil-sim event, probably a shooting trip sometime after that and of course the fall Camp Dirtbag.
 

Attachments

wsucougarx

Well-known member
6,951
64
48
Location
Washington State
Where are you keeping your spare tire? I'm currently idle on my project. However, it's reads like this that help jumpstart things. Great write up!! Something that I really haven't thought about is the roof vent. May need to get that one in the books. Great idea!!! Do you have a model number on the battery equilizer? What gauge cable you running to your battery bank?
 
Top
AdBlock Detected

We get it, advertisements are annoying!

Sure, ad-blocking software does a great job at blocking ads, but it also blocks useful features of our website like our supporting vendors. Their ads help keep Steel Soldiers going. Please consider disabling your ad blockers for the site. Thanks!

I've Disabled AdBlock
No Thanks