• Steel Soldiers now has a few new forums, read more about it at: New Munitions Forums!

  • Microsoft MSN, Live, Hotmail, Outlook email users may not be receiving emails. We are working to resolve this issue. Please add support@steelsoldiers.com to your trusted contacts.


Changing caster angle solved problems with G-177 tires

wilfreeman

Active member
1,082
7
38
Location
Richburg, SC
Very interesting! Like you say, since it looks to have no angle, it might be easier to weld up your own and get a lift too! Let us know what you come up with Lt Dan.
 

tobyS

Well-known member
4,820
815
113
Location
IN
Lt. Dan, it might take you a little while on a mill to remove about 1/2", but then you just do a replacement, parts ready to go.

If you have 1 1/2" of block (lift) replacing the OEM, do your bolts still reach?

The spring (not axle) starts off at +4.4 * (first drawing of G/peashooter). The centerline of the castor angle is 90* to the top of the axle, so it also is +4.4* with a parallel block.

Another thought...extend it all the way out and drill out for the bolts to go through it, like the bottom. I do this on trailer axles to help keep everything in place (Hummer wheels I'm using put more side stress). That might be overkill with 2" material, but if one had time on a mill, could make some bad-ass-axle-saddles (wide to beyond the bolts). They would provide large areas on both the spring and axle to resist twisting.
 
Last edited:
862
6
18
Location
Reading Pa
Who said anything about a mill? I do everything by hand with a grinder lol. And actually I'm not going to make the ground in the solid I don't think. I'm going to weld lips on the bottom to locate front and rear.

As far as boots go I think I'm going to flip the bolts over for better ground clearance and get longer bolts.
 

peashooter

Well-known member
1,039
204
63
Location
Hanover, minnesota
I forgot to mention that the shims have a bevel in the axle pocket area on one side. It is there because on the passenger side it needs clearance for the differential banjo (I think that's what people call it). Since the passenger side shim basically touches the banjo area, you may have to do a little more grinder work to get it to fit/seat properly. It will be obvious when you are installing it, but now you know to expect it:)
 
862
6
18
Location
Reading Pa
I'm still not sure on this yet. Making lift blocks would be great but then longer shocks might be needed and longer u bolts as well Luke stated above. Plus what is it going to change in the steering so on and so forth.
 

tobyS

Well-known member
4,820
815
113
Location
IN
Wait till you get it and see what it has on it Lt. Dan.

It seems that a +2-3* will be a good target for the caster angle and you can expect it to be around -.5* to begin with. Going to 2-3* won't change the drive-shaft angle too much upward. I'd be starting to be concerned at above +4.4* (the angle of a flat saddle block) about it.

Of course after your done, check alignment.

This thread is about G177 tires. Another thread exists where it has been pointed out (peashooter I think) that the G177's are a drive tire. Thus it seems that when we use the G177 as a steering tire, we should have taken every precaution that we can to make them safe and reliable. I hope we have defined the problems and the solutions that guys with deuces and G177 tires may encounter at least on the steering caster angle issue.

They are a great tire, but this sounds like an important change to the deuce for their use as a steer tire. Lets make a summary of these angle alternatives after your done Lt. Dan...OK?
 

319

Lieutenant
Steel Soldiers Supporter
3,349
49
48
Location
Michigan
I didn't realize there was a high side?

Has anyone tried doing this instead of shims? If so, how much did
you take off for what tire size?

Thanks
Yes, I did the Gringletaube modification on my M35A2 for 1100R20 G177s. The material I removed was actually 5/32", per Gringletaube, not 5/16". Using a bench grinder and hand files I removed the necessary stock, reinstalled the perches, and the truck steers and rides great. Total time for both sides was about two hours. The G177s are great in the snow and a nice ride on the freeway.
 

Attachments

Last edited:
862
6
18
Location
Reading Pa
So I looked under the truck tonight and found I have have the thinner shims.... so once I get it bobbed and the bigger michelins on it I'll try flipping them and see what happens.
 

Valence

Well-known member
Steel Soldiers Supporter
2,131
605
113
Location
Davis County, UT
Sooooooo, how important is the little centering/retaining tab on the top of the axle for the spring perch? I broke one side trying to get the spring perch off the axle. The perch just would not come off.

Driver's side, non broken:
image.jpg

Passenger side broken:
image.jpg

Perch & broken tab:
image.jpg

I assume it it can be welded back on...
 

tobyS

Well-known member
4,820
815
113
Location
IN
Sooooooo, how important is the little centering/retaining tab on the top of the axle for the spring perch? I broke one side trying to get the spring perch off the axle. The perch just would not come off.

Driver's side, non broken:
View attachment 579500

Passenger side broken:
View attachment 579499

Perch & broken tab:
View attachment 579501

I assume it it can be welded back on...
Apparently it keeps it from moving sideways on the axle.

You mean welded on the axle? I don't envy you. Welding anything with oil inside a closed space is not my idea of fun. Can you drill and tap a hole and use a socket head cap screw (taking special care to keep shavings out).

Or weld blocks on the side to keep it from going either direction, but with a mig and not too much heat?

Maybe others can speak to welding on an axle with oil in it.
 

gringeltaube

Staff Member
Super Moderator
Moderator
Steel Soldiers Supporter
6,882
2,259
113
Location
Montevideo/Uruguay
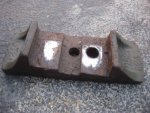
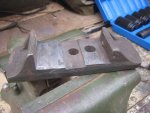
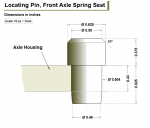
Locating pin for front axle spring seat.

Since this isn't a part you would find in the manuals I made a quick drawing, for anyone to see the dimensions of that locating pin. (below...)

If I had this issue (Valence's) I would look for a new replacement pin, or simply make one, out of a short 5/8" bolt (grade 5). Then either pull- or push-out- the remaining piece.

There are two ways: the "correct" - and much more labor-intensive way which would be pulling that side axle shaft, then get a punch and knock the broken end all the way down into the housing. Then get it out with a telescoping magnet or similar.
(I would only go this route if it was time already to service the inner oil seal, or the knuckle boot or kingpins...)

Or... much faster - if it worked: drill & tap the remaining piece to create a 3/8"-16 threaded hole, about 1/2" deep. Then look for some kind of a 3/4"-long bushing (or a 3/4" hex nut; any 3/4"-thick spacer; etc..), with a 5/8" I.D. and use a section of 3/8"-16 threaded rod plus nut and flat washers, to make it work as a puller tool.
Better don't drill all the way through if you want to avoid shavings inside the axle housing!
After screwed in place (puller nut on, but still loose) get a hammer and give that rod some good wacks from the top, to help breaking loose the offending part. Use lots of PB-blaster or equivalent!
Alternative, if you had a nice oxy-acethlene torch: with rod inserted, quickly heat up that part and let cool. It will shrink and may come out with almost no effort.


G.
 

Attachments

Valence

Well-known member
Steel Soldiers Supporter
2,131
605
113
Location
Davis County, UT
Wow thanks gringeltaube for the awesome alternative solutions. There is no end to how valuable you are to the community! Thanks for the help once again!

Question:
If you were making a new locating pin from a 5/8" bolt, would you be drilling out and tapping the axle housing for the 5/8" bolt? Or only doing that if you were opening up that side of the axle?).

It is far from time to service my seals or boots, as I just did that this spring. I have the better inner seal from Welldigger, and boots are like new (though the red/cheaper bearing grease that I used is leaking out a bit from the bottom of the boot but I did put over 5 lbs in the nuckle...)
 

tobyS

Well-known member
4,820
815
113
Location
IN
On removal...another way would be to use a nut for about a 5/8" bolt and weld the remaining stud to the inside of the nut. Then you have something to get hold of and it can't go on down in. I've done it to avoid nasty drill and tap procedures that G outlined. I would use the 3/32" 7018 rod if you have it and make sure the top of the bolt is ground and will stick. Welding heat will help to dislodge it after it has cooled.
 

gringeltaube

Staff Member
Super Moderator
Moderator
Steel Soldiers Supporter
6,882
2,259
113
Location
Montevideo/Uruguay
....weld the remaining stud to the inside of the nut....
1) This is not the threaded end of a broken bolt, that you can then unscrew by turning that nut with a wrench. 2) The broken piece does not protrude from the housing; there is a risk to weld all three parts together. 3) If the welding doesn't hold you will have a "hard" time to get a tap in there to remove it as previously described. That pin is carbon steel and might turn hardened where the weld was.
....If you were making a new locating pin from a 5/8" bolt, would you be drilling out and tapping the axle housing for the 5/8" bolt? Or only doing that if you were opening up that side of the axle?....)
No and no! The 5/8 bolt would only be used as material to be turned in a lathe, to make that pin. And if you only had a drill press (w/5/8" chuck) and a grinder, or no grinder but a good file, that pin could still be made to work as good as the original. Just go slowly and don't remove too much material; you want a good press fit when hammering that new pin in place.


G.
 
Last edited:

Valence

Well-known member
Steel Soldiers Supporter
2,131
605
113
Location
Davis County, UT
I did want to show that I don't think I did too bad with the material removal on the leaf spring perch, using only a hand held 90 degree grinder and a bastard file (the same file I use to sharpen my axes and lawn mower blade). As can be seen, I have a couple of points that are just a touch too low, but negligible in my opinion. I think all said and done, via my calipers, after filing I removed about 11/64" (about 1/64" more than the prescribed 5/32").
2015-09-04 18.19.33.jpg 2015-09-04 18.19.45.jpg

I shimmied the axle over towards the driver's side to gain access to the locator pin. I placed a jack stand under the tie rod to keep the axle more level (it wanted to rotate towards the rear of the truck - not good on the still attached brake line).
2015-09-10 19.17.03.jpg

Still not a lot of room to work and I ended up using a cinch strap on my drill to put downward pressure.

Unfortunately the locator pin is made of hardened steel. A Cobalt drill bit didn't even touch it. I talked to a place near here, AA Carbide in Salt Lake City, looking for an all carbide or diamond bit but they do not think the pin will be drill-able at all (too hard, let alone be able to tap it). The fellow at AA Carbide recommended a "V-Point" attachment on like a Dremel to grind out a hole for a puller tool to slot into. I do have a Dremel and did see narrow diamond grinding bits for sale for them. However, I'm clueless on the type of pulling tool that will (I assume) have an expandable tip to press fit into the hole.
 
Last edited:
Top
AdBlock Detected

We get it, advertisements are annoying!

Sure, ad-blocking software does a great job at blocking ads, but it also blocks useful features of our website like our supporting vendors. Their ads help keep Steel Soldiers going. Please consider disabling your ad blockers for the site. Thanks!

I've Disabled AdBlock
No Thanks