• Steel Soldiers now has a few new forums, read more about it at: New Munitions Forums!

  • Microsoft MSN, Live, Hotmail, Outlook email users may not be receiving emails. We are working to resolve this issue. Please add support@steelsoldiers.com to your trusted contacts.


wsucougarx's M923 acquisition

wsucougarx

Well-known member
6,951
65
48
Location
Washington State
Bumper Steps and Winter/Cold Weather Mask Install

Today was a wet one. Didn't get around to doing much today. Before the rainstorms hit, I was able to get the bumper steps installed. It took awhile as my old and dying portable Bosch drill motor batteries needed a charge after each hole:roll:. So it took about an hour from start to finish.
Also, since I was having so much fun drilling. I decided to mount the Winter/Cold Weather mask mounting hardware. Only took one battery charge:lol:. I was pretty impressed by the quality of the masks. I noticed the mask has some excess hanging down over the bumper. I'm thinking this is there for the winched trucks. Just folded the excess up and we're good to go.

Got my M923 title in the mail today...whew! I've heard of guys having issues in WA over not having the 17 # VIN's on their 1981 and newer vehicles. I took a pic of the VIN and gave it to the Licensing gal. Must have helped out.

This marks the last day I can work on her uninterrupted while on vacation. So progress will be slowing down from here on out.

Projects Completed:
-Mounted Two Bumper Steps
-Mounted Winter/Cold Weather Mask mounting hardware.

Pics:
1- Bumper Steps
2- Winter/Cold Weather Mask Install Hardware and instructions. Painted the screws and loops ahead of time.
3- Mounting Hardware installed and ready for the mask
4- Mask installed with the winched truck overhang
5,6- Tucked the excess up and under. Didn't put the strap through each loop...too lazy;-)
7- Mask with the radiator cover fully folded up.
 

Attachments

Last edited:

wsucougarx

Well-known member
6,951
65
48
Location
Washington State
Windshield Gasket Caulking

Well, today didn't go as planned. We made plans to head to the beach. The first order of business was to mow the lawn. Well, about 20 minutes into the job my very first lawnmower decided to finally say it's farewell to me and just quit. Can't blame it, I've had that thing for little over 13 years and have used it a ton. So I had a "man down" and ran into the garage to muster my tools. After about 1.5-2 hours of surgery, I decided to call it.:cry: 
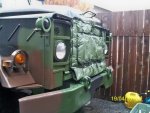
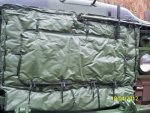
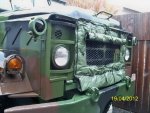
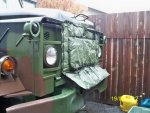
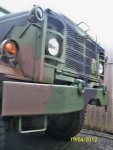
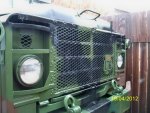
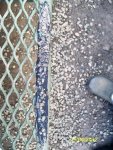
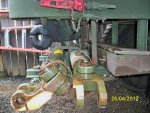
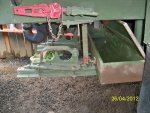
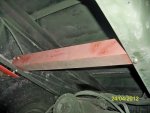
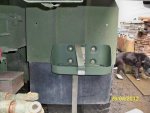
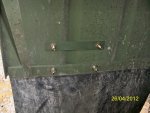
So, after my futile attempts to bring her back to life, I decided to work on the truck:razz:
As all M939 owners know, the windshield loves to leak. The main culprit is the lower so-called gasket that runs the length of the windshield. It seals, or is suppose to seal, the cowl and windshield frame. Unlike the deuce, there does not appear to be a step up from the cowl to the top of the dash. What has been happening is water runs down the windshield, hits the top lip on the gasket, and the rainwater runs into the cab and puddles on the floor. The only thing is, the water goes under the cab insulation and stagnates and rusts. Today I grabbed my caulking gun and went to work.
I also decided to polish up the non-slip surface on the cab steps. Not having an abrasive medium to throw down, I just grabbed a handful of gravel and panned it for the small stuff. Seems to work really good;-) Once she dries up I'll shoot some paint on it to blend it in.
Oh, and I did hit the Honda Powertool shop and got myself another Honda push mower. I've never owned a Honda vehicle, but I'll never own a lawnmover other than a Honda!! Should have another 13 years of service;-) Didn't make it to the beach:?

24APR12
My truck has endured two straight days of raining. The sealant on the lower windshield gasket passed the test. No puddles on the driver floor and she's dry in the cab! The DIY non-slip area got painted and put to the test. That passed as well;-).

Projects Completed:
-Sealed up the lower windshield gasket
-Polished up the non-slip textured steps with caulk and gravel:razz:

Pics:
1- The caulking I used. It is flexible and paintable. Stuff smells like chocolate when you lay it down...no joke.
2- Caulked lower gasket
3,4- My version of a non-skid surface, field expedited;-) I plan on adding another coat to smooth out the finish.
 

Attachments

Last edited:

wsucougarx

Well-known member
6,951
65
48
Location
Washington State
Towbar Mount and Safety Chain box

A tow bar is something you hardly ever need. However, when you need it...you need it right away. Due to how heavy those things are, I've made it a point to buy one for each truck. Getting too old to lug those things from truck to truck. Also due to how high the bed is off the ground (future super singles will be worse), I decided to have the towbar more accessible. Following my M109A3 project idea, I opted to do the same mounting. The only added item I had to figure out was an add'l frame L beam. I had a piece of 1/2" L beam laying around so I decided to cut it down to fit between the frame rails.

Today I got my medium tow bar mount and safety tow chain storage box mounted. It was a pain in the rear trying to calculate where everything needed to go. I wanted the assy to be high enough for ground clearance, yet low enough not to interfere with the pintle. Plus I wanted to make sure it was far enough away from the mudflaps as not to interfere with a future project. The parts I used were parts I had sitting in my parts trailer. The "L" beams are NOS M939 brackets used to hold the passenger step/tool box. The tow bar bracket is something I've had for a couple years, and the safety chain tool box is off a generator trailer. The only thing I had to purchase were the frame to L-beam support brackets and bolts. I got those little brackets from the electrical section in Home Depot.

Just like all the projects I have done, this thing is probably way overbuilt. I used Grade 8 bolts and nuts throughout.

I still have about 1.5 ft between the assy and the pumpkin. So clearance is not an issue with the articulation. But it'll probably be a pain when I get in there to replace all the air brake pancakes in a couple weeks.

I still need to throw some paint on everything to complete it.
Projects Completed:
-Completed the Tow Bar Mounting Bracket and Safety Chain Storage Box

Pics:
1- Supporting L beam, Medium Tow Bar Brackets, and the M939 brackets.
2- Home Depot Supporting Brackets
3- Supporting Brackets Mounted and Ready to go. Oh hey Rob (odnorth), that beam has MADE IN CANADA stamped on her;-) That's for you bro!
4- L Beam in place
5- Supporing Bracket Mounted to the L Beam
6- M939 L Brackets Mounted
7- Everything mounted and ready to go. Had to mount a support arm between the box and tow bar bracket
8- Just barely clears the pintle, just how I planned;-)
9,10- Yep
 

Attachments

Last edited:

wsucougarx

Well-known member
6,951
65
48
Location
Washington State
Well, I've had the truck for about a month now. I think I pretty much have her the way I want her. There are a couple little things left to do.

Projects still on the list:
1) super singles 14.00s or 395s (16.00s are too big for my liking)
2) MTVR boarding ladder bolted to tailgate ( in transit as of 27Apr12)
3) Coolant filter addition
4) In bed headache rack for gear attachment
5) Mudflap mounted Jerry can brackets (done)
6) Battery Relocation Kit-bottom of list. Still tentative.
7) CB Radio
8) Backup lights using armored military lights
9 LWS.......someday:)
10) MTVR cargo tie down brackets
 
Last edited:

odnorth

Member
76
0
6
Location
Abbotsford, B.C.
Hey Mike l thought that truck looked familiar, it's one of our trucks we forgot to bring back after joint operations. If you look closer at the beam you will also see NOT FOR SALE TO NON-CANADIAN RESIDENTS. To be on the safe side you better bring it to my place and l'll smooth things over for you.
 

wsucougarx

Well-known member
6,951
65
48
Location
Washington State
Mudflap Fuel/Water Can Holder

Got home and found no one was home...time to head out and do some uninterrupted work on the truck! I had 30 minutes and decided to tackle the Fuel/Water can mounts onto the mudflaps.
As I was sitting there eyeballing where to put the mount in reference to the mudflap (making sure you can take the can in/out without issues). I noticed the bolts along the bottom of the mudflap assy matched the holes on the mounts. Sweet, the spacing is exact!!
Got the bottom bolts mounted and pulled out the drill motor to make the mounting holes for the top bolt holes. Had her done within 30 minutes for both sides. I plan on installing footman loops at the 12:00 position for the vertical strap. This will help to pull the Fuel/Water can back into the mudflap to add some stability. Also, I will install two footman loops at the 9:00 and 3:00 in relation to the jerry can to really keep her in place.

Completed Projects:
-Two Fuel/Water Can mounts mounted onto rear mudflaps

Pics:
1- The missing bolts match up with the Jerry Can mounts exact
2- Backing plate I made for the Jerry Can mouts specifically for the mudflaps
3- Mounted Jerry Can. I used Grade 8 hardware
4- Backling plate in action;-)
5,6- The almost finished project
 

Attachments

Last edited:

wsucougarx

Well-known member
6,951
65
48
Location
Washington State
Hey Mike l thought that truck looked familiar, it's one of our trucks we forgot to bring back after joint operations. If you look closer at the beam you will also see NOT FOR SALE TO NON-CANADIAN RESIDENTS. To be on the safe side you better bring it to my place and l'll smooth things over for you.
You know I think I saw the exact same thing on the ring mount you're storing for us;-). To help to smooth things over between the US and Canada. We ought to mount that ring mount on the 923;-)
 

wsucougarx

Well-known member
6,951
65
48
Location
Washington State
Nice job on the tow bar brackets. Did you make or buy the hinged tube clamps?
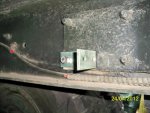
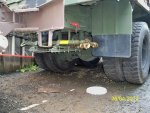
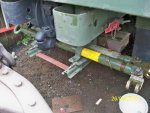
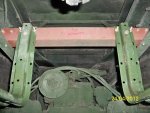
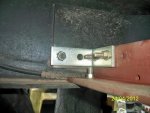
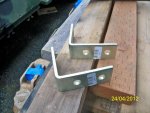
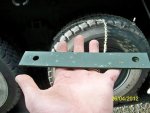
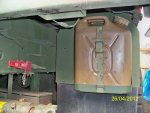
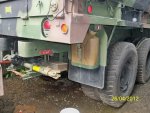
I bought the hinged tow bar brackets. I think I paid $20 for the pair. They've been sitting in the garage looking for a home for sometime. The brackets are specific to the Medium Towbar. Not sure what vehicle these were mounted on.
 

Neophyte

Active member
Steel Soldiers Supporter
Outstanding write up!! As a new'b.....I'll be doing my 1st recovery in Sparta WI in the next month or so on a 925. I have other vehicles that I've rebuilt (Mustang, Chevy II), but I have to say....I have never been this excited for any project !! Having bought a "ready to go" m817 for immediate use, I felt I short changed myself on the learning curve needed for this hobby.

Thanks for posting.

So
 

wsucougarx

Well-known member
6,951
65
48
Location
Washington State
Nice and inventive work. :)
Thanks Peter. I'm having a ton of fun with this project.

Thanks Mike....if you ever see another pair (and you don't grab em for yourself) please grab em for me! thx
Roger that, you're the second SS to contact me about the brackets. I'll keep my eyes open.

Outstanding write up!! As a new'b.....I'll be doing my 1st recovery in Sparta WI in the next month or so on a 925. I have other vehicles that I've rebuilt (Mustang, Chevy II), but I have to say....I have never been this excited for any project !! Having bought a "ready to go" m817 for immediate use, I felt I short changed myself on the learning curve needed for this hobby.

Thanks for posting.

So
You're welcome. I try to provide as many pics and details for other's to follow if they wish. This project has been a blast. I'm nearing the end of the add ons. Not sure what'll be next. Maybe another truck to work on;-) I wish, no room...LOL. I would like to have a M925A1 to complete the collection. Best of luck on your recovery!
 

usmarines72

New member
65
2
0
Location
California
Outstanding work Mike! You are one motivated dude. Wish the Marines in my unit were as motivated as you are on this project. Keep up the outstanding work and keep the details/pics coming!!!!
 

wsucougarx

Well-known member
6,951
65
48
Location
Washington State
Thanks John, roger that! I've been working all weekend and haven't been able to do anymore projects on her:shock:. I did lower the solargizer tower down about 12 inches. I used a swinging bracket to raise/point the solargizer in the direction of the sun. I'll have to post pics later as I'm ready to head out the door.
 

wsucougarx

Well-known member
6,951
65
48
Location
Washington State
Front Wheel Drive where are you?

Today I decided to go out and check to see if the front axle was locking up. Looks like a no go for me. Troubleshoot here I come.

I've got the front end jacked up so I can check to see if the axle locks.

Scenario 1:

Built up air pressure to 120 PSI
Shut off truck
Engaged manual Front Wheel Drive air switch (Axle lock light came on)
Front tires free spin....:???:
Attempted to shift to Lo Range to see if the axle would lock up...nope couldn't get the lever to move. (Shifter switch or solenoid bad?)
I toggled the dash switch a few times and everytime it's released you hear the air draining.

Scenario 2:
Drained off all the air in the truck
Now she will shift to Lo Range
Started truck back up and got air pressure to 120 PSI
No front axle lock up light
Front tires free spin
Attempted to shift to Hi Range....nope couldn't get the lever to move again.
Drained off the air in the truck

Scenario 3:
Shift truck to Hi Range once truck was drained of air
Started the truck up and got air pressure to 120 PSI
Turned truck off
Crawled under the truck and moved the transfer case switch that locks up axle
No sound could be heard of anykind when moving the roller switch:???:
Whacked it a couple times with a rubber hammer...nothing

So I need to trouble shoot a few things. I'm looking into the P2P M939 program to see if I can get things figured out.
So as it stands.
I have issues shifting the transfer case when the air pressure is built up in the truck. May have a problem with the switch on the handle or the solenoid is FUBAR'd.
I also have issues with the roller switch under the truck by the transfer case. When I manually roll the switch, I head nothing. No air bleeds off...nothing.

I focused my attention on the wires coming off the transfer case shift lever. I noticed both wires had one of those wire attachments for joining wires together...hmm could they have crossed the wires? I got under the truck to see where the wires went to. One wire heads down towards the bottom of the transmission and the second wire goes back to the transfer case.

I did find the solution to my parking brake light issue. When I was on the ground looking up to the underside of the cab. I saw a female wire connector sitting there dangling in the area where the parking brake would be. I shined the flash light into her female part...LOL...Ok and saw the contact was shiny clean. I looked around and saw the male counterpart sitting there dangling two feet away. They are now joined and guess what...the parking brake light is now off;-)
 
Last edited:
Top
AdBlock Detected

We get it, advertisements are annoying!

Sure, ad-blocking software does a great job at blocking ads, but it also blocks useful features of our website like our supporting vendors. Their ads help keep Steel Soldiers going. Please consider disabling your ad blockers for the site. Thanks!

I've Disabled AdBlock
No Thanks