• Steel Soldiers now has a few new forums, read more about it at: New Munitions Forums!

  • Microsoft MSN, Live, Hotmail, Outlook email users may not be receiving emails. We are working to resolve this issue. Please add support@steelsoldiers.com to your trusted contacts.


ARB Air Locker RD145 Install Thread - Pics and Tips

mudguppy

New member
1,587
15
0
Location
duncan, sc
First off, this install isn't going in my MV - it is going in a project truck, but I thought others may benefit from a couple things I have learned.

Secondly, the truck is nowhere near complete yet, so I will not be able to give any driving impressions. However, having lockers in my truck, I can assume that 'locked' is equally impressive, but the 'unlocked' is much more street friendly than the auto-lockers.

The install:

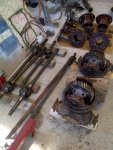
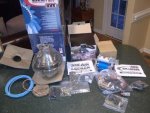
The ARBs are pricey - I picked up 2 lockers and an air compressor from East Coast Gear Supply online. They were priced competitively, had good reviews, and shipped relatively quickly. The ARBs were packaged well and included everything needed for the ARB system: locker, air lines, solenoids, switches, fittings, etc.

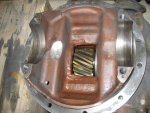
Dissassembly of the differential is pretty straight-forward. I picked up a few tips from SewerZuk's thread as well as SpicerGear's tip about using washers/coins between the diff housing nuts and diff housing to break the seal to the axle housing - that was a great tip!!!

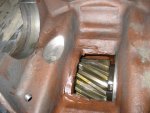
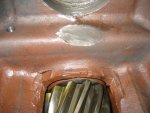
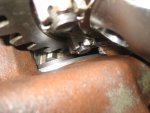
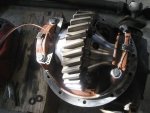
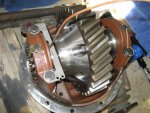
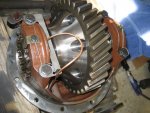
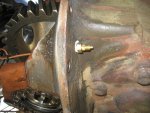
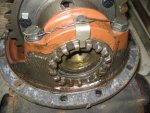
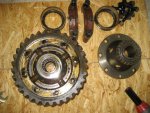
Further dissassembly of the differential was also straight forward. The bearing caps, however, did take a lot more motivation than my 1/2" air impact could supply. If you don't have a larger impact, this can get tricky because the differential is extremely awkward to stabilize and work with. I ended up standing on the upside-down diff and using a breaker bar and several sledge hammer hits to break the bearing cap bolts free. That was tough.

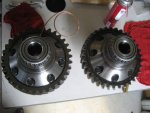
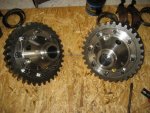
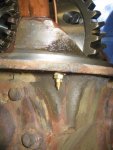
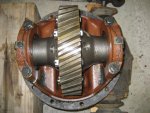
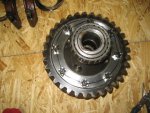
Also tough was the actual differential carrier bolts. However, once apart, a good whack with a mallet freed the carrier halves and gear.

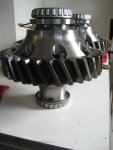
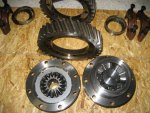
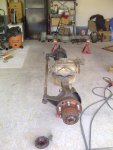
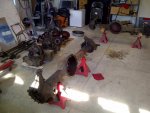
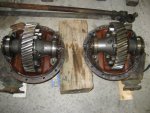
The pics below show one of the ARB boxes opened up; axles that I'm working on; dissassembly pics; differential pics; differential dissassembly.
 

Attachments

mudguppy

New member
1,587
15
0
Location
duncan, sc
ARB Assembly

The instructions with the ARBs are OK, not great though. They left a couple things out, though.

Anyway, assembly of the ARB carrier and differential gear was pretty easy. You will need to cook the gear in the oven to get it to fit properly onto the ARB carrier. 300°F for 30 minutes warmed them up just fine.

The instructions say to add some grease around the edges of the carrier where they insert into the gear - I think this aides in aligning the two carrier halves properly with the gear during assembly. While it was still warm, I put 4 of the carrier bolts through and snugged them to assure the assembly was aligned while it cooled off.

One item to note is that during reassembly of the ARB carrier, the carrier bolts/nuts are intended to go together so that the nuts are on the smaller half of the carrier. This means that the nuts are captured against the machined surface of the carrier half, so tightening is done via the bolt head and not the nut (this is mentioned in the instructions). This also means that the bolt/nuts are oriented in the opposite direction which will be important for reassembly - I'll explain later.

Once the gear and carrier had cooled/tightened, I removed the carrier bolts and reinstalled with blue thread locker. It does mention in the instructions to tighten in a star pattern, but doesn't mention torque values. Actually, torque values are absent throughout the entire instructions, so I had to dig through the -34 TM to find some. I never did find anything for the carrier bolts, but knew they were on tight.


On edit: one thing I forgot to mention - when tightening the carrier bolts from the cap head of the bolt, you'll likely find that an impact socket will not fit in the machined bolt head opening of the ARB carrier. I had to use a standard socket; use caution anytime using an impact tool and a non-impact socket as they can more easily break and shatter. I recommend safety glasses, at least, and more likely a face shield in the event of a socket failure.


Others have noted that you could use cotter pins through the carrier bolt castle nuts. However, what I found is that it was very difficult to get the hole in the bolt aligned properly to utilize cotter pins since the nut was captured. In the end, since I need to purchase a safety wire kit anyway, I ended up running safety wire through the carrier bolts/nuts. This is likely overkill with the locktite, but what the heck...

The instructions do a good job at explaining how to install the air seal housing. The seal with o-rings is a pretty tight fit, so be sure to soak the o-rings in oil well to help ensure they don't twist on assembly. Also, be sure not to install the carrier bearing on the seal housing side before you install the seal housing - you'll be hurting if you do.

Lastly, bearings - it doesn't mention much about bearings except that you'll need a press to put them onto the new carrier. What is not mentioned is to not even bother trying to pull the old carrier bearings off and re-use them. You probably won't get them off without destroying them. They are at Napa for $28/each - just buy some new ones and save yourself the headache. FYI - Timken 395 are the carrier bearings, 395A is the corresponding cup (which are easily reused).

I didn't use a press to put the bearings on the ARB carrier - put 'em in the oven and tapped them on with a mallet. What was interesting was they practically fell on the carrier side with the air seal housing without much effort at all. Either way, they are nice and snug once cooled.

Pics:
- ARB halves dissassembled
- ARBs assembled, threadlocked, safety wired
- ARBs assembled with new bearings; note that the seal housing can be seen with copper tubing protruding
- ARBs with new bearings; note that the air seal housing can be seen on the upper end of the carrier, just under the bearing at top.
 

Attachments

Last edited:

mudguppy

New member
1,587
15
0
Location
duncan, sc
ARB Install

Here's where the instructions start to get vague - reinstallation. Seems important, right? Well...

The instructions explain to drill a 7/16" hole through the housing and to tap it for 1/4" NPT. It shows a picture of this as well. It doesn't, however, give any sort of measurement of exactly where to drill this hole. Firstly, it may seem obvious, but it doesn't mention to drill the hole through the side opposite the pinion shaft. When it's upside down, it's easy to get confused.

I ended up drilling the hole at OK locations. However, if I had to give advice I'd say to drill the hole more towards the bearing cap or more toward the outside - once completed, I had a hard time getting my tap aligned from the outside because they were a little close to the differential chunk on the other side. If it helps, I can provide a measurement to give an idea of a better location. You can see in the last pic below that the fitting got a little close to the diff chunk on the outside...

The next thing not mentioned whatsoever is that the ARB doesn't just drop into the housing - it doesn't fit. The inside of the housing needs to be clearanced due to the size of the large half of the carrier (the side with the air seal housing and air locking internals). An area needs to be ground out - I used an angle grinder to remove material. And it's a lot of material to be removed. The PITA thing is that you won't know if you've got it until you test fit it. So you'll have to pull all the rags out that you have stuffed down into the housing, clean out the residual metal shavings, and then drop in the 40lb assembly. Every time you think you have it, you don't. In the photo below, I actually had to take some more material out after I realized there was a second clearance issue...

The second issue is the carrier bolts/nuts. Remember when I said they are oriented differently than original? Well, this means that the nuts are on the pinion shaft side of the differential, which has less room. This isn't really an issue, as there is still plenty of room to shift the differential away from the pinion side. However, this meant that I had to take it back out for more grinding on the other side since I slid it over farther. The spur gear is much wider than the bull gear, so there is no concern for sacrificing gear contact area, but I wanted you all to be aware and make sure you check for good clearance at the carrier nuts (see 4th photo).

Once clearanced, fit, reclearanced, assembly is the same as removal. ARB provides a bracket that fits on the inside of the bearing cap and holds the air seal housing stationary. It is intened that this bracket be used and to not reuse the bearing cap washers. I found that the bearing cap bolts did not fit through the holes on this bracket and had to open them up to 7/16" for assembly. :roll:

I couldn't find any preload torque setting for the bear cap adjusters in the TM, but I did find 25 ft-lbs is what's used on other internet sights. I did find that proper runout for the bull gear is 0.008" - but I couldn't figure out how to change this if it was out so I didn't finish setting up to measure.

The TMs did say that the proper bearing cap torque was 300 ft-lbs. Once I had everything set in a satisfactory manner, I safety wired it all back up. I routed the copper hose around, through the fitting, trimmed, and zip-tied in place at the location provided.

I haven't found a good way to hook up air to it for testing or leak checking yet.

Pics:
- 1-3 Clearancing required (and then some...)
- 4 Potential interference from the carrier bolt/nuts and differential housing
- 5-8 Final assembly
- 9-10 Air fitting
 

Attachments

mudguppy

New member
1,587
15
0
Location
duncan, sc
Finished?

I still have the 2nd differential to assemble. I am rotating that chunk 180° so I still have holes to drill out - I'm awaiting a diff gaskets in the mail to use as drill templates. I have not clearanced this diff yet, so if there are any other questions that I could answer for the sake of the thread or measurements that might be helpful, let me know.

I didn't mention any special tools - none really needed. However, I did not have a good way to incorporate a spanner wrench with the torque wrench to set the preload to the 25 ft-lbs. I really don't know if this is an issue, especially with this being a non-street truck.

Other information:
Pinion Nut torque - 300-400 ft-lbs (TM)
Bearing cap torque - 300 ft-lbs (TM)
Differential Housing torque - 60-65 ft-lbs (TM)
Bull Gear runout - 0.008" (TM)
Bull Gear side play - 0.007-0.014" (TM)
Bearing cap pre-load - 25 ft-lbs (misc. internet research)
Carrier Bearings - Timken/SKF 395 (~$28/ea NAPA, ordered item)
Bearing Cups - Timken/SKF 395A (~$12/ea NAPA, ordered item)

Other items:
- safety wire pliers and wire
- cotter pins for carrier bolts/nuts (optional)
- thread locker (optional)
- oven for bull gear (and diff bearings if press not available)
- arbor press for carrier bearings
- grease
- suggest larger than 1/2" air impact for disassembly
 
Last edited:

sewerzuk

Member
524
9
18
Location
Seaside, OR
One of the most awkward components I've ever had to maneuver around by hand. :doh:
Nice work!

Awkward doesn't begin to describe it! I had to invite a couple of buddies over to maneuver my 3rd members out. In the rear I used a block and Warn Pullzall to lift the chunk out. On the front, I dropped the axle down and used a 10' long piece of 1.75" DOM tubing that stuck out both fender wells for easier lifting. Neither method was easy, but the rear was certainly easier than the front. I do believe I left the easiest one for last...I believe I can use my forklift to hoist that one out of there.
 

rancherrob

Member
57
3
8
Location
SW WA
We're adding ARB air lockers to our deuce rear diffs and have just come across having to press out the main shaft out of the third member. We are stripping it all the way apart so we can sand blast and paint or powder coat too while apart. Do you know what size/strength press it would take? Clever idea on using the oven by the way but I only have the shop microwave which probably won't work to well :wink:
 

Aaholland

New member
10
1
3
Location
Fisherville, KY
I still have the 2nd differential to assemble. I am rotating that chunk 180° so I still have holes to drill out - I'm awaiting a diff gaskets in the mail to use as drill templates. I have not clearanced this diff yet, so if there are any other questions that I could answer for the sake of the thread or measurements that might be helpful, let me know.

I didn't mention any special tools - none really needed. However, I did not have a good way to incorporate a spanner wrench with the torque wrench to set the preload to the 25 ft-lbs. I really don't know if this is an issue, especially with this being a non-street truck.

Other information:
Pinion Nut torque - 300-400 ft-lbs (TM)
Bearing cap torque - 300 ft-lbs (TM)
Differential Housing torque - 60-65 ft-lbs (TM)
Bull Gear runout - 0.008" (TM)
Bull Gear side play - 0.007-0.014" (TM)
Bearing cap pre-load - 25 ft-lbs (misc. internet research)
Carrier Bearings - Timken/SKF 395 (~$28/ea NAPA, ordered item)
Bearing Cups - Timken/SKF 395A (~$12/ea NAPA, ordered item)

Other items:
- safety wire pliers and wire
- cotter pins for carrier bolts/nuts (optional)
- thread locker (optional)
- oven for bull gear (and diff bearings if press not available)
- arbor press for carrier bearings
- grease
- suggest larger than 1/2" air impact for disassembly
Did you ever update how the air lockers functioned?
 
Top
AdBlock Detected

We get it, advertisements are annoying!

Sure, ad-blocking software does a great job at blocking ads, but it also blocks useful features of our website like our supporting vendors. Their ads help keep Steel Soldiers going. Please consider disabling your ad blockers for the site. Thanks!

I've Disabled AdBlock
No Thanks