I have enjoyed the CUCV around the farm and really like the old school truck!
I have bought a few of them, some good some parts trucks and some junk!
I feel the need for speed so an inspiration dawned upon my humble self after a suggestion from Evldoer here on SteelSoldiers and a ride in a truck he converted!
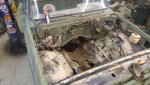
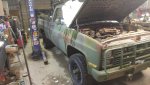
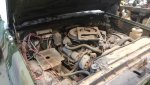
This truck was purchased just as you see it with 22,363 miles on the clock from GL in their heydays. It was sold as a non runner and had the door and tail gate in the bed with a multitude on ether cans and assorted bits and pieces.
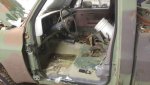
It is in beautiful structural and body condition and the brakes worked yesterday when we loaded the truck!
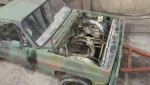
I think we may spend the time to see if the 6.2 Detroit engine will run before it gets pulled. Yes, the diesel engine, tranny and all take out parts will be saved and distributed among those restoring their rides if a price is agreed to and shipping is not a pain in the A$$.
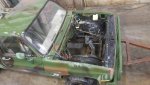
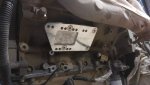
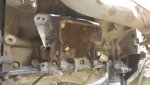
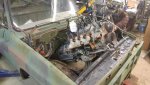
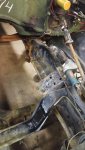
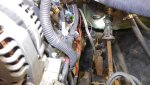
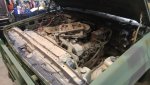
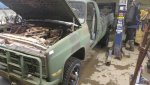
As you see, the body is nice and the engine compartment is nice and full of the metal Detroit built the truck with. It is not a rusted out piece of junk.
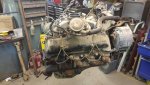
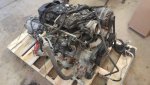
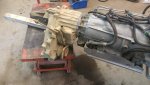
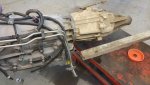
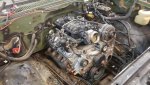
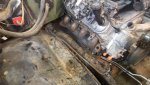
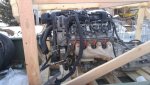
The engine in the crate is a 2008 L92 6.2 gas with it's mated 6l80e 4 x 4 tranny out of a Denalli truck. Spalding auto reprogramed the ECM and trimmed the factory wiring harness all of which came from one donor truck, the Denalli. The engine and tranny came with all cables, hoses and what not complete, front to back , pan to top and manifold to manifold. It was very carefully removed and unbolted, not cut out of the donor vehicle, all in all a very slick and nice setup.
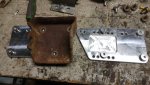
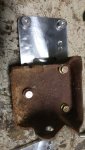
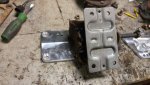
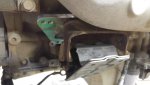
I was told the tranny will bolt right up to the 208 transfer case and we will use some adapter plates from the engine to new factory motor mounts.
The accessory power steering pump on the L92 will bolt right up to the lines from the CUCV hydroboost braking system.
There are about 8 wires on the harness to mate to the CUCV system and it is basically plug and play as Spalding test ran the engine before shipping to me and they said it was a strong runner.
The CUCV will be 12 volt through and through, all the 24 volt wiring is mostly under the hood and it will all be carefully removed and saved.
There are a couple of wiring revisions to do and one is connecting the solenoid wire to the signal wire for activation of the starter and a bit of thought with the gen lights.
We will use the cable speedo off of the transfer case as well as a neat 3 5/8 face Auto Meter old time speedometer with tachometer needle all on same face triggered off of the speedo and tach wire from the engine ECM harness. It is my intention to use the indicator lights as well as the factory gauges as well as some aftermarket gauges to fill in the gaps.
Will keep you posted as we progress.
I have bought a few of them, some good some parts trucks and some junk!
I feel the need for speed so an inspiration dawned upon my humble self after a suggestion from Evldoer here on SteelSoldiers and a ride in a truck he converted!
This truck was purchased just as you see it with 22,363 miles on the clock from GL in their heydays. It was sold as a non runner and had the door and tail gate in the bed with a multitude on ether cans and assorted bits and pieces.
It is in beautiful structural and body condition and the brakes worked yesterday when we loaded the truck!
I think we may spend the time to see if the 6.2 Detroit engine will run before it gets pulled. Yes, the diesel engine, tranny and all take out parts will be saved and distributed among those restoring their rides if a price is agreed to and shipping is not a pain in the A$$.
As you see, the body is nice and the engine compartment is nice and full of the metal Detroit built the truck with. It is not a rusted out piece of junk.
The engine in the crate is a 2008 L92 6.2 gas with it's mated 6l80e 4 x 4 tranny out of a Denalli truck. Spalding auto reprogramed the ECM and trimmed the factory wiring harness all of which came from one donor truck, the Denalli. The engine and tranny came with all cables, hoses and what not complete, front to back , pan to top and manifold to manifold. It was very carefully removed and unbolted, not cut out of the donor vehicle, all in all a very slick and nice setup.
I was told the tranny will bolt right up to the 208 transfer case and we will use some adapter plates from the engine to new factory motor mounts.
The accessory power steering pump on the L92 will bolt right up to the lines from the CUCV hydroboost braking system.
There are about 8 wires on the harness to mate to the CUCV system and it is basically plug and play as Spalding test ran the engine before shipping to me and they said it was a strong runner.
The CUCV will be 12 volt through and through, all the 24 volt wiring is mostly under the hood and it will all be carefully removed and saved.
There are a couple of wiring revisions to do and one is connecting the solenoid wire to the signal wire for activation of the starter and a bit of thought with the gen lights.
We will use the cable speedo off of the transfer case as well as a neat 3 5/8 face Auto Meter old time speedometer with tachometer needle all on same face triggered off of the speedo and tach wire from the engine ECM harness. It is my intention to use the indicator lights as well as the factory gauges as well as some aftermarket gauges to fill in the gaps.
Will keep you posted as we progress.
Attachments
-
 52.3 KB Views: 121
 -
 48 KB Views: 121
 -
 52.4 KB Views: 127
 -
 40.4 KB Views: 131
 -
 54.2 KB Views: 168
 -
 54 KB Views: 135
Last edited: